
The OAuth2 sample application demonstrates how to get access tokens from various resource owners that use the OAuth2 protocol RFC6749, such as Google, Facebook, and Twitter.
The following figure illustrates the main view of the OAuth2 application in its normal state.
Figure: OAuth2 main view
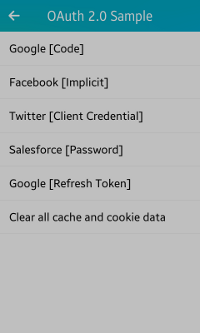
The application main screen has a list of various resource providers along with their authorization grant type.
Prerequisites
To ensure proper application execution, the following privileges must be set:
- http://tizen.org/privilege/network.get
- http://tizen.org/privilege/internet
-
The dummy client ID and dummy client secret in the oauth2_provider_configs.h file must be replaced with the respective App ID and App secret in the OAuth2 sample application.
Obtain the needed client IDs and secrets from the respective resource owners. For example, the Google client ID and secret can be obtained from the Developers Console as follows:
- Go to Developers Console, sign in to your Google account, and click Create project.
- In the New Project dialog box, enter the name of your project for the OAuth2 sample and click Create.
- Select the Enable and manage APIs on the dashboard, then Credentials on left tab, and then OAuth consent screen on the upper tab.
- Enter the product name by using your project name and click Save.
- In the drop-down box, select New credentials > OAuth client ID.
- Select Web application as the Application type.
- Enter a valid name for your client in the Name field.
- In order to set new Authorized redirect URIs when creating the Google ID and secret, enter the redirection URL as OAUTH2_REDIRECT_URL in the oauth_provider_configs.h file:
// All applications are registered with this redirection URL
#define OAUTH2_REDIRECT_URL "dummy_redirect_url"
// You must provide the redirect URL
Replace dummy_redirect_url with a valid URI in the file. On the web site, set the URI to the Authorized redirect URIs field and finalize the client ID and secret generation process.
Implementation
The OAuth 2.0 specification is defined in [RFC 6749] and it builds on the OAuth 1.0 [RFC 5849] deployment experience, as well as additional use cases and extensibility requirements gathered from the wider IETF community. The OAuth 2.0 protocol is not backward-compatible with OAuth 1.0.
An authorization grant is a credential representing the resource owner's authorization (to access its protected resources) used by the client to obtain an access token. The specification defines 4 grant types, the authorization code, implicit, resource owner password credentials, and client credentials, as well as an extensibility mechanism for defining additional types.
The 4 authorization grant types are explained in the following examples.
Authorization Code
The authorization code is obtained by using an authorization server as an intermediary between the client and resource owner. Instead of requesting authorization directly from the resource owner, the client directs the resource owner to an authorization server, which in turn directs the resource owner back to the client with the authorization code.
The authorization code provides some important security benefits, such as the ability to authenticate the client, as well as the transmission of the access token directly to the client without passing it through the resource owner's user-agent and potentially exposing it to others, including the resource owner. The following example explains this with Google as the resource owner.
Figure: Google authorization
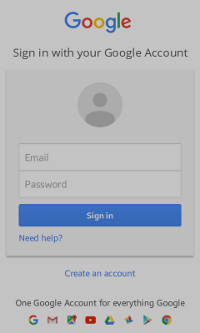
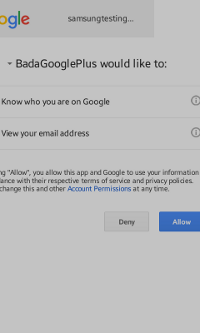
After you click Google [Code] on the main screen, the sign-in screen appears (on the left in the above figure). Enter your Google account credentials to get the access token.
After you click Sign in and your account gets verified, the permission window appears (in the middle in the above figure). Click Allow to give the permission.
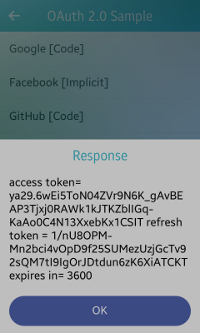
The response is visible on the home screen as a pop-up (on the right in the above figure).
To cancel the operation, press the back key or click Deny for the permission.
void
start_google_oauth_cb(void *data, Evas_Object *obj, void *event_info)
{
   win_data = (Evas_Object *) data;

   oauth2_manager_h mgr = NULL;
   int ret = oauth2_manager_create(&mgr);

   oauth2_request_h request = NULL;
   ret = oauth2_request_create(&request);

   ret = oauth2_request_set_auth_end_point_url(request, GOOGLE_AUTH_URL);
   ret = oauth2_request_set_token_end_point_url(request, GOOGLE_REQ_TOK_URL);
   ret = oauth2_request_set_redirection_url(request, GOOGLE_REDIRECT_URL);
   ret = oauth2_request_set_client_id(request, GOOGLE_CLIENT_ID);
   ret = oauth2_request_set_client_secret(request, GOOGLE_CLIENT_SECRET);
   ret = oauth2_request_set_scope(request, GOOGLE_SCOPE);
   ret = oauth2_request_set_response_type(request, OAUTH2_RESPONSE_TYPE_CODE);

   if (mgr && request)
   {
      ret = oauth2_manager_request_token(mgr, request, token_response_cb, NULL);
   }
}

void
token_response_cb(oauth2_response_h response, void *user_data)
{
   dlog_print(DLOG_INFO, LOG_TAG, "token_response_cb");

   char *acc_token = NULL;
   oauth2_response_get_access_token(response, &acc_token);

   char *ref_token = NULL;
   oauth2_response_get_refresh_token(response, &ref_token);
   google_refresh_token = ref_token;

   long long int expires_in = 0;
   oauth2_response_get_expires_in(response, &expires_in);

   char displayStr[1024] = {0,};
   if (acc_token)
   {
      displayStr[0] = '\0';
      strcpy(displayStr, "access token= ");
      strcat(displayStr, acc_token);
   }
   else
   {
      oauth2_error_h e_handle =  NULL;

      oauth2_response_get_error(response, &e_handle);
      char *error_val = NULL;
      oauth2_error_get_custom_data(e_handle, "error", &error_val);
      if (error_val)
         strcpy(displayStr, error_val);
      else
      {
         int error_code = 0;
         int platform_error_code = 0;

         oauth2_error_get_code(e_handle, &error_code, &platform_error_code);
         if (error_code != 0 || platform_error_code != 0)
         {
            sprintf(displayStr, "Error=[%d][%d]",
            error_code, platform_error_code);
         }
         else
            strcpy(displayStr, "Unknown server error");
      }
   }

   if (ref_token)
   {
      strcat(displayStr, "\r\n");
      strcat(displayStr, "refresh token = ");
      strcat(displayStr, ref_token);
   }

   if (expires_in != 0)
   {
      strcat(displayStr, "\r\n");
      strcat(displayStr, "expires in= ");
      char expires_str[128] = {0};
      sprintf(expires_str, "%lld", expires_in);
      strcat(displayStr, expires_str);
   }

   create_popup(displayStr , win_data);

   return;
}
Implicit Code
In the implicit flow, the client is issued an access token directly (as a result of the resource owner authorization). The grant type is implicit, as no intermediate credentials (such as an authorization code) are issued.
Implicit grants improve the responsiveness and efficiency of some clients (such as a client implemented as an in-browser application), since it reduces the number of round trips required to obtain an access token. The following example explains this with Facebook as the resource owner.
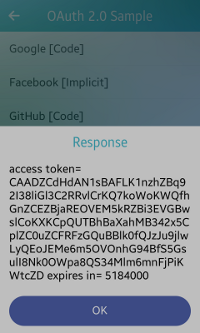
Figure: Facebook authorization
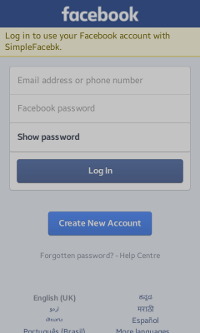
After you click Facebook [Implicit] on the main screen, the log-in screen appears (on the left in the above figure). Enter your Facebook account credentials to get the access token.
After you click Log In and your account gets verified, the response is visible on the home screen as a pop-up (on the right in the above figure).
To cancel the operation, press the back key.
void
start_fb_oauth_cb(void *data, Evas_Object *obj, void *event_info)
{
   oauth2_manager_h mgr = NULL;
   int ret = oauth2_manager_create(&mgr);

   win_data = (Evas_Object *) data;

   oauth2_request_h request = NULL;
   ret = oauth2_request_create(&request);

   ret = oauth2_request_set_auth_end_point_url(request, FACEBOOK_AUTH_URL);
   ret = oauth2_request_set_redirection_url(request, OAUTH2_REDIRECT_URL);
   ret = oauth2_request_set_client_id(request, FACEBOOK_CLIENT_ID);
   ret = oauth2_request_set_scope(request, FACEBOOK_SCOPE);
   ret = oauth2_request_set_response_type(request, OAUTH2_RESPONSE_TYPE_TOKEN);

   if (mgr && request)
   {
      ret = oauth2_manager_request_token(mgr, request, token_response_cb, NULL);
   }
}
Client Credentials
Client credentials can be used as an authorization grant when the authorization scope is limited to the protected resources under the control of the client, or to protected resources previously arranged with the authorization server.
Client credentials are typically used as an authorization grant when the client is acting on its own behalf (the client is also the resource owner) or is requesting access to protected resources based on an authorization previously arranged with the authorization server. The following example explains this with Twitter as the resource owner.
Figure: Twitter authorization
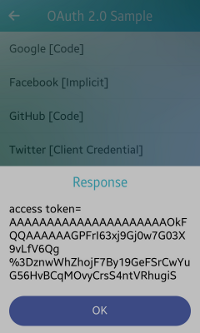
After you click Twitter [Client Credentials] on the main screen, the response is visible on the home screen as a pop-up (in the above figure).
void
start_twitter_apponly_oauth_cb(void *data, Evas_Object *obj, void *event_info)
{
   oauth2_manager_h mgr = NULL;
   int ret = oauth2_manager_create(&mgr);

   oauth2_request_h request = NULL;
   ret = oauth2_request_create(&request);

   win_data = (Evas_Object *) data;

   ret = oauth2_request_set_auth_end_point_url(request, TWITTER_AUTH_URL);
   ret = oauth2_request_set_token_end_point_url(request, TWITTER_REQ_TOK_URL);
   ret = oauth2_request_set_redirection_url(request, OAUTH2_REDIRECT_URL);
   ret = oauth2_request_set_client_id(request, TWITTER_CONS_KEY);
   ret = oauth2_request_set_client_secret(request, TWITTER_CONS_SEC);
   ret = oauth2_request_set_grant_type(request, OAUTH2_GRANT_TYPE_CLIENT_CREDENTIALS);
   ret = oauth2_request_set_client_authentication_type(request, OAUTH2_CLIENT_AUTHENTICATION_TYPE_BASIC);

   if (mgr && request)
   {
      ret = oauth2_manager_request_token(mgr, request, token_response_cb, NULL);
   }
}
Resource Owner Password Credentials
The resource owner password credentials (such as username and password) can be used directly as an authorization grant to obtain an access token.
Even though this grant type requires direct client access to the resource owner credentials, the resource owner credentials are used for a single request and are exchanged for an access token. This grant type can eliminate the need for the client to store the resource owner credentials for future use, by exchanging the credentials with a long-lived access token or refresh token. The following example explains this with Salesforce as the resource owner.
Figure: Salesforce authorization

After you click Salesforce [Password] on the main screen, the response is visible on the home screen as a pop-up (in the above figure).
void
start_salesforce_oauth_code_cb(void *data, Evas_Object *obj, void *event_info)
{
   oauth2_manager_h mgr = NULL;
   int ret = oauth2_manager_create(&mgr);

   oauth2_request_h request = NULL;
   ret = oauth2_request_create(&request);

   win_data = (Evas_Object *) data;

   ret = oauth2_request_set_auth_end_point_url(request, SALESFORCE_AUTH_URL);
   ret = oauth2_request_set_token_end_point_url(request, SALESFORCE_REQ_TOK_URL);
   ret = oauth2_request_set_redirection_url(request, OAUTH2_REDIRECT_URL);
   ret = oauth2_request_set_client_id(request, SALESFORCE_CLIENT_ID);
   ret = oauth2_request_set_client_secret(request, SALESFORCE_CLIENT_SECRET);
   ret = oauth2_request_set_grant_type(request, OAUTH2_GRANT_TYPE_PASSWORD);
   ret = oauth2_request_set_user_name(request, SALESFORCE_CLIENT_USER_NAME);
   ret = oauth2_request_set_password(request, SALESFORCE_CLIENT_PASSWORD);

   if (mgr && request)
   {
      ret = oauth2_manager_request_token(mgr, request, token_response_cb, request);
   }
}
Clearing Cache and Cookie Data
To delete all data related to the stored credentials from all the resource owner Web site from the sample application, use the clear_cache_and_cookies_cb() function.
Figure: Clearing cache and cookie data
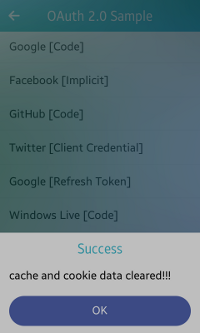
After you click Clear all cache and cookie data on the main screen and the data is successfully deleted, the response is visible on the home screen as a pop-up (in the above figure).
void
clear_cache_and_cookies_cb(void *data, Evas_Object *obj, void *event_info)
{
   win_data = (Evas_Object *) data;

   if (mgr1 != NULL)
   {
      oauth2_manager_clear_cache(mgr1);
      oauth2_manager_clear_cookies(mgr1);

      mgr1 = NULL;

      flag = 1;

      popStr = "cache and cookie data cleared!!!";
      create_popup(popStr, win_data);

      return;
   }
}