
The Drag and Drop sample application demonstrates how you can implement a drag-and-drop operation using a generic API from EFL. The sample provides a user interface in the form of an image gallery. The drag-and-drop operation is used to arrange images into the favorite section.
The following figure illustrates the application views.
Figure: Drag and Drop screens
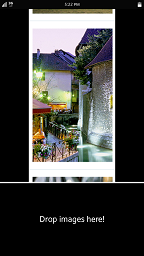

The application user interface is split into 2 sections:
- Image browser is a preview of all available images arranged in a vertically scrollable list.
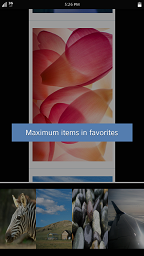
- Favorites is a preview of all images set as favorite. This section can contain up to 4 images.
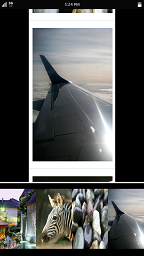
The user can:
- Set an image as favorite by dragging it from the image browser to the favorites section.
- Remove an image from favorites by dragging it away from the favorites section.
- Rearrange the favorites by dragging and dropping images within the favorites section.
Implementation
The application code is divided into 3 modules.
Figure: Drag and Drop application modules
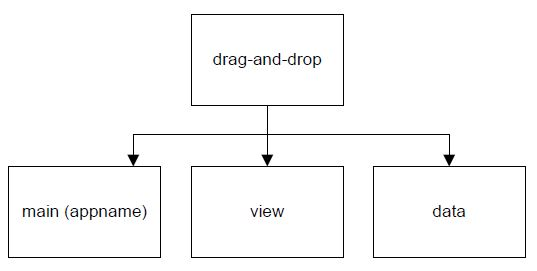
Each module provides a separate functionality:
- The main module contains the code automatically generated by the Tizen SDK when you create a new native project with EDJE files. The module initializes the application instance and handles app control event callbacks.
- The view module is responsible for creating the image browser component (elm_genlist) and the favorites section at the bottom of the screen (elm_gengrid). It also handles drag and drop events and callbacks.
- The data module is responsible for reading information from the resources folder. It also updates the application's preference database when favorite content is changed.
Main Module
The main application module implementation file is generated by the Tizen SDK. The following updates have been introduced to it:
A static structure to handle the main window size and a public function to share it between modules, if necessary:
static struct
{
   int win_width;
   int win_height;
} s_info =
{
   .win_width = -1,
   .win_height = -1,
};

int
app_get_win_width(void)
{
   return s_info.win_width;
}
The image browser and the favorites section are initialized in the _create_base_gui() function:
static void
_create_base_gui(appdata_s *ad)
{
   img_browser = view_image_browser_create(ad->layout);
   fav_browser = view_favorites_browser_create(ad->layout);

   elm_object_part_content_set(ad->layout, PART_IMG_BROWSER, img_browser);
   elm_object_part_content_set(ad->layout, PART_FAV_BROWSER, fav_browser);
}
As shown above, after an object is created, it must be inserted into the elm_layout component. For this purpose, use the elm_object_part_content_set() function. In this sample application, the conf.h file is used to define all public parts declared in the EDJE file. This is a good approach to avoid typo errors.
For the definition of the main layout, only one EDJE script file is used. The following code snippet shows the structure of this file.
At the beginning, the conf.h file is included to access the preprocessor definitions and use them as valid part names. The EDJE script file defines 2 swallow parts, which are the placeholders for the image browser and the favorites component.
#include "../../inc/conf.h"

collections
{
   group
   {
      name: "main";
      parts
      {
         // ============================ SWALLOW PART FOR GENLIST =======================
         part
         {
            name: PART_IMG_BROWSER;
            type: SWALLOW;
            description
            {
               state: "default" 0.0;
               rel1 {relative: 0.2 0.0;}
               rel2 {relative: 0.8 0.7;}
            }
         }
         // ============================ SWALLOW PART FOR GENGRID =======================
         part
         {
            name: PART_FAV_BROWSER;
            type: SWALLOW;
            description
            {
               state: "default" 0.0;
               rel1 {relative: 0.0 0.7;}
               rel2 {relative: 1.0 1.0;}
            }
         }
      }
   }
}
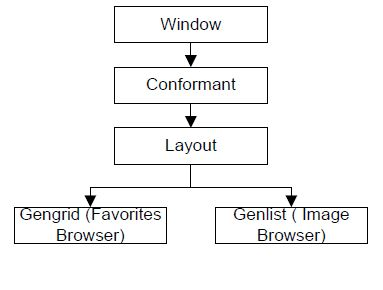
The following figure illustrates the base UI layout structure.
Figure: Application layout structure
View Module
The view module implementation is included in the view.c file, which is divided into 6 parts:
- Static structure, used for storing the drag and drop data and other necessary information
- Local functions
- Genlist-related functions
- Gengrid-related functions
- Drag and drop-related functions
- Public functions' implementation
The implementation of the public functions is related to the creation of the elm_genlist and elm_gengrid components:
-
To create elm_genlist component:
- The UI component creation function is invoked from the main module. In this case, the elm_layout component is the parent, so when the main window is removed, it also removes the elm_genlist component.
- Elm_Genlist_Item_Class is used when a new item is added into the genlist component. This step is related to the default configuration of the elm_genlist item class. This class is stored in a static structure so it needs to be done only once.
- Connect the _item_longpressed_cb function to the longpressed smart callback.
- Genlist must react to "drop" events. The Elm_drop_target_add() function sets the elm_genlist component as a drop container, so when the user moves an icon over the genlist and drops it, the _genlist_dnd_drop_cb() callback is invoked.
Evas_Object *view_image_browser_create(Evas_Object *parent) { Evas_Object *genlist = NULL; // (1) genlist = elm_genlist_add(parent); // (2) if (!s_info.list_it_class) { s_info.list_it_class = elm_genlist_item_class_new(); s_info.list_it_class->item_style = "default"; s_info.list_it_class->func.content_get = _genlist_content_get; s_info.list_it_class->func.del = _genlist_content_del; s_info.list_it_class->func.text_get = NULL; s_info.list_it_class->func.state_get = NULL; } // (3) evas_object_smart_callback_add(genlist, "longpressed", _item_longpressed_cb, NULL); // (4) elm_drop_target_add(genlist, ELM_SEL_FORMAT_TARGETS, NULL, NULL, NULL, NULL, NULL, NULL, _genlist_dnd_drop_cb, NULL); } -
The creation of the elm_gengrid component is similar:
- In addition to the longpressed callback, the application registers the realized callback. The _gengrid_items_realized_cb() function is invoked every time an item in elm_gengrid is updated (such as is appended or changes content). The callback is used to obtain the updated content list.
Evas_Object
*view_image_browser_create(Evas_Object *parent)
{
   gengrid = elm_gengrid_add(parent);

   if (!s_info.grid_it_class)
   {
      s_info.grid_it_class = elm_gengrid_item_class_new();
      s_info.grid_it_class->item_style = "default";
      s_info.grid_it_class->func.content_get = _gengrid_content_get;
      s_info.grid_it_class->func.del = _gengrid_content_del;
      s_info.grid_it_class->func.text_get = NULL;
      s_info.grid_it_class->func.state_get = NULL;
   }

   // (1)
   evas_object_smart_callback_add(gengrid, "longpressed", _item_longpressed_cb, NULL);
   evas_object_smart_callback_add(gengrid, "realized", _gengrid_items_realized_cb, NULL);

   elm_drop_target_add(gengrid, ELM_SEL_FORMAT_TARGETS,
                       NULL, NULL,
                       NULL, NULL,
                       NULL, NULL,
                       _gengrid_dnd_drop_cb, NULL);
}
After the UI components are created, the application reads data from resources and inserts it in the elm_genlist component:
- To obtain the available images, an external function from the data module is used.
- In a for loop, new genlist items are added. The elm_genlist_item_append() function is used to append a new item into the genlist. This function invokes the callback connected to the genlist item class.
// (1)
l_img_paths = data_available_images_get();

c = eina_list_count(l_img_paths);

// (2)
for (i = 0; i < c; i++)
{
   elm_genlist_item_append(genlist, s_info.list_it_class, eina_list_nth(l_img_paths, i),
                           NULL, ELM_GENLIST_ITEM_NONE, NULL, NULL);
}

eina_list_free(l_img_paths);
- The data variable is a pointer to a char passed to the elm_gengrid_item_append() function.
- The _genlist_item_content_get() function is used for each part in the elm_genlist_item() function: The number and name of a part depends on the item style used for a specific item class. The application checks the name of the part and, if it is proper, returns an object which is inserted in the elm_object_item.
static Evas_Object
*_genlist_content_get(void *data, Evas_Object *obj, const char *part)
{
   Evas_Object *icon = NULL;

   // (1)
   if (!data)
   {
      dlog_print(DLOG_ERROR, LOG_TAG, "[INVALID_CB_DATA][data=NULL]");

      return NULL;
   }

   // (2)
   if (!strcmp(part, "elm.swallow.icon"))
   {
      icon = _list_item_create(obj, (char*) data);

      return icon;
   }

   return NULL;
}
To create a list item:
- Create the elm_box component.
- Create the elm_image component and set a file as the image source.
- Add the image into the box. The elm_box component is used as an item because of the paddings in the elm_genlist. If a padding in the item is necessary, it is done in the following way:
- Modify the elm_genlist style using the elm_theme_extension_add() function and a custom theme for the elm_genlist component.
- Prepare an elm_layout component and insert the item into this container.
- Use the box container. In this case, it is the simplest solution.
- Return the elm_box component. It is used later as an elm_gengrid item content.
static Evas_Object
*_list_item_create(Evas_Object *parent, const char *file)
{
   // (1)
   box = elm_box_add(parent);

   // (2)
   image = elm_image_add(parent);

   // (3)
   elm_box_pack_end(box, image);

   // (4)
   return box;
}
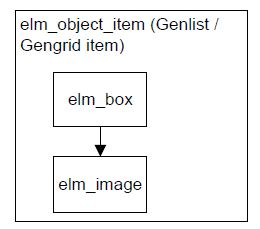
A similar function is used for creating the elm_gengrid item. The following image illustrates the structure of the container item.
Figure: Container item structure
Drag and Drop Operation
To start the drag and drop operation, the longpressed smart callback is used on the elm_gengrid and elm_genlist components. This callback is invoked when the user moves the mouse pointer above the container item, presses the left mouse button, and holds it for 0.5 seconds.
- Obtain the necessary data from the event info and a local function which is used in the drag and drop later.
- Use the elm_drag_start() function to inform the application that a drag and drop operation has started:
- Image is set as the moved object.
- ELM_SEL_FORMAT_TARGETS is a selection format parameter, which defines the type of the dragged content.
- "dnd" text is used as the drag and drop data.
- ELM_XDND_ACTION_MOVE defines the kind of action associated with the drop data.
- The _dnd_drag_icon_create_cb() callback function is invoked to create a new window with custom content.
The new window is necessary when the drag and drop mechanism is used between 2 different windows of separate applications.
- The _dnd_drag_done_cb() callback is invoked when the user releases the moved icon.
static void
_item_longpressed_cb(void *data, Evas_Object *obj, void *event_info)
{
   // (1)
   Elm_Object_Item *it = (Elm_Object_Item*) event_info;
   Evas_Object *image = _container_item_content_get(it);

   s_info.src_object = image;
   s_info.src_container = obj;
   s_info.src_item = it;
   s_info.src_idx = elm_gengrid_item_index_get(it);
   // (2)
   elm_drag_start(image,
                  ELM_SEL_FORMAT_TARGETS, "dnd",
                  ELM_XDND_ACTION_MOVE, _dnd_drag_icon_create_cb, image,
                  NULL, NULL,
                  NULL, NULL,
                  _dnd_drag_done_cb, obj);

   elm_scroller_movement_block_set(obj, ELM_SCROLLER_MOVEMENT_BLOCK_VERTICAL);
}
- The original icon is needed here to obtain its coordinates and source file. This callback invocation creates a new window with specific parameters indicated by a win pointer. For that reason, you cannot use the original icon and return it in this function. If you do not want to create a new icon, you can implement an Elm_Drag_Pos callback which is called whenever the mouse position is changed.
- Create a new icon. The parent of this object is the new win object, so the framework uses the canvas from this window to draw the new icon.
- Obtain information about the coordinates of the original icon. The evas_pointer_canvas_xy_get() function sets the coordinates of the mouse pointer. It is necessary for setting the X and Y offset of the moved icon.
- Set the initial position of the moved icon.
- Set the initial offset of the moved icon. The center of the moved icon is behind the mouse pointer during the drag and drop operation.
static Evas_Object
*_dnd_drag_icon_create_cb(void *data, Evas_Object *win, Evas_Coord *xoff, Evas_Coord *yoff)
{
   // (1)
   Evas_Object *org_ic = (Evas_Object*) data;

   // (2)
   dragged_ic = elm_image_add(win);

   // (3)
   evas_object_geometry_get(org_ic, &x, &y, &w, &h);
   evas_pointer_canvas_xy_get(evas_object_evas_get(org_ic), &xo, &yo);

   // (4)
   evas_object_resize(dragged_ic, w/2, h/2);
   evas_object_move(dragged_ic, x - w/2, y - h/2);

   // (5)
   if (xoff) *xoff = xo - w/4;
   if (yoff) *yoff = yo - h/4;
}
The most important callback function is invoked when the user performs the "up" action. To handle the use case from the sample application, the callback implementation must look like the following code snippet. If you want some custom behavior on your drop callback, change the logic of this function.
- In this case, only 4 items can be inserted into the favorites section, so the function must have information about the number of items in the gengrid. The obj pointer is the gengrid component (the callback is connected to the gengrid in the elm_drop_target_add() function).
- The X and Yy coordinates are necessary for obtaining the valid item from the elm_gengrid component. This item indicates the position to which the moved image is dropped.
- The drag and drop application has only 2 containers. The _gengrid_dnd_drop_cb() function is always invoked for the elm_gengrid component. If s_info.src_container != obj is true, the source object is the elm_genlist component. The application needs this information to decide what type of reposition has been started. If the rel_it pointer is NULL, the repositioned object is placed in the last position.
- If the relative item is not NULL, the application uses the elm_gengrid_item_insert_before() function to insert the item in the valid position.
- The else if condition refers to the situation when the moved object was obtained from the elm_gengrid. It means that the user wants to change the position of items placed in the favorites section.
- Obtain the destination index from the relative item and delete the source item.
- If the destination index is higher than the source index, the application inserts the moved object after the relative item.
- If the destination index is lower than the source index, the application inserts the moved object before the relative item. The application removes the source item, so it must check whether the destination index is lower or higher than the source index. If the source item is removed, all items in favorites are moved left, so in that case you must add the item after the relative index.
static Eina_Bool
_gengrid_dnd_drop_cb(void *data, Evas_Object *obj, Elm_Selection_Data *ev)
{
   // (1)
   count = elm_gengrid_items_count(obj);
   if ((count == MAX_FAVORITE_ITEMS) && (obj != s_info.src_container))
   {
      _popup_show(s_info.parent, POPUP_MAX_ITEMS);
      return EINA_FALSE;
   }

   // (2)
   evas_pointer_output_xy_get(evas_object_evas_get(obj), &x, &y);
   rel_it = elm_gengrid_at_xy_item_get(obj, x, y, &xposret, &yposret);

   // (3)
   if ((s_info.src_container != obj) && !rel_it)
   {
      elm_gengrid_item_append(obj, s_info.grid_it_class, _grid_item_create(obj, file), NULL, NULL);
   }

   // (4)
   else if ((s_info.src_container != obj) && rel_it)
   {
      elm_gengrid_item_insert_before(obj, s_info.grid_it_class, _grid_item_create(obj, file), rel_it, NULL, NULL);
   }
   // (5)
   else if ((s_info.src_container == obj && rel_it))
   {
      // (6)
      dst_idx = elm_gengrid_item_index_get(rel_it);
      elm_object_item_del(s_info.src_item);

      // (7)
      if (dst_idx > s_info.src_idx)
      {
         elm_gengrid_item_insert_after(obj, s_info.grid_it_class, _grid_item_create(obj, file), rel_it, NULL, NULL);
      }
      // (8)
      else if (dst_idx < s_info.src_idx)
      {
         elm_gengrid_item_insert_before(obj, s_info.grid_it_class, _grid_item_create(obj, file), rel_it, NULL, NULL);
      }
   }
}
If the user drags an item from the elm_gengrid component and drops it above the elm_genlist component, the _dnd_genlist_drop_cb() callback is invoked and the item is removed from the favorites section:
static Eina_Bool
_genlist_dnd_drop_cb(void *data, Evas_Object *obj, Elm_Selection_Data *ev)
{
   elm_object_item_del(s_info.src_item);
   s_info.src_item = NULL;
}
Data Module
The data module implementation is included in the data.c file. There are 2 main functionalities in this module:
- Obtain the images list.
The data module uses the dirent.h library to read the available images list.
- Store the information about favorite items.
The following code snippets are responsible for the main tasks of the data module:
- The preference_get_string() function takes 2 parameters: the name of the key to retrieve and the string value associated with the given key. In the drag and drop application, the preference keys are stored in the key table.
- The obtained data is saved in a list which is returned by the data_favorite_images_get() function.
- Remove all old values from the system preference database.
- Iterate through the file path list and set new values into valid keys.
Eina_List
*data_favorite_images_get(void)
{
   // (1)
   preference_get_string(prefs[i], &path);
   // (2)
   favs = eina_list_append(favs, strdup(path));
}

Eina_Bool
data_favorites_update(Eina_List *paths)
{
   // (3)
   preference_remove_all();

   // (4)
   EINA_LIST_FOREACH(paths, it, file_path)
   {
      preference_set_string(prefs[i++], file_path);
   }
}