The Alarm Widget sample application demonstrates how you can manage text objects and image objects to create a complete widget view. In addition, the widget application can launch another application for a more detailed operation, if required.
For information on creating the sample application project in the IDE, see Creating Sample Applications.
The following figure illustrates the main screen of the Alarm Widget.
Figure: Alarm Widget screen
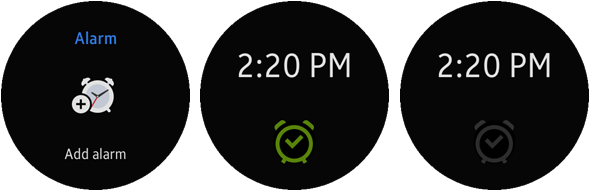
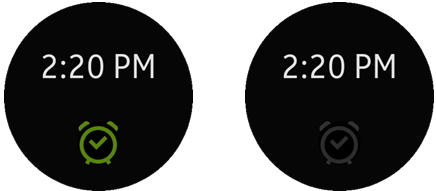
When the widget starts and no alarms exist, the main view (no alarm view) is shown, as in the left screen in the above figure. To add an alarm, click the button in the middle of the main view.
In the alarm view, you can switch the alarm on and off by clicking it, as in the middle and right screen in the above figure.
Source Files
You can create and view the sample application project including the source files in the IDE.
| File name | Description |
|---|---|
| edje/images | This directory contains the image files used in the main.edc file. |
| inc/data.h | This file contains information and definition of the variables and functions used in the C files, especially in the data.c file. |
| inc/main.h | This file contains information and definition of the variables and functions used in the C files, especially in the main.c file. |
| inc/view.h | This file contains information and definition of the variables and functions used in the C files, especially in the view.c file. |
| res/edje/main.edc | This file is for the UI and contains style, image, and position of the sample application. |
| res/image | This directory contains the image files used in the C files. |
| src/data.c | This file contains the functions for retrieving and making data for the application. |
| src/main.c | This file contains the functions related to the application life-cycle, callback functions, view control, and data. |
| src/view.c | This file contains the functions for implementing the views and handling events. |
Implementation
Application Layout
According to the widget instance life-cycle, the widget_instance_create_cb() callback is always called after the widget instance is created. Within the widget_instance_create_cb() callback:
- Call the view_create() function to create the widget view.
The window (win) and conformant (conform) components are essential in creating the application UI.
- Use the widget_app_context_set_tag() function to set the widget context.
In the view_create() function, you can get the wid data structure from the context using the widget_app_context_get_tag() function.
void
view_create(widget_context_h context, int w, int h)
{
   widget_instance_data_s *wid = NULL;

   widget_app_context_get_tag(context, (void**) &wid);

   wid->win = view_create_widget_win(context, w, h);

   wid->conform = view_create_conformant_without_indicator(wid->win);
   if (wid->conform == NULL)
   {
      dlog_print(DLOG_ERROR, LOG_TAG, "failed to create a conformant");

      return;
   }

   wid->root_width = w;
   wid->root_height = h;
}
No Alarm View
When the widget is started and no alarms exist, call the view_alarm_widget_create() function to create the main (no alarm) view:
From the data_get_resource_path() function, you can get the EDJ file path to be used for the widget layout.
The view_create_naviframe() function creates the naviframe to manage multiple views. With the naviframe, the widget can change views more efficiently.
After you create a layout with the given EDJ file using the view_alarm_create_layout_no_alarmlist() function, push the layout to the naviframe.
data_get_resource_path(EDJ_PATH, edj_path, sizeof(edj_path));
view_alarm_widget_create(context, edj_path);

void
view_alarm_widget_create(widget_context_h context, const char *file_path)
{
   widget_instance_data_s *wid = NULL;

   // Get the structure point from context
   widget_app_context_get_tag(context, (void**) &wid);

   // Create a naviframe for managing multiple views
   wid->nf = view_create_naviframe(wid->conform);
   if (wid->nf == NULL)
   {
      dlog_print(DLOG_ERROR, LOG_TAG, "failed to create a naviframe.");
      evas_object_del(wid->win);

      return;
   }

   // Create an Eext circle surface for the circular genlist
   // to make this app show a circular layout
   wid->circle_surface = eext_circle_surface_naviframe_add(wid->nf);

   // Create a layout for the no alarm view
   wid->layout = view_alarm_create_layout_no_alarmlist(wid->nf, file_path, "base_alarm", NULL);
   if (wid->layout == NULL)
   {
      dlog_print(DLOG_ERROR, LOG_TAG, "failed to create a layout of no alarm.");
      evas_object_del(wid->win);

      return;
   }

   // Push to naviframe
   view_push_item_to_naviframe(wid->nf, wid->layout, NULL, NULL);
}
The following figure shows the no alarm view frame created by the above code.
Figure: No alarm view frame
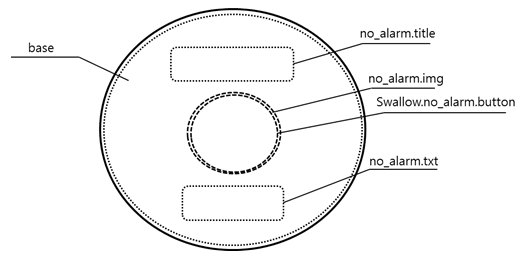
To fill out each part in the view frame:
- Use the view_set_text() function to fill out the no_alam.title part with the Alarm text.
Fill out the no_alam.text part similarly.
- Use the view_set_button() function to fill out the swallow.no_alarm.button part with a button that has the focus style and the _no_alarm_clicked_cb callback.
The callback is triggered when the button is clicked. You can use the callback to launch any application to connect with the widget. In this sample, the alert popup and a virtual view of a connected alarm application are shown.
view_set_text(wid->layout, "no_alarm.title", "Alarm");
view_set_button(wid->layout, "swallow.no_alarm.button", "focus", NULL, NULL,
                _no_alarm_down_cb, _no_alarm_up_cb, _no_alarm_clicked_cb, wid);
view_set_text(wid->layout, "no_alarm.text", "Add alarm");}
Define the position of the parts in the EDJ file. The focus style of the button is used for transparency, since the image and button are set in the same position:
part
{
   name: "swallow.no_alarm.button";
   type: SWALLOW;
   mouse_events: 1;
   description
   {
      state: "default" 0.0;
      rel1.relative: 0.5 0.5;
      rel1.to: "base";
      rel2.relative: 0.5 0.5;
      rel2.to: "base";
      min: 98 98;
      max: 98 98;
      fixed: 1 1;
   }
}
part
{
   name: "no_alarm.img";
   type: IMAGE;
   mouse_events: 0;
   description
   {
      state: "default" 0.0;
      rel1.to: "swallow.no_alarm.button";
      rel2.to: "swallow.no_alarm.button";
      image.normal: "alarm_no_alarm_icon.png";
      min: 98 98;
      max: 98 98;
      fixed: 1 1;
      visible: 1;
   }
}
Alert Popup
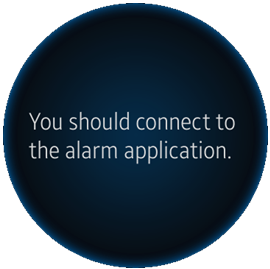
When the user clicks the button in the main view, the _no_alarm_clicked_cb() callback is triggered. The callback retrieves the text that you want to display, and calls the view_create_text_popup() function with the text to display an alert popup:
- The second parameter of the view_create_text_popup() function (POPUP_DURATION) determines how long the alert popup is displayed on the screen.
- When the popup time is up and it is hidden, a timeout event occurs and triggers the _timeout_cb callback (registered by the view_set_smart_callback() function).
static void
_no_alarm_clicked_cb(void *data, Evas_Object *obj, void *event_info)
{
   widget_instance_data_s *wid = data;
   Evas_Object *popup = NULL;
   char *popup_text = NULL;

   // Get the text to show on the popup
   popup_text = data_get_popup_text();
   // Create a circular popup with the given text and time
   popup = view_create_text_popup(wid->layout, POPUP_DURATION, popup_text);
   // Set the function to be called when the popup time is up
   view_set_smart_callback(popup, "timeout", _timeout_cb, wid);
   free(popup_text);
}
Figure: Alert popup view
Alarm View
When the alert popup is hidden, the _timeout_cb() callback creates the alarm view:
- Get the EDJ file path to be used for the alarm view layout using the data_get_resource_path() function.
- Call the view_create_layout() function with the EDJ file and the alarm.view group name that describes the alarm widget in the EDJ file.
- Get the alarm time using the data_get_saved_time_text() function, and fill out the widget.time part using the view_set_text() function with the alarm time.
- The view_set_event_callback() function registers the _alarm_on_off_clicked_cb callback to the widget.event part. The callback is triggered when the alarm view is clicked.
static void
_timeout_cb(void *data, Evas_Object *obj, void *event_info)
{
   widget_instance_data_s *wid = data;

   char *alarm_time = NULL;
   char edj_path[PATH_MAX] = {0,};

   // Get the EDJ file path
   data_get_resource_path(EDJ_PATH, edj_path, sizeof(edj_path));

   // Create alarm view with the alarm.view group in the EDJ file
   wid->alarm_view = view_create_layout(wid->nf, edj_path, "alarm.view", NULL, NULL);
   // Get the saved time from the alarm application, if it is connected
   alarm_time = data_get_saved_time_text(wid);
   // Set the alarm_time text to the widget.time part
   view_set_text(wid->alarm_view, 'widget.time', alarm_time);
   // Set the function to be called when the widget is clicked
   view_set_event_callback(wid->alarm_view, "widget.event", WIDGET_EVENT_CLICKED, _alarm_on_off_clicked_cb, wid);

   // Push the alarm view to the naviframe
   view_push_item_to_naviframe(wid->nf, wid->alarm_view, NULL, NULL);

   free(alarm_time);
}
The following figure shows the alarm view frame created by the above code.
Figure: Alarm view frame
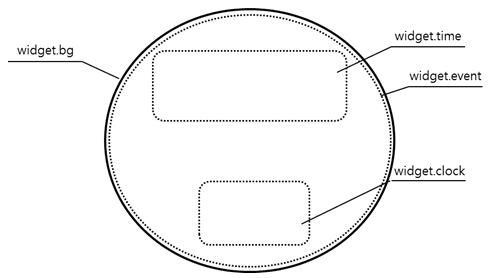
The widget.clock part is filled with an image defined in the EDJ file. The part has 2 states, and the color of the image changes accordingly to the state.
part
{
   name: "widget.clock";
   type: IMAGE;
   mouse_events: 1;
   description
   {
      state: "default" 0.0;
      rel1
      {
         relative: 180/360 268.5/360;
         to: "widget.bg";
      }
      rel2
      {
         relative: 180/360 268.5/360;
         to: "widget.bg";
      }
      min: 80 83;
      image
      {
         normal: "Alarm_icon.png";
      }
      color: 127 191 15 200;
   }
   description
   {
      state: "off" 0.0;
      inherit: "default" 0.0;
      color: 250 250 250 51;
   }
}
Managing Alarms
You can switch the alarm on and off by clicking the alarm view. The click triggers the _alarm_on_off_clicked_cb() callback:
- Check whether the alarm view is clicked, or just pressed for scrolling through multiple alarms. The event_flag == EVAS_EVENT_FLAG_ON_HOLD value means that the alarm view is scrolling, and no action are needed.
- If the view is fully clicked, check the state of the alarm_on variable and send a signal to the EDJ file using the view_send_signal_to_edje() function with an off or on signal and the alarm source.
static void
_alarm_on_off_clicked_cb(void *user_data)
{
   Evas_Event_Flags event_flag;
   widget_instance_data_s *wid = user_data;

   // Check whether this event is CLICK or MOUSE UP
   event_flag = evas_event_default_flags_get(evas_object_evas_get(wid->win));
   // Click event on scroll is not dealt with
   if (event_flag == EVAS_EVENT_FLAG_ON_HOLD)
   {
      return;
   }
   dlog_print(DLOG_DEBUG, LOG_TAG, "clicked a widget");
   // Check whether alarm is on or off
   if (wid->alarm_on)
   {
      view_send_signal_to_edje(wid->alarm_view, "off", "alarm");
      wid->alarm_on = 0;
   }
   else
   {
      view_send_signal_to_edje(wid->alarm_view, "on", "alarm");
      wid->alarm_on = 1;
   }
}
You can customize the event signal passed to the EDJ file.
In the following example, if the off or on signal is sent to the EDJ file with the alarm source, the EDJ file finds the widget.clock target part and changes its state. Consequently, the alarm image is highlighted or returned to normal.
programs
{
   program
   {
      name: "alarm.off";
      signal: "off";
      source: "alarm";
      action: STATE_SET "off" 0.0;
      target: "widget.clock";
   }
}
programs
{
   program
   {
      name: "alarm.on";
      signal: "on";
      source: "alarm";
      action: STATE_SET "default" 0.0;
      target: "widget.clock";
   }
}
Figure: Alarm on and off