Setting up ARTIK530/ARTIK530S without SD Card
Installing Tizen Studio
If you have already installed Tizen Studio 3.0 and installed the 5.0 Mobile profile for the Main SDK and the IOT-Headed-5.0 and IOT-Headless-5.0 profiles for the Extension SDK, you can skip this section.
Otherwise, to install Tizen Studio and the required profiles for IoT development:
-
Download and install the correct version of Tizen Studio 3.0 (or later) for your operating system from Tizen developer site.
-
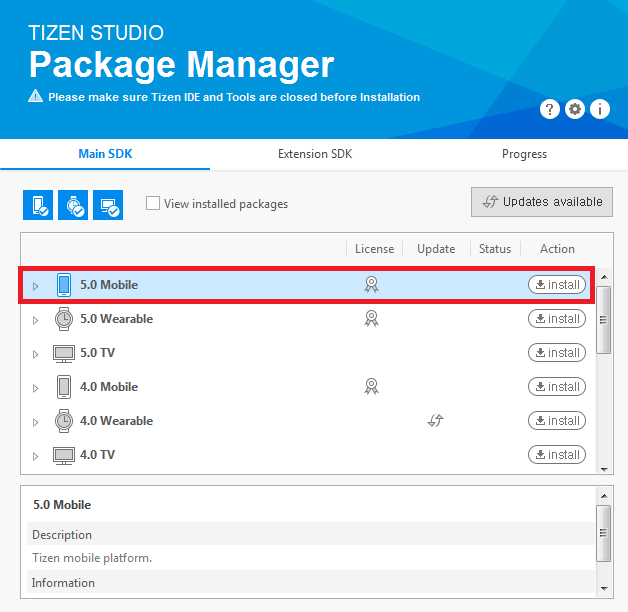
Open the Tizen Studio Package Manager, select the Main SDK tab, and install the 5.0 Mobile profile:
-
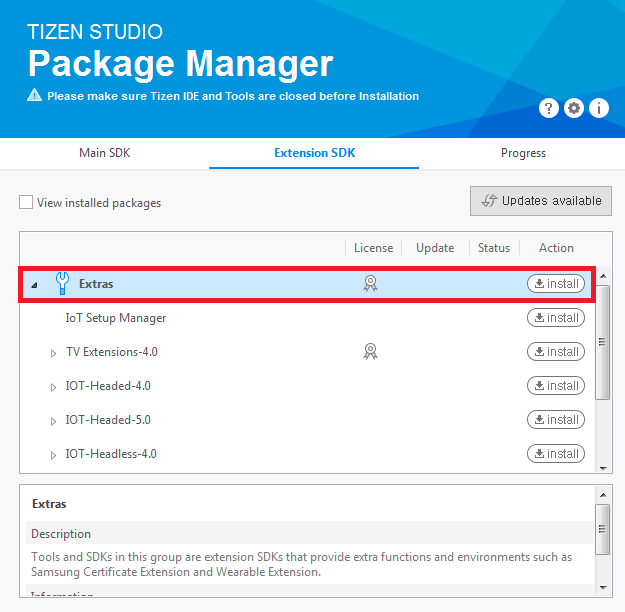
Select the Extension SDK tab and install Extras. Extras includes IOT-Headed-5.0 and IOT-Headless-5.0 profiles:
Note
Extension SDK should be updated to the latest version.
Setting up ARTIK 530 or ARTIK 530s
Samsung has discontinued support for ARTIK.
In case you are still using ARTIK, we recommend that you migrate to Raspberry Pi 3 for headless-type IoT devices. Information on Raspberry Pi 3 for Tizen IoT will help you at it. The documentation for Tizen IoT with respect to ARTIK will be available only until August 2019.
Thank you for your interest and support as always.
To configure the ARTIK 530 or the ARTIK 530s hardware board:
-
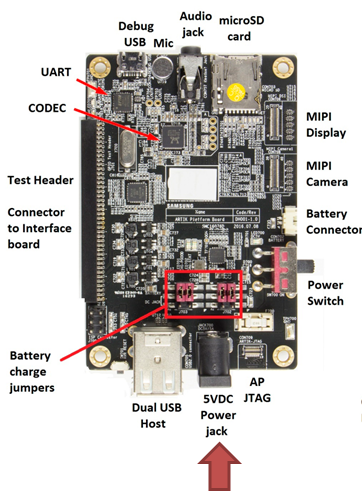
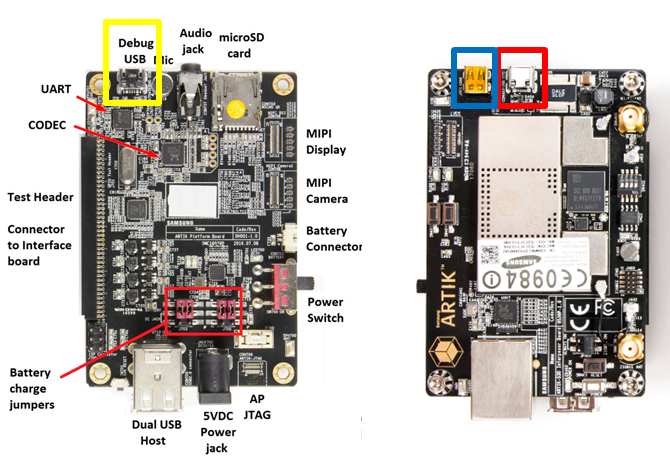
Connect the 5V DC power supply to the board (marked with a red arrow). The following figure shows the bottom view of the board:
-
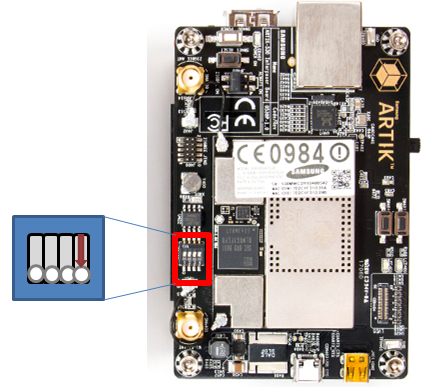
Set the DIP switch on the board as shown in the following figure (top view of the board):
-
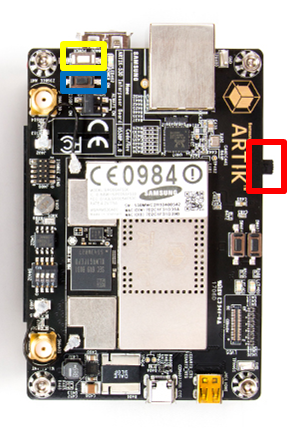
Connect a USB serial cable (marked with a yellow box) and a separate USB OTG cable (the red box) to your Linux computer. The following figure shows the bottom view of the board on the left and top view on the right:
-
Boot the board by sliding the power switch (marked with a red box) to ON position and press the power push-button (the yellow box). The following figure shows the top view of the board:
-
Launch two shell prompts on your Linux computer. One for serial communication (serial shell) and the other for installing the drivers. For serial communication to the board, run a serial communication application, such as Minicom or PuTTY.
-
Minicom example:
Minicom can be used in Linux computer. Run the following command to run Minicom:
$ sudo minicom -c onTo configure Minicom:
- Go to the Minicom configuration settings menu by consecutively pressing
Ctrl + A,Z, andO(the letter O). - In the
Serial Devicefield, set the correct USB port for serial communication. The format is/dev/ttyUSBXwhereXequals the number of the port. - Modify the
Hardware Flow Controlfield toNo.
+-----------------------------------------------------------------------+
| A -    Serial Device      : /dev/ttyUSBX                              |
| B - Lockfile Location     : /var/lock                                 |
| C -   Callin Program      :                                           |
| D -  Callout Program      :                                           |
| E -    Bps/Par/Bits       : 115200 8N1                                |
| F - Hardware Flow Control : No                                        |
| G - Software Flow Control : No                                        |
In the serial shell, log in with
root/tizen:localhost login: root Password: tizen Welcome to Tizen - Go to the Minicom configuration settings menu by consecutively pressing
-
PuTTY example:
Download PuTTY from the Internet and launch PuTTY.
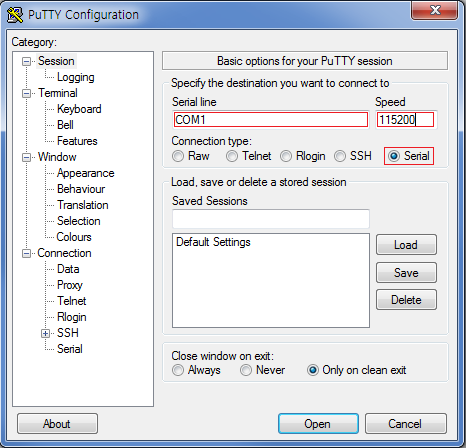
To configure PuTTY:
- Select
Serialconnection type. - Enter the serial line number for the board connected to your computer (it can be COM
NwhereNis a natural number such as COM1, COM4, and so on) in theSerial linefield. - Type 115200 in the
Speedfield. - Click
Open.
In the serial shell, log in with
root/tizen:localhost login: root Password: tizen Welcome to Tizen - Select
-
Flashing Tizen Images
Prerequisites
You must have the binary images in your computer. You can download the binary images from:
-
Boot image:
-
Platform image:
- Headless (without display): tizen-unified_20181024.1_iot-headless-2parts-armv7l-artik530_710.tar.gz
- Headed (with display): tizen-unified_20181024.1_iot-headed-3parts-armv7l-artik530_710.tar.gz
To make a device with a display, select Headed image, which consists of the UI framework. To make a device without a display, select Headless image.
Most of the flashing steps mentioned in this section for ARTIK 530 and ARTIK 530s are the same. Only step 4 is different.
Flashing eMMC (internal flash memory)
-
Complete the following prerequisites:
- Ensure that you have Ubuntu 14.04 or above installed on your host computer.
- Install
fastbootandlthor. For more information, see https://wiki.tizen.org/Booting_Tizen_From_eMMC_On_ARTIK530. - Verify whether the binary image files are in your computer. For more information, see Prerequisites.
-
Set up the board connections. For more information, see ARTIK 530 or ARTIK 530s Set-up.
-
Turn off and turn on the board. After the board is reset, the serial shell shows a number counting down next to the Hit any key to stop autoboot line. Before the count reaches 0, press Enter in the serial shell to stop the boot process and enter the bootloader mode.
Board: ARTIK530 Raptor DRAM: 512 MiB HW Revision: 4 MMC: NEXELL DWMMC: 0, NEXELL DWMMC: 1 In: serial Out: serial Err: serial LCD#1:0x4, LCD#2:0x4, CAM#1:0x4, CAM#2:0x4 ADD-ON-BOARD : 0xFFFF Net: Warning: ethernet@c0060000 (eth0) using random MAC address - xx:xx:xx:xx:xx eth0: ethernet@c0060000 Hit any key to stop autoboot: 0 <Enter key> artik530# -
Flash the boot image:
-
ARTIK 530
-
Make a temporary directory (e.g. Migration_ARTIK530_tizen) and download the
tar.gzfile from scripts_tizen_artik530_os_3.0.0_Migration_ARTIK530_20181026.tar.gz -
Unzip the
scripts_tizen_artik530_os_3.0.0_Migration_ARTIK530_20181026.tar.gzfile to get theflash_boot_for_tizen.shfile in the `temporary directory (e.g. Migration_ARTIK530_tizen). -
In the serial shell, enter
fastboot 0:artik530# fastboot 0 -
In the Linux shell, run
flash_boot.sh:$ ./flash_boot_for_tizen.sh -
Reboot the board and enter the bootloader mode again.
-
In the serial shell, enter
thordown 0 mmc 0:artik530# thordown 0 mmc 0 -
In the Linux shell, run
lthorto flash the boot image (which you downloaded in step 1):$ lthor tizen-unified_YYYYMMDD.V_iot-boot-armv7l-artik530.tar.gz
-
-
ARTIK 530s
-
Make a temporary directory (e.g. Migration_ARTIK530S_tizen) and download the
tar.gzfile from scripts_tizen_artik530s_os_3.0.0_Migration_ARTIK530S_20181026.tar.gz -
Unzip the
flash_boot_artik530_tizen5.0.zipfile to get theflash_boot_for_tizen.shfile in theMigration_ARTIK530S_tizendirectory. -
In the serial shell, enter
fastboot 0:artik530# fastboot 0 -
In the Linux shell, run
flash_boot.sh:$ ./flash_boot_for_tizen.sh -
Reboot the board and enter the bootloader mode again.
-
In the serial shell, enter
thordown 0 mmc 0:artik530# thordown 0 mmc 0 -
In the Linux shell, run
lthorto flash the boot image (which you downloaded in step 1):$ lthor tizen-unified_YYYYMMDD.V_iot-boot-armv7l-artik530.tar.gz
-
-
For detailed information, see https://wiki.tizen.org/Booting_Tizen_From_eMMC_On_ARTIK530#Migration_to_Tizen_Platform_from_other_platform.
-
Flash the platform image:
-
Reboot the board and enter the bootloader mode again.
-
In the serial shell, enter
thordown 0 mmc 0:artik530# thordown 0 mmc 0 -
In the Linux shell, run lthor to flash the platform image:
$ lthor tizen-unified_YYYYMMDD.V_iot-headless-2parts-armv7l-artik530_710.tar.gzor
$ lthor tizen-unified_YYYYMMDD.V_iot-headed-3parts-armv7l-artik530_710.tar.gz
-
-
Open the Smart Development Bridge (SDB) connection:
-
Verify whether SDB is connected, in the Linux shell of the host computer:
~$ sdb root on
Switched to 'root' account mode
~$
Note
sdbexecution file is available in thetoolssub-directory of the directory where Tizen Studio is installed. -
Enter the
sdb helpcommand in the Linux shell of the host computer, for more information.
-
-
Install connectivity drivers, see the next section.
Installing Drivers
-
Connect Smart Development Bridge (SDB) as described in the previous section.
-
Install the connectivity drivers:
-
Download the plugin zip file from the ARTIK530(5.0) Plugin section at http://developer.samsung.com/tizendevice/firmware and follow the instructions.

-
For the case of the Linux shell (Linux), run the
shscript given in the instructions. For example:$ ./ARTIK_530_plugin_tizen5.0.sh -
For the case of the Command window (Windows), run the
batscript given in the instructions. For example:> ARTIK_530_plugin_tizen5.0.bat
-
Tips
Setting up Wi-Fi
This section is not applicable if you want to connect your device to the SmartThings Cloud. In case of SmartThings devices, the device enables SoftAP mode during setup, therefore, you need not switch to Wi-Fi separately.
You can set up a Wi-Fi connection by running wifi_manager_test and entering the options 1 > 3 > 9 > b > c. If you set up the connection once, it reconnects automatically the next time you power cycle the device.
# wifi_manager_test
Test Thread created...<Enter>
Event received from stdin
Network Connection API Test App
Options..
1   - Wi-Fi init and set callbacks
2   - Wi-Fi deinit(unset callbacks automatically)
3   - Activate Wi-Fi device
4   - Deactivate Wi-Fi device
5   - Is Wi-Fi activated?
6   - Get connection state
7   - Get MAC address
8   - Get Wi-Fi interface name
9   - Scan request
a   - Get Connected AP
b   - Get AP list
c   - Connect
d   - Disconnect
e   - Connect by wps pbc
f   - Forget an AP
g   - Set & connect EAP
h   - Set IP method type
i   - Set Proxy method type
j   - Get Ap info
k   - Connect Specific AP
l   - Load configuration
m   - Save configuration
n   - Remove configuration
o   - TDLS Discover
p   - TDLS Connect
q   - TDLS Connected peer
r   - TDLS Disconnect
s   - Connect Hidden AP
t   - Connect WPS PBC without SSID
u   - Connect WPS PIN without SSID
v   - Cancel WPS Request
w   - Set Auto Scan Enable-Disable
x   - Set Auto Scan Mode
y   - Get wifi scanning state
z   - Get Auto Scan Enable-Disable
A   - Get Auto Scan Mode
B   - Enable TDLS Channel Switch Request
C   - Disable TDLS Channel Switch Request
D   - Get Wi-Fi Module State
E   - BSSID Scan
F   - Add VSIE
G   - Get VSIE
H   - Remove VSIE
I   - Start Multi Scan
J   - Flush BSS
K   - Set auto connect mode
L   - Get auto connect mode
0   - Exit
ENTER  - Show options menu.......
Operation succeeded!
1
Event received from stdin
Wifi init succeeded
Operation succeeded!
3
Event received from stdin
Wi-Fi Activation Succeeded
Operation succeeded!
9
Event received from stdin
Interface name : wlan0
Operation succeeded!
b
Event received from stdin
AP name : crash_messaging, state : Disconnected
AP name : dnet1, state : Disconnected
... < list of APs > ...
Get AP list finished
Operation succeeded!
Background Scan Completed, error code : NONE
c
Event received from stdin
Input a part of AP name to connect : <AP name>
Passphrase required : TRUE
Input passphrase for dnet1 : <Password>