Flash an Image to RPI
This topic describes how to flash Tizen on an SD card and setting up Raspberry Pi 4.
NoteRaspberry Pi 3 was not supported since Tizen 8.0. Raspberry Pi 5 (64bit-only) can be using for experimental.
Supported systems
| Division | Ubuntu | Windows |
|---|---|---|
| Headless 32-bit | Yes | No |
| Headless 64-bit | Yes | No |
| Headed 32-bit | Yes | No |
| Headed 64-bit | Yes | No |
Prerequisites
Operating system
Ubuntu 18.04 LTS and later (Recommended to use Ubuntu 20.04 / 22.04)
Update EEPROM on RPi target
Tizen is using GPT partition since Tizen 7.0. It has to update the EEPROM that is supported GPT partition.
Important(If eeprom is upper than 2022.04.26 version, This step can be optional.)
Download binaries
You must have the supported binary images in your computer. To download the binary images, follow these steps:
-
Download images from Downloads.
-
Select Tizen-9.0 (or “Tizen” whichever is present) > Tizen-9.0-Unified (or “Tizen-unified” whichever is present) > latest > images > standard.
-
Download the compressed file for different devices or profiles from:
-
RPI4 Headless 32-bit:
- Boot Image (Until Tizen-9.0): tizen-boot-armv7l-rpi4/
- Boot Image: tizen-boot-armv7l-rpi/
- Platform Image: tizen-headless-armv7l/
-
RPI4 Headless 64-bit:
- Boot Image (Until Tizen-9.0): tizen-boot-arm64-rpi4/
- Boot Image: tizen-boot-aarch64-rpi/
- Platform Image: tizen-headless-aarch64/
-
RPI4 Headed 32-bit:
- Boot Image (Until Tizen-9.0): tizen-boot-armv7l-rpi4/
- Boot Image: tizen-boot-armv7l-rpi/
- Platform Image: tizen-headed-armv7l/
-
RPI4 Headed 64-bit:
- Boot Image (Until Tizen-9.0): tizen-boot-arm64-rpi4/
- Boot Image: tizen-boot-aarch64-rpi/
- Platform Image: tizen-headed-aarch64/
-
Flash through the command line
You can flash the SD card through the command line on a Linux computer. To flash the SD card for Raspberry Pi 4 or 5, follow the steps below:
-
Complete the following prerequisites:
-
Install the
pvpackage in the Linux computer:$ sudo apt-get install pv -
Ensure that you have an SD card of 16 GB or more.
-
Verify whether the binary image files are in your computer.
-
Fusing-script for Raspberry Pi 4 (fusing script is same for RPI5):
git clone git://review.tizen.org/git/platform/kernel/tizen-fusing-scripts -b tizen
cd tizen-fusing-scripts
$ ./scripts/sd_fusing.py
usage: sd_fusing.py [-h] [-b BINARIES [BINARIES ...]] [--create] [--debug] [-d DEVICE] [--format] [--log-level LOG_LEVEL] [--partition-size [PARTITION_SIZES ...]] [--size SIZE] -t TARGET [--update {a,b,ab}] [--version] [--YES] [--super_delivered]
-
-
Flash the SD card to ensure it is ready to be used for Tizen:
-
Insert an SD card to the Linux computer and verify its device node.
Warning
It MUST check the device node of SD-card on host PC side. Otherwise, other block device can be formatted. Follow the below step. To verify the device node:
-
Run the following command before inserting the SD card into the Linux computer:
$ ls -al /dev/sd*For example:
$ ls -al /dev/sd* brw-rw---- 1 root disk 8, 0 9 18 09:08 /dev/sda brw-rw---- 1 root disk 8, 1 9 18 09:08 /dev/sda1 brw-rw---- 1 root disk 8, 2 9 18 09:08 /dev/sda2 brw-rw---- 1 root disk 8, 5 9 18 09:08 /dev/sda5 -
Insert the SD card and type the same command again:
$ ls -al /dev/sd*For example:
$ ls -al /dev/sd*
brw-rw---- 1 root disk 8,  0  9 18 09:08 /dev/sda
brw-rw---- 1 root disk 8,  1  9 18 09:08 /dev/sda1
brw-rw---- 1 root disk 8,  2  9 18 09:08 /dev/sda2
brw-rw---- 1 root disk 8,  5  9 18 09:08 /dev/sda5
brw-rw---- 1 root disk 8, 16  9 22 14:59 /dev/sdb
brw-rw---- 1 root disk 8, 17  9 22 14:59 /dev/sdb1
brw-rw---- 1 root disk 8, 18  9 22 14:59 /dev/sdb2
brw-rw---- 1 root disk 8, 19  9 22 14:59 /dev/sdb3
brw-rw---- 1 root disk 8, 20  9 22 14:59 /dev/sdb4
brw-rw---- 1 root disk 8, 21  9 22 14:59 /dev/sdb5
brw-rw---- 1 root disk 8, 22  9 22 14:59 /dev/sdb6
brw-rw---- 1 root disk 8, 23  9 22 14:59 /dev/sdb7
The new
sdXnode (where X is a letter) is the device node for the SD card.In this example, the device node for the SD card is
sdb.
-
-
Download compatible boot and platform image according to target device.
-
Run the following commands:
$ sudo ./sd_fusing.py -d <SD card device node> -t <Target Board> --format
$ sudo ./sd_fusing.py -d <SD card device node> -b <Boot Image> <Platform Image> -t <Target Board>
For example:
$ sudo ./sd_fusing.py -d /dev/sdb -t rpi4 --format
$ sudo ./sd_fusing.py -d /dev/sdb -b tizen-unified_{DATE}_tizen-boot-armv7l-rpi4.tar.gz tizen-unified_{DATE}_tizen-headed-armv7l.tar.gz -t rpi4
-
-
Open the Smart Development Bridge (SDB) connection. For more information, see Set up Raspberry Pi 4.
Note
Repeat
sdb connect 192.168.1.11in the Linux shell (Linux) or the command window (Windows) whenever you power cycle the device, in order to reconnect the SDB tool.
Set up Raspberry Pi 4
Connect the board to the PC
To configure the Raspberry Pi board, follow the steps below:
-
Insert the SD card, in which Tizen Platform binaries and the drivers are flashed into the Raspberry Pi board.
-
For the serial communication connection:
-
Connect the host computer to the Raspberry Pi with a UART-to-USB dongle such as PL2303 or FT232 USB UART board.
To use the PL2303, connect the Raspberry Pi TXD0 pin (pin 8) to RXD on the UART board, RXD0 (pin 10) to TXD on the UART board, and the ground (pin 6) to GND on the UART board, and set the jumper switch to 3.3V (pin 1).
Note
Before using a UART-to-USB dongle, familiarize yourself with any hardware limitations it has by visiting the manufacturer’s website.
-
Execute a terminal program such as Minicom or PuTTY.
-
Minicom example:
Minicom can be used in Linux computer. Run the following command to run Minicom:
$ sudo minicom -c onTo configure Minicom:
- Go to the Minicom configuration settings menu by consecutively pressing
Ctrl + A,Z, andO(the letter O). - In the
Serial Devicefield, set the correct USB port for serial communication. The format is/dev/ttyUSBXwhereXequals the number of the port. - Modify the
Hardware Flow Controlfield toNo.
+-----------------------------------------------------------------------+
| A -    Serial Device      : /dev/ttyUSBX                              |
| B - Lockfile Location     : /var/lock                                 |
| C -   Callin Program      :                                           |
| D -  Callout Program      :                                           |
| E -    Bps/Par/Bits       : 115200 8N1                                |
| F - Hardware Flow Control : No                                        |
| G - Software Flow Control : No                                        |
In the serial shell, log in with
root/tizen:localhost login: root Password: tizen Welcome to Tizen - Go to the Minicom configuration settings menu by consecutively pressing
-
PuTTY example:
Download PuTTY from the Internet and launch PuTTY.
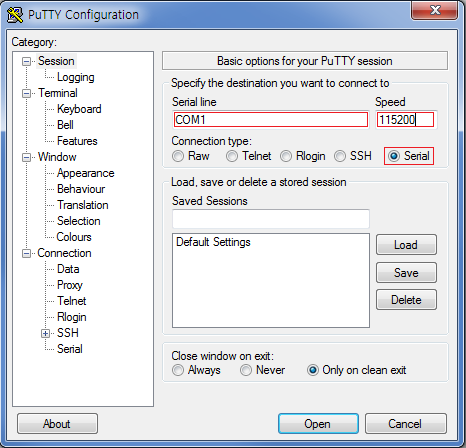
To configure PuTTY, follow the steps below:
- Select
Serialconnection type. - Enter the serial line number for the board connected to your computer (it can be COM
NwhereNis a natural number such as COM1, COM4, and so on) in theSerial linefield. - Type 115200 in the
Speedfield. - Click
Open.
In the serial shell, log in with
root/tizen:localhost login: root Password: tizen Welcome to Tizen - Select
-
-
-
For the SDB connection:
-
Connect the host computer to the Raspberry Pi through an Ethernet cable.
Note
If Ethernet ports are not available in the host computer or the Raspberry Pi, you can also use an
Ethernet-to-USBdongle. -
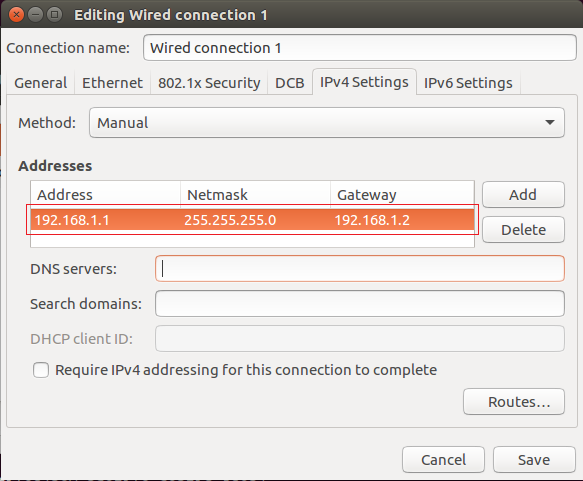
Set a new network interface in the host computer as shown in the following figures. This is a one time activity:
-
Linux computer.
-
Windows computer.
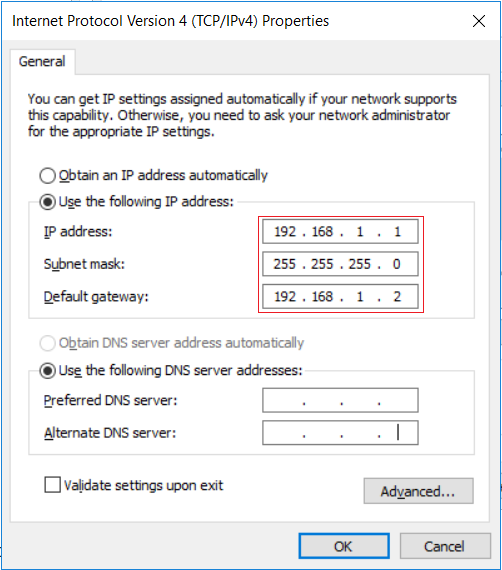
If you are using the Ethernet-to-USB dongle, you must install the proper driver for the dongle. If the network cable is connected correctly, you can find a new connection in Network and Sharing Center. In the new connection, enter the properties of IPv4, and configure as shown in the Windows computer figure.
-
-
-
Verify the IP address for eth0.
ifconfigIf the IP address for eth0 is 192.168.1.11, go to step 5. If not, set an IP address for the SDB connection in the serial shell of the Raspberry Pi using the
ifconfigcommand:ifconfig eth0 192.168.1.11 -
Connect Smart Development Bridge (SDB) in the Linux shell (Linux) or Command window (Windows) of the host computer:
sdb connect 192.168.1.11
sdb root on
For example, for Linux computer:
~$ sdb connect 192.168.1.11 * server not running. starting it now on port 26099 * * server started successfully * connecting to 192.168.1.11:26101 ... connected to 192.168.1.11:26101 ~$ sdb root on Switched to 'root' account mode ~$ -
Enter the
sdb helpcommand in the Linux shell (Linux) or Command window (Windows) of the host computer, for more information.Note
sdbexecution file is available in thetoolssub-directory of the directory where Tizen Studio is installed.
Install drivers
- Connect Smart Development Bridge (SDB) as described in Connect the board to the PC.
- Install the connectivity drivers for each board:
- Raspberry Pi 4
-
Download the plugin zip file from the Raspberry Pi 4(9.0) Plugin section at Tizen Device Firmware and follow the instructions.
-
For the case of the Linux shell (Linux), run the
shscript given in the instructions. For example:$ ./install_with_SDB.sh
-
- Raspberry Pi 4
Set up Wi-Fi
This section is not applicable if you want to connect your device to the SmartThings Cloud. In case of SmartThings devices, the device enables SoftAP mode during setup. Therefore, you need not switch to Wi-Fi separately.
You can set up a Wi-Fi connection by running wifi_manager_test and entering the options 1 > 3 > 9 > b > c. If you set up the connection once, it reconnects automatically the next time you power cycle the device.
# wifi_manager_test
Test Thread created...<Enter>
Event received from stdin
Network Connection API Test App
Options..
1   - Wi-Fi init and set callbacks
2   - Wi-Fi deinit(unset callbacks automatically)
3   - Activate Wi-Fi device
4   - Deactivate Wi-Fi device
5   - Is Wi-Fi activated?
6   - Get connection state
7   - Get MAC address
8   - Get Wi-Fi interface name
9   - Scan request
a   - Get Connected AP
b   - Get AP list
c   - Connect
d   - Disconnect
e   - Connect by wps pbc
f   - Forget an AP
g   - Set & connect EAP
h   - Set IP method type
i   - Set Proxy method type
j   - Get Ap info
k   - Connect Specific AP
l   - Load configuration
m   - Save configuration
n   - Remove configuration
o   - TDLS Discover
p   - TDLS Connect
q   - TDLS Connected peer
r   - TDLS Disconnect
s   - Connect Hidden AP
t   - Connect WPS PBC without SSID
u   - Connect WPS PIN without SSID
v   - Cancel WPS Request
w   - Set Auto Scan Enable-Disable
x   - Set Auto Scan Mode
y   - Get wifi scanning state
z   - Get Auto Scan Enable-Disable
A   - Get Auto Scan Mode
B   - Enable TDLS Channel Switch Request
C   - Disable TDLS Channel Switch Request
D   - Get Wi-Fi Module State
E   - BSSID Scan
F   - Add VSIE
G   - Get VSIE
H   - Remove VSIE
I   - Start Multi Scan
J   - Flush BSS
K   - Set auto connect mode
L   - Get auto connect mode
0   - Exit
ENTER  - Show options menu.......
Operation succeeded!
1
Event received from stdin
Wifi init succeeded
Operation succeeded!
3
Event received from stdin
Wi-Fi Activation Succeeded
Operation succeeded!
9
Event received from stdin
Interface name : wlan0
Operation succeeded!
b
Event received from stdin
AP name : crash_messaging, state : Disconnected
AP name : dnet1, state : Disconnected
... < list of APs > ...
Get AP list finished
Operation succeeded!
Background Scan Completed, error code : NONE
c
Event received from stdin
Input a part of AP name to connect : <AP name>
Passphrase required : TRUE
Input passphrase for dnet1 : <Password>