Emulator Extension Development Guide
You can develop various extensions for the emulator: QEMU, kernel, Emulator Manager, and Emulator Control Panel extensions.
Develop QEMU extensions
To develop a QEMU extension, follow the steps below:
- Develop your extension in a separate source directory.
For ease of management, you can usegit submoduleto handle theQEMUGit repository as a subdirectory. - Build the extension:
- Add your extension source code to a subdirectory under
<QEMU>/tizen/src/.
You can usegit submoduleto create the subdirectory from your source code directory, or link to it using a symbolic link. - Prepare the
configurescript.
Use the existingemulator_configure.shfile in the<QEMU>/tizen/directory as a template. - Run the
configurescript with the argument--extension-path = [extension directory], where the extension directory is a relative path starting from<QEMU>/tizen/src. - Run the
makecommand with the<QEMU>/tizen/Makefilefile.
If you usedgit submoduleto manage theQEMUrepository as a subdirectory, it can be convenient to create a wrapperMakefilein the parent directory.
- Add your extension source code to a subdirectory under
- After you have built and tested your extension, push your code to the
QEMUGit repository.
Develop kernel extensions
To develop a kernel extension, follow the steps below:
- Develop your extension in a separate source directory.
For ease of management, you can usegit submoduleto handle theemulator-kernelGit repository as a subdirectory. - Build the extension:
- Add your extension source code to a subdirectory under
<emulator-kernel>/drivers/maru/.
You can usegit submoduleto create the subdirectory from your source code directory, or link to it using a symbolic link. - Prepare the
defconfigfile.
Use the existingdefconfigfile as a template.
You can use a script to set the extension path at build time, or if the extension path is fixed, it can be hardcoded in thedefconfigfileCONFIG_MARU_EXTENSION_SOURCEandCONFIG_MARU_EXTENSION_SOURCE_PATHvariables. - Run the
makecommand with thedefconfigfile.
If you usedgit submoduleto manage theemulator-kernelrepository as a subdirectory, it can be convenient to create a wrapperMakefilein the parent directory.
- Add your extension source code to a subdirectory under
- After you have built and tested your extension, push your code to the
emulator-kernelGit repository.
Develop emulator manager extensions
Before developing Emulator Manager extensions, you must understand the structure of the Emulator Manager. The Emulator Manager has the following components:
em-lib.jarmanages the common parts of the UI and CLI. It loads the plugin.jarfile and the default property.xmlfile.em-3.0-ui.jarcontains the UI source, which is implemented using JavaFX. It loads the emulator UI template.xmlfile.em-cli.jarcontains the CLI source.
Figure: Emulator Manager structure
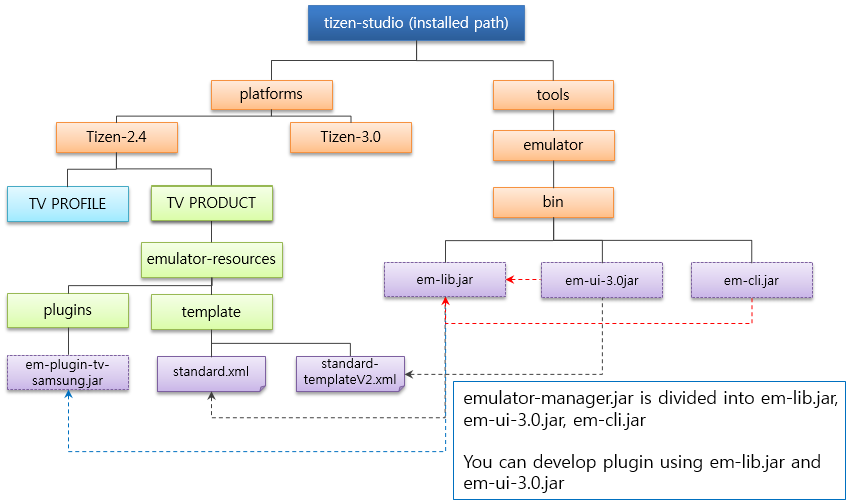
In Emulator Manager plugins:
- Each platform has separate files for its UI items and emulator options.
- Each profile has a separate plugin.
For example:em-plugin-mobile.jarem-plugin-wearable.jar
- The
templatedirectory contains.xmlfiles that define platform-specific UI and property values.
For example:X86-standard.xml(default property)X86-standard-template-v2.xml(UI template)
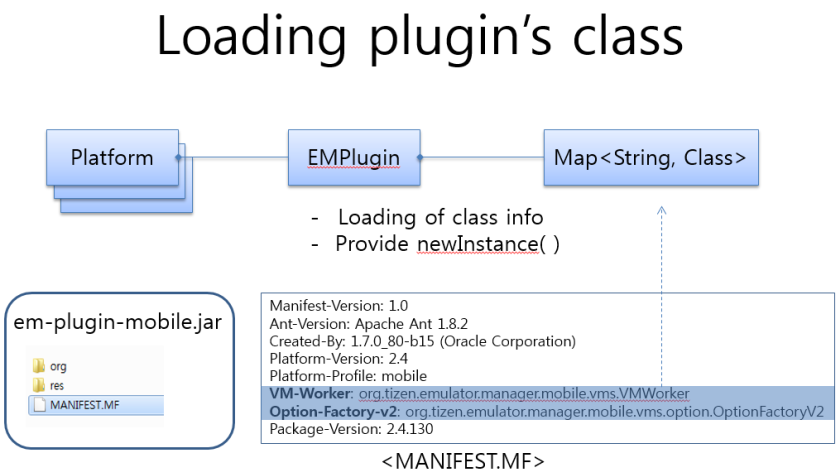
Extension points and their associated classes allow you to extend the features of Emulator Manager:
- The
Item-Factoryclass extends property view items in the UI.- Extension point:
org.tizen.emulator.manager.ui.item.ViewItemFactory
- Extension point:
- The
Option-Factory-v2class extends launch options.- Extension point:
org.tizen.emulator.manager.vms.option.IOptionFactory
- Extension point:
- The
Platform-Resource-Selectorclass selects whether to use platform resources.
You must specify the extension class in the MANIFEST.MF file of the plugin.
Figure: Loading a plugin class
The following figure describes how extension plugins implement new features in Emulator Manager.
Figure: Implementing a plugin class
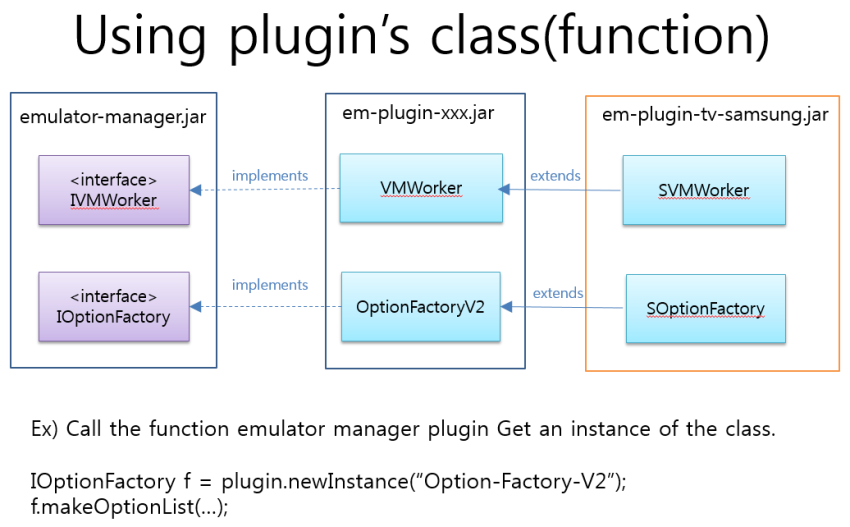
For example, you can create a UI extension to modify the launch options. This is implemented using the org.tizen.emulator.manager.vms.option.Option extension point. After creating a class instance, you can extend the OptionFactoryV2 class by using MakeOptionList to add a new option to the Common option list, or addOption to add a new option to a specific list item.
Develop emulator control panel extensions
The Emulator Control Panel extensions use 2 Git repositories:
- Lib, UI, and CLI code:
sdk/emulator/emulator-control-panel - Device code:
sdk/tools/emulator-control-panel-devices
To build an extension:
- Copy the external binaries.
- Copy the following binaries from
tizen-sdk/tools/emulator/binto the 2libsfolders in your project:args4j,jfxrt,jline,json-simple, andprotobuf
- Build the code:
- In the case of
lib,ui, andclilibraries, to build them all at once, enter theantshell command at the top level of your project. - In the case of devices:
- When building is complete, copy the built
libecp,emulator-control-panel.jar, andemulator-control-panel-cli.jarfiles tolibsin the devices project directory. - To build the
mobile,wearable, andtvprofiles all at once, enter theantshell command at the top level of your project. To build a specific profile only, you can specify, for example,ant -f ECP-DEVICE/build_mobile.xml.
- When building is complete, copy the built
- In the case of
- If you configure devices separately, you only need to push changes to the
emulator-control-panel-devicesrepository. - When building is complete, move the following files:
libecp.jar,emulator-control-panel.jar, andemulator-control-panel-cli.jartosdk/tools/emulator/bin- Device
xmlandjarfiles toplatforms/<version>/<profile>/emulator-resources/plugins- You must also rename the
.jarand.xmlfiles as ‘ecp-plugin-- . ’.
- You must also rename the
To execute the extension in Eclipse, follow these steps:
- Launch the Eclipse IDE.
- Import all the project files.
- In the run configuration, set the main project and class.
- Project:
ECP-UIfor UI orECP-CLIfor CLI - Main class:
org.tizen.ecp.EmulatorControlPanelfor UI ororg.tizen.cli.TizenEmulatorClifor CLI
- Project:
- In the run configuration, set the program arguments.
- vm_name: the name of vm instance
- base_port: this can be found the first item from the context menu when you right click on an emulator. The port indicates the connected sdb port, so you should subtract 1 to get the base port.
- platform_version: see below example
- profile: see below example For example:
vm_name=w-0906-1 base_port=26100 platform_version=tizen-2.3.2 profile=wearable<tizen-sdk>/platforms/<platform_version>/<profile> - In the run configuration, add the
ECP-DEVICESproject into class path and source path. - In the run configuration, enter the following VM arguments. This is needed in order to change the search option to find the device xml and jar location. Basically, non-develop mode of ECP searches 3 above relative directory to find sdk.info. If it is in develop mode, it searches the current directory and the executable binary directory.
-Ddevelop
- Create a symbolic link on a terminal to set target directory of Tizen studio. Tizen studio base location is used to find the target device xml and jar location, including extension version and profile location.
sdk.infofile is found based on the SDK installation path- For example:
emulator-control-panel/ECP-LIBln -s ~/tizen-studio/sdk.info sdk.info