
The Rotary Timer sample application demonstrates how you can design a timer with a rotary animation for a Gear device to fit in the circular UI.
The following figure illustrates the main screens of the Rotary Timer.
Figure: Rotary Timer screens
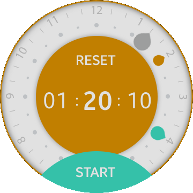
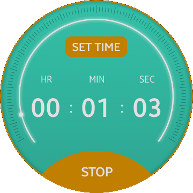
The application opens with the main screen that provides a hour, minute, and second indicators to set the timer.
To set the timer, rotate the bezel clockwise or counterclockwise. The hour, minute, and second indicators rotate to represent the set time.
Source Files
You can create and view the sample application project, including the source files, in the IDE.
| File name | Description |
|---|---|
| config.xml | This file contains the application information for the platform to install and launch the application, including the view mode and the icon to be used in the device menu. |
| css/style.css | This file contains the CSS styling for the application UI. |
| index.html | This is a starting file from which the application starts loading. It contains the layout of the application screens. |
| js/app.js | This file contains the code for handling the main functionality of the timer application. |
| js/page.js | This file contains the code for handling the page navigation functionality. |
Implementation
Application Layout
Add the page elements to the page controller. The page added first becomes the main page to show.
/* app.js */
/* Add both pages to the page controller */
pageController.addPage("page-main");
pageController.addPage("page-run");
Basic Operations
The entry point for the application is the js/app.js module, and the page module is required to run the application. Include both .js files.
<!--index.html-->
<script src="js/page.js"></script>
<script src="js/app.js"></script>
The js/app.js module registers callbacks for user events, such as the Back button or bezel rotation:
/* js/app.js */
function setDefaultEvents()
{
   window.addEventListener("tizenhwkey", keyEventHandler);
   document.addEventListener("rotarydetent", rotaryEventHandler);
   btnStart.addEventListener("click", function()
   {
      pageController.movePage("page-run");
      btnStop.style.backgroundImage = "url('./image/button_stop.png')";
      setting.timeRemain = setting.timeSet;
      animRequest = window.requestAnimationFrame(drawRunAnimationFrame);
   });
   btnStop.addEventListener("click", function()
   {
      if (animRequest)
      {
         stopRunAnimation();
         btnStop.style.backgroundImage = "url('./image/button_start.png')";
      }
      else
      {
         animRequest = window.requestAnimationFrame(drawRunAnimationFrame);
         btnStop.style.backgroundImage = "url('./image/button_stop.png')";
      }
   });
   btnSettime.addEventListener("click", function()
   {
      stopRunAnimation();
      pageController.moveBackPage();
   });
   btnReset.addEventListener("click", function()
   {
      setting.timeSet = 0;
      refreshMainTimeView();
   });
}
Animation Effects
To apply the animation effects:
-
In the timer running page, the drawRunAnimationFrame() method draws the animation of the remaining time indicator.
The remaining time is calculated by the difference of the timestamp with the previous method call.
/* js/app.js */ function drawRunAnimationFrame(timestamp) { /* Check timestamp of the last animation frame */ if (!animTimePrevFrame) { animTimePrevFrame = timestamp; } /* TimeElapsed is the sum of progress from each call */ setting.timeRemain -= (timestamp - animTimePrevFrame) / 1000; if (setting.timeRemain / setting.timeSet >= 0) { setText(document.querySelector("#text-run-hour"), addLeadingZero(Math.floor(setting.timeRemain / 3600), 2)); setText(document.querySelector("#text-run-minute"), addLeadingZero(Math.floor(setting.timeRemain / 60) % 60, 2)); setText(document.querySelector("#text-run-second"), addLeadingZero(Math.floor(setting.timeRemain) % 60, 2)); applyStyleTransition(elmDotProg, ROTATE_DATA_PROGRESS, "START", "END", 1 - (setting.timeRemain / setting.timeSet)); animTimePrevFrame = timestamp; animRequest = window.requestAnimationFrame(drawRunAnimationFrame); } else { stopRunAnimation(); pageController.moveBackPage(); } } -
The main code of the applyStyleTransition() method calculates the style value of a specific frame in a transitional animation.
Apply the calculated style value to each element to implement the animation effect.
/* js/app.js */
function applyStyleTransition(elm, dataArray, origPos, destPos, ratio)
{
   var valOrigStyle,
       valDestStyle,
       valAnimStyle;

   if (ratio > 1)
   {
      ratio = 1;
   }

   /* Calculate the style value of the element for the moment */
   Object.keys(dataArray[origPos]).forEach(function(key)
   {
      switch (key)
      {
         case "transform":
            /* Remove the "rotate(" string, then parse the float value */
            /* After parsing, calculate the result value and recover the prefix "rotate(" and suffix "deg)" */
            valOrigStyle = parseFloat(dataArray[origPos][key].substring(7));
            valDestStyle = parseFloat(dataArray[destPos][key].substring(7));
            valAnimStyle = "rotate(" + (valOrigStyle + (valDestStyle - valOrigStyle) * ratio) + "deg)";
            break;
         default:
            break;
      }

      elm.style[key] = valAnimStyle;
   });
}