
The Stop Watch sample application demonstrates how to create a simple stopwatch application.
The following figure illustrates the main stopwatch screen and the lap list screen.
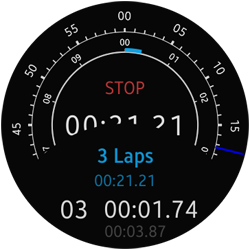
Figure: Stop Watch screens
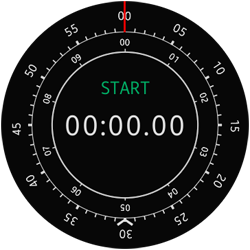
After the user clicks START, the application runs a digital clock showing the elapsed time with millisecond precision. The clock can be stopped and started in an instant at any time.
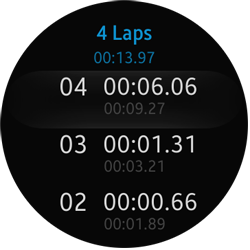
You can also add laps, by clicking LAP. To view the lap list, swipe up from the bottom of main page. To go back to the main view, use the device Back key or swipe down on the lap list page.
Source Files
You can create and view the sample application project including the source files in the IDE.
The application uses a simple MV (Model View) architecture. The js/core/ directory contains files that implement a simple AMD (Asynchronous Module Definition) and specify module defining.
| File name | Description |
|---|---|
| config.xml | This file contains the application information for the platform to install and launch the application, including the view mode and the icon to be used in the device menu. |
| css/style_gear.css | This file contains the CSS styling for the application UI. It styles the elements of the index.html file and templates. |
| index.html | This is a starting file from which the application starts loading. It contains the layout of the application screens. |
| js/app.js | This file contains the code for the main application module used for initialization. |
| js/core/ | This directory contains the core modules which determine the application architecture. |
| js/libs/ | This directory contains the TAU library and the circular phone helper. |
| js/models/timer.js | This file contains the timer object which provides the main stopwatch functionality. |
| js/views/initPage.js | This file manages low battery power and hardware key behavior. |
| js/views/stopWatchPage.js | This file contains the Stop Watch application. |
| templates/lapRow.tpl | This file contains the HTML template for the lap list element. |
Implementation
Application Layout
All UI pages are styled with the css/style_gear.css file that contains both common styling for all pages and styles for separate elements on each page.
The Stop Watch application consists of 2 pages defined in the index.html file:
<!--index.html-->
<div class="ui-page ui-page-active" id="stopwatch-page" data-scroll="none">
   <div class="ui-content" id="stopwatch-content-timer" data-scroll="none">
      <div class="progress-indicator lap-progress"></div>
      <div class="progress-indicator total-progress"></div>
      <div class="progress-indicator cue"></div>
      <canvas id="path-canvas" class="progress-indicator path-around" width="360" height="360"></canvas>
      <div class="touch-indicator top-indicator"></div>
      <div class="touch-indicator bottom-indicator"></div>
      <div class="main-control">
         <button indicator="top" type="button"
                 class="ui-btn ui-btn-footer-icon stopwatch-btn stopwatch-ready btn-play"
                 id="stopwatch-start-btn">START</button>
         <button indicator="top" type="button"
                 class="ui-btn ui-btn-footer-icon stopwatch-btn stopwatch-running btn-left btn-pause hidden"
                 id="stopwatch-stop-btn">STOP</button>
         <button indicator="top" type="button"
                 class="ui-btn ui-btn-footer-icon stopwatch-btn stopwatch-paused btn-left btn-restart hidden"
                 id="stopwatch-restart-btn">RESUME</button>
         <div id="stopwatch-wrapper">
            <div id="stopwatch-wrapper-frame">
               <div id="d0" class="digit d0 del"></div>
               <div id="d1" class="digit d0 del"></div>
               <div class="digit colon del"></div>
               <div id="d2" class="digit d0">0</div>
               <div id="d3" class="digit d0">0</div>
               <div class="digit colon">:</div>
               <div id="d4" class="digit d0">0</div>
               <div id="d5" class="digit d0">0</div>
               <div class="digit colon">.</div>
               <div id="d6" class="digit d0">0</div>
               <div id="d7"class="digit d0">0</div>
            </div>
         </div>
         <button indicator="bottom" type="button"
                 class="ui-btn ui-btn-footer-icon stopwatch-btn stopwatch-paused btn-right btn-stop hidden footer-button-last"
                 id="stopwatch-reset-btn">RESET</button>
         <div class="lap-section">
            <button indicator="bottom" type="button"
                    class="ui-btn ui-btn-footer-icon stopwatch-btn stopwatch-running btn-right btn-lap hidden footer-button-last"
                    id="stopwatch-lap-btn">LAP</button>
            <span class="lap-count"></span>
         </div>
      </div>
   </div>
</div>
To implement the screen elements:
- Time indicators
The Stop Watch application contains 2 rotating indicators:
<!--index.html-->
<div class="progress-indicator lap-progress"></div>
<div class="progress-indicator total-progress"></div>
The total time in minutes is also displayed as a blue arc around the dial's inner circle. The arc is drawn on the canvas element.
<!--index.html-->
<canvas id="path-canvas" class="progress-indicator path-around" width="360" height="360"></canvas>
- Digital timer
Every digit is held in a separate <div> element:
<!--index.html-->
<div id="stopwatch-wrapper-frame">
   <div id="d2" class="digit d0">0</div>
   <div id="d3" class="digit d0">0</div>
   <div class="digit colon">:</div>
   <div id="d4" class="digit d0">0</div>
   <div id="d5" class="digit d0">0</div>
   <div class="digit colon">.</div>
   <div id="d6" class="digit d0">0</div>
   <div id="d7" class="digit d0">0</div>
</div>
- Control buttons
The control buttons are placed above and below the digital timer.
-
The START, STOP and RESUME buttons are positioned above the digital timer. Only 1 button in this group is visible at a time.
<!--index.html-->
<button indicator="top" type="button"
        class="ui-btn stopwatch-btn stopwatch-ready btn-play"
        id="stopwatch-start-btn">START</button>

<button indicator="top" type="button"
        class="ui-btn stopwatch-btn stopwatch-running btn-left btn-pause hidden"
        id="stopwatch-stop-btn">STOP</button>

<button indicator="top" type="button"
        class="ui-btn stopwatch-btn stopwatch-paused btn-left btn-restart hidden"
        id="stopwatch-restart-btn">RESUME</button>
-
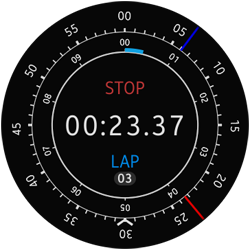
The LAP button is located below the digital timer. It is replaceable with the RESET button. As in the group above, only 1 button is visible at a time.
The lap counter is displayed under the LAP button when laps are set.
Figure: STOP and LAP buttons

<!--index.html-->
<button indicator="bottom" type="button"
        class="ui-btn ui-btn-footer-icon stopwatch-btn stopwatch-paused btn-right btn-stop hidden footer-button-last"
        id="stopwatch-reset-btn">RESET</button>

<div class="lap-section">
   <button indicator="bottom" type="button"
           class="ui-btn ui-btn-footer-icon stopwatch-btn stopwatch-running btn-right btn-lap hidden footer-button-last"
           id="stopwatch-lap-btn">LAP</button>
   <span class="lap-count"></span>
</div>
-
Stopwatch Functionality
The implementation of the stopwatch functionality is located in the js/views/stopWatchPage.js file.
This section explains how the Stop Watch application works and how the UI is updated.
Timer Implementation
To implement the timer:
-
At the application startup, a new timer instance is created. It dispatches a tick event every 10 milliseconds.
timer = new Timer(10, 'tick');
-
To implement the stopwatch functionality, define the Timer class:
/* js/models/timer.js */ function Timer(delay, callbacks) { this.reset(); this.callbacks = callbacks; this.delay = delay; this.id = setInterval(this.tick.bind(this), this.delay); } Timer.prototype = { pause: function pause() { /* Define content */ }, reset: function reset() { /* Define content */ }, run: function run() { /* Define content */ }, stop: function stop() { /* Define content */ }, getTimeElapsed: function getTimeElapsed() { /* Define content */ }, lap: function lap() { /* Define content */ }, tick: function tick() { /* Define content */ } }; -
The Timer class consists of the following methods:
- reset(): Resets the stopwatch and clears the laps.
- run(): Starts the stopwatch.
- lap(): Adds a lap.
- pause(): Pauses the stopwatch. The timing can be resumed later.
- stop(): Stops the stopwatch permanently. The timing cannot be resumed anymore.
- getElapsedTime(): Returns the elapsed time.
- tick(): The callback executed repeatedly while the stopwatch is not paused or stopped.
The constructor of the class gets a delay value and a callbacks array on input.
Firstly, the constructor resets the Timer instance by executing the reset() method. Next, it starts executing the tick() method repeatedly after every delay.
The reset() method initializes the internal variables:
- The status variable indicates status of the stopwatch. It is set as ready, which means that the stopwatch is initialized but not started yet.
- The startTime variable contains a timestamp where the stopwatch was started.
- The lapNo and lastLapTime variables are useful in creating laps.
/* js/models/timer.js */ reset: function reset() { this.status = 'ready'; this.startTime = null; this.lapNo = 1; this.lastLapTime = 0; } -
The tick() method executes callbacks if the timer is running:
/* js/models/timer.js */ tick: function tick() { var i; if (this.status !== 'running') { return this; } /* Execute the callbacks */ return this; } -
To run the timer, call the run() method.
The run() method checks the status value. If the stopwatch is in the ready state, the startTime variable is set as the current timestamp.
If the status variable has the paused value, the startTime variable is increased of the delay from the point in time when the stopwatch was paused until the current time.
If the stopwatch is stopped, the method throws an exception because the stopping operation is not changeable.
After the check, the status variable is set as the running value.
/* js/models/timer.js */ run: function run() { switch (this.status) { case 'ready': if (this.startTime === null) { this.startTime = Date.now(); } break; case 'paused': /* Adjust the startTime by the time passed since the pause so that the time elapsed remains unchanged */ this.startTime += Date.now() - this.timePaused; break; case 'running': /* Already running */ return this; case 'stopped': throw new Error('Can\'t run a stopped timer again'); } this.status = 'running'; return this; } -
The stopwatch can be paused when it is running. To pause the stopwatch:
/* js/models/timer.js */ pause: function pause() { if (this.status !== 'running') { throw new Error('Can pause only a running timer'); } this.status = 'paused'; this.timePaused = Date.now(); return this; } -
It is possible to register laps while a stopwatch is running. A lap is defined by the following class:
/* js/models/timer.js */

function lap(no, time)
{
   this.no = no;
   this.time = time;
}
An instance of the Lap class has 2 variables:
- no: Lap number
- time: Indicates how much time passed from the last lap to now.
To implement a method registering a lap, introduce a method returning information on how much time passed:
/* js/models/timer.js */
getTimeElapsed: function getTimeElapsed()
{
   if (this.status === 'running')
   {
      return Date.now() - this.startTime;
   }
   if (this.status === 'paused')
   {
      return this.timePaused - this.startTime;
   }

   return 0;
}
The following function registers a lap:
/* js/models/timer.js */ lap: function lap() { var lapObj = new Lap(this.lapNo, /* The lap time is the total time minus the previous lap time */ this.getTimeElapsed() - this.lastLapTime); this.lastLapTime = this.getTimeElapsed(); this.lapNo += 1; return lapObj; } -
When the Timer instance is no longer needed, it can be stopped permanently by calling the following stop() method:
/* js/models/timer.js */
stop: function stop()
{
   clearInterval(this.id);
   this.status = 'stopped';
   this.timePaused = null;

   return this;
}
Actions
The stopwatch has the following actions:
- Start and Resume
Starts the stopwatch.
- Stop
Pauses the stopwatch.
- Reset
Sets the timer to 0, resets the current laps, and wipes the lap list.
/* Reset to zero */ /* Works when the timer is stopped (paused) */ function reset() { timer.reset(); currentLap = null; document.getElementById('stopwatch-lap-list').innerHTML = ''; lapCount.innerText = ''; refreshTimer(); showButtons(); lapCount.classList.remove('visible'); lapCounterElement.innerHTML = '0 Laps'; } - Lap
Adds a new lap.
/* stopWatchPage.js */
currentLap = timer.lap();

currentLapLeadingZero = currentLap.no > 9 ? currentLap.no : '0' + currentLap.no;

stopLapListEl = stopLapListEl || document.getElementById('stopwatch-lap-list');

updateLapListHeader(currentLap.no);

/* Build and append the new lap list element of the core template module */
html = tpl.get('lapRow',
{
   no: currentLapLeadingZero,
   totalTime: new Time(timer.getTimeElapsed()),
   lapTime: new Time(currentLap.time)
});

newItem = document.createElement('li');
newItem.className = 'stopwatch-lap-row'
newItem.innerHTML = html;

if (stopLapListEl.firstChild)
{
   stopLapListEl.insertBefore(newitem, stopLapListEl.firstChild);
}
else
{
   stopLapListEl.appendChild(newitem);
}

stopContentListLapEl.scrollTop = 0;
stopContentListLapElScrollTop = 0;

/*
   All buttons are connected with touch indicators by HTML attribute
   which is why every button press causes a tap animation
*/
lapCount.innerText = currentLapLeadingZero;
lapCount.classList[currentLap ? 'add' : 'remove']('visible');
cueIndicator.classList.add('animate');

/* Every action calls the button status update at the end */
setTimeout(function removeClass()
{
   cueIndicator.classList.remove('animate');
}, CUE_RESTORE_TIMEOUT);
Updating Counters and Indicators
To update the counters and indicators:
-
All elements are updated by the refreshTimer() method, which is called on the tick event:
/* views/stopWatchPage.js */ function refreshTimer() { /* Array of digits @type {array} */ var elapsedTimestamp = timer.getTimeElapsed(), lastLapTimestamp = timer.lastLapTime, time = new Time(elapsedTimestamp), i, element; for (i = time.length - 1; i >= 0; i -= 1) { element = document.getElementById('d' + i); element.classList.remove('d0', 'd1', 'd2', 'd3', 'd4', 'd5', 'd6', 'd7', 'd8', 'd9'); element.classList.add('d' + time[i]); element.innerText = time[i]; } totalProgress.style.webkitTransform = 'rotateZ(' + elapsedTimestamp / 1000 / 15 / 2 * Math.PI + 'rad)'; lapProgress.style.webkitTransform = 'rotateZ(' + (elapsedTimestamp - lastLapTimestamp) / 1000 / 15 / 2 * Math.PI + 'rad)'; redrawCanvas(elapsedTimestamp); timeCounterElement = timeCounterElement || document.querySelector('#lap-list-page .time-counter'); if (stopContentListLapEl.classList.contains('ui-page-active')) { timeCounterElement.innerText = elapsedTimestamp; } if (currentLap) { updateLapListHeader(currentLap.no); } return time; } -
On every tick event, a digital stopwatch is built with use of the timer helper Time (Time = req.helpers.timer.Time).
The rotating indicators are updated by using the –webkit-transform: rotate with the counted value.
/* views/stopWatchPage.js */ totalProgress.style.webkitTransform = 'rotateZ(' + elapsedTimestamp / 1000 / 15 / 2 * Math.PI + 'rad)'; lapProgress.style.webkitTransform = 'rotateZ(' + (elapsedTimestamp - lastLapTimestamp) / 1000 / 15 / 2 * Math.PI + 'rad)'; -
Repaint the canvas element:
/* views/stopWatchPage.js */ /* Repaints the progress bar @param {number} ts Total time in milliseconds */ function redrawCanvas(ts) { roundProgressCanvasContext.clearRect(0, 0, 360, 360); roundProgressCanvasContext.beginPath(); roundProgressCanvasContext.arc(180, 180, 180, INDICATOR_START_ANGLE, INDICATOR_START_ANGLE + (ts / 1000 / 60 * Math.PI * 2 / 10) % (Math.PI * 2)); roundProgressCanvasContext.stroke(); } -
At the end, if a lap is added, the counter on the lap list page is updated:
/* views/stopWatchPage.js */
if (stopContentListLapEl.classList.contains('ui-page-active'))
{
   timeCounterElement.innerText = elapsedTimestamp;
}

if (currentLap)
{
   updateLapListHeader(currentLap.no);
}
Changing Active Application Pages
This application has a custom page transition which allows you to use a swipe gesture to display the lap list page.
There are marked HTML elements that you can drag.
<!--index.html-->
<div class="ui-header" data-draggable="true">
   <span class="lap-counter" data-draggable="true"> 0 laps </span>
   <span class="time-counter" data-draggable="true"> 00:00.00 </span>
</div>
Dragging these elements causes the lap list page to move by binding touch events to them.
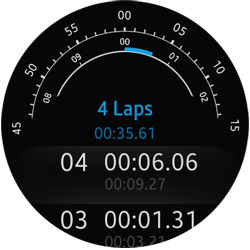
Figure: Lap list page being swiped up
/* views/stopWatchPage.js */
/*
   Draggable elements.
   @type {DOMCollection}
*/
dragElements = lapListPage.querySelectorAll('[data-draggable]'),
                                            /* Binds touch events to specified elements */
                                            Array.prototype.slice.apply(dragElements)
                                            .map(function bindEvents(elem)
                                            {
                                               elem.addEventListener('touchstart', showLapList, true);
                                               elem.addEventListener('touchmove', moveLapList, true);
                                               elem.addEventListener('touchend', moveLapList, true);
                                            });