
The Alarm sample application demonstrates how you can create a simple alarm application UI using the TAU (Tizen Advanced UI).
The application contains an animated alarm list UI and indicator screens for adding an alarm:
- The alarm list uses the toggle 2-line list in the TAU.
You can change the image for the on or off alarm button by customizing the relevant CSS file class.
- The indicator page that sets the alarm time and repeat period contains a TAU PageIndicator component.
This application is only a UI sample, so there are no alarm functions.
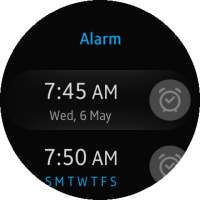
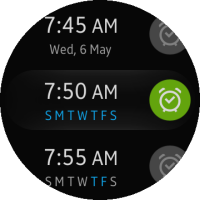
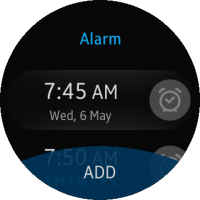
The following figure illustrates the main screens of the Alarm.
Figure: Alarm screens
Source Files
You can create and view the sample application project, including the source files, in the IDE.
| File name | Description |
|---|---|
| config.xml | This file contains the application information for the platform to install and launch the application, including the view mode and the icon to be used in the device menu. |
| css/style.css | This file contains the CSS styling for the TAU (Tizen Advanced UI). |
| index.html | This is a starting file from which the application starts loading. It contains the layout of the application screen, the registered alarm list, and the layout of the indicator screen. |
| js/animation.js | This file contains the methods for the animation effect of the alarm list. |
| js/app.js | This file contains the method for common page functions. |
| js/circle-helper.js | This file contains the method for the rounded scroller effect. |
| js/pageindicator.js | This file contains the method for the indicator section changer effect. |
Implementation
To define the application layout:
-
Create the main page (alarm list page). This page consists of a toggle 2-line list of TAU with a toggle button and 2 lines.

<!--Main page-->
<div id="main-page" class="ui-page">

   <!--Header-->
   <header class="ui-header">
      <h2 class="ui-title">Alarm</h2>
   </header>

   <!--Content-->
   <div class="ui-content">
      <ul class="ui-listview">
         <li class="li-has-multiline li-has-toggle">
            <label>
               <div class="alarm-list ">
                  <div class="time-container">
                     <span class="time">7:45</span>
                     <span class="ampm">AM</span>
                  </div>
                  <div class="li-text-sub ui-li-sub-text date-container">
                     <span class="normal">Wed, 6 May</span>
                  </div>
               </div>
               <div class="ui-toggleswitch">
                  <input type="checkbox" class="ui-switch-input">
                  <div class="ui-switch-button"></div>
               </div>
            </label>
         </li>
         <li class="li-has-multiline li-has-toggle">
            <label>
               <div class="alarm-list ">
                  <div class="time-container">
                     <span class="time">7:50</span>
                     <span class="ampm">AM</span>
                  </div>
                  <div class="li-text-sub ui-li-sub-text date-container">
                     <span class="select">S M T W T F S</span>
                  </div>
               </div>
               <div class="ui-toggleswitch">
                  <input type="checkbox" class="ui-switch-input">
                  <div class="ui-switch-button"></div>
               </div>
            </label>
         </li>
         <li class="li-has-multiline li-has-toggle">
            <label>
               <div class="alarm-list ">
                  <div class="time-container">
                     <span class="time">7:55</span>
                     <span class="ampm">AM</span>
                  </div>
                  <div class="li-text-sub ui-li-sub-text date-container">
                     <span class="normal">S M T W</span>
                     <span class="select">T F</span>
                     <span class="normal">S</span>
                  </div>
               </div>
               <div class="ui-toggleswitch">
                  <input type="checkbox" class="ui-switch-input">
                  <div class="ui-switch-button"></div>
               </div>
            </label>
         </li>
         <li class="li-has-multiline li-has-toggle">
            <label>
               <div class="alarm-list ">
                  <div class="time-container">
                     <span class="time">8:00</span>
                     <span class="ampm">AM</span>
                  </div>
                  <div class="li-text-sub ui-li-sub-text date-container">
                     <span class="normal">Wed, 7 May</span>
                  </div>
               </div>
               <div class="ui-toggleswitch">
                  <input type="checkbox" class="ui-switch-input">
                  <div class="ui-switch-button"></div>
               </div>
            </label>
         </li>
      </ul>
   </div>

   <!--Footer-->
   <footer class="ui-footer ui-bottom-button">
      <button class="ui-btn" id="add-alarm-button">ADD</button>
   </footer>
</div>
You can change the toggle images of the toggle alarm button in the alarm list. To change the images, use the ui-switch-input and ui-switch-button classes in the style.css file. You can also use your own images instead of the alarm_list_icon_bg.png and alarm_list_icon.png sample files.
/* css/style.css */
/* Alarm list toggle image */
.ui-toggleswitch .ui-switch-input
{
   -webkit-mask-image: url("../images/alarm_list_icon_bg.png");
}

.ui-toggleswitch .ui-switch-activation::before,
.ui-toggleswitch .ui-switch-button::before
{
   -webkit-mask-image: url("../images/alarm_list_icon.png");
}

.ui-toggleswitch .ui-switch-activation::after,
.ui-toggleswitch .ui-switch-button::after
{
   -webkit-mask-image: url("../images/alarm_list_icon.png");
}
If you use the above source code, the footer button is always shown on the screen.
To change the footer position to the end of the list, add the following code to the style.css file:
/* css/style.css */
/* Alarm list footer */
.ui-page .ui-footer.ui-bottom-button
{
   position: relative !important;
   height: 100px;
   overflow: hidden;
}
Create the second page, which is used for adding alarms. You can also set the time and alarm repetition. This page contains a page indicator.
When you use a page indicator, you can change the options, such as the number of pages, circular functionalities, and bouncing effect in the pageindicator.js file.
In this application, create 2 indicator pages with 2 section elements in the index.html file:
<!--Alarm set page-->
<!--This page is the alarm set page, where you can set the alarm time and repeat information-->
<!--This page consists of 2 indicator pages-->
<!--The one is the set time page and the other is the set repeat page-->
<div id="alarm-set-page" class="ui-page" data-enable-page-scroll="false">
   <div id="indicator" class="ui-page-indicator"></div>
   <div id="sectionchanger-newalarm" class="ui-content">
      <div>
         <section class="ui-section-active">
            <!--First page-->
         </section>
         <section>
            <!--Second page-->
         </section>
      </div>
   </div>
</div>
- Change 'circular: true' to 'circular: false' in the pageindicator.js file:
/* pageindicator.js */ /* Make only 2 indicators */ page.addEventListener("pagebeforeshow", function(event) { /* pageIndicator consists of sections */ /* 'numberOfPages' is the number of section elements in the 'sectionchanger' */ pageIndicator = tau.widget.PageIndicator(elPageIndicator, {numberOfPages: sections.length}); /* First section's state is set as 'active' */ pageIndicator.setActive(0); /* Make the 'sectionchanger' object non-circular and horizontal, and use a bouncing effect */ sectionChanger = new tau.widget.SectionChanger(changer, { circular: false, orientation: "horizontal", useBouncingEffect: true }); }); - Add a header to both sections:
<!--index.html-->
<section class="ui-section-active">
   <header class="ui-header">
      <h2 class="ui-title">Set alarm</h2>
   </header>
</section>
<section>
   <header class="ui-header">
      <h2 class="ui-title">Repeat</h2>
   </header>
</section>
- The footer is a common item, so add a footer at the end of the page:
<!--index.html-->
<footer class="ui-footer ui-bottom-button ui-fixed">
   <button id="pageIndicatorFooterButton" class="ui-btn">SET</button>
</footer>
- Add content for setting the time and repeat period in the sections:
<!--index.html-->
<section class="ui-section-active">
   <!--Header-->

   <p class="set-time-unit"><span>Hrs</span><span class="set-time-unit-min">Mins</span></p>
   <p class="set-time"><span class="set-time-hour">08</span>:<span class="set-time-min">20</span></p>
</section>
<section>
   <!--Header-->

   <!--There are 7 repeat toggle buttons-->
   <!--From Sunday to Saturday-->
   <!--If these buttons are set, the  'data-state' value is '1' -->
   <!--The handler for these buttons is in the app.js file-->
   <div id="repeat1" class="repeat-toggle" data-status="0">S</div>
   <div id="repeat2" class="repeat-toggle" data-status="0">M</div>
   <div id="repeat3" class="repeat-toggle" data-status="0">T</div>
   <div id="repeat4" class="repeat-toggle" data-status="0">W</div>
   <div id="repeat5" class="repeat-toggle" data-status="0">T</div>
   <div id="repeat6" class="repeat-toggle" data-status="0">F</div>
   <div id="repeat7" class="repeat-toggle" data-status="0">S</div>
</section>
- The toggle event for the repeat button is made in the app.js file:
/* js/app.js */
/* Bind the event for toggling the repeat button in 'indicator-page' */
/* There are 7 toggle buttons for Sunday, Monday, Tuesday, Wednesday, Thursday, Friday, and Saturday */
for (i = 1; i <= 7 ; i++)
{
   repeatToggle = document.querySelector("#repeat" + i);
   repeatToggle.addEventListener("click", toggleRepeatButtonHandler);
}

function toggleRepeatButtonHandler(event)
{
   if (event.target.getAttribute("data-status") === "0")
   {
      event.target.setAttribute("data-status", "1");
      event.target.style.backgroundColor = "rgba(18,180,255,100)";
      event.target.style.backgroundImage = "none";
   }
   else
   {
      event.target.setAttribute("data-status", "0");
      event.target.style.backgroundColor="transparent";
      event.target.style.backgroundImage = "url('./images/alarm_repeat_bg.png')";
   }
}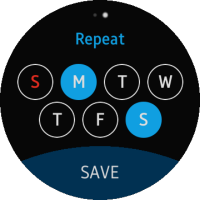
- Change 'circular: true' to 'circular: false' in the pageindicator.js file: