
The Voice Memo sample application demonstrates how you can create a voice memo application with the formal Tizen UI/UX using TAU (Tizen Advanced UI Framework).
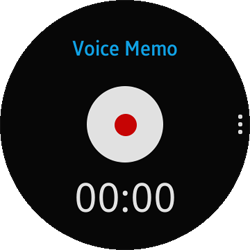
The application opens with the main screen, which shows a recording button in the middle:
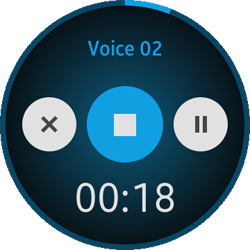
- When the recording button is clicked, the recording view opens, showing a stop button with cancel and pause buttons. It also displays a circular progress bar around the edge of the screen.
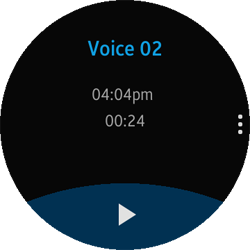
- When the stop button is clicked, the application automatically saves what has been recorded and displays a view where you can play the recording. Since the gear device does not provide a physical speaker, it requires you to connect the device to a Bluetooth headset to hear the recording.
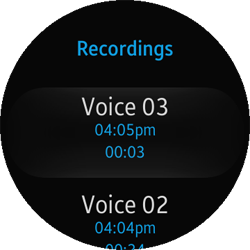
The application provides a list view which can be accessed from the main screen by clicking the more options button with 3 dots on the right. It lists the recorded files in a reverse chronological order. You can also play the recordings from the list.
The following figure illustrates the main screens of the Voice Memo application.
Figure: Voice Memo screens
Source Files
You can create and view the sample application project including the source files in the IDE.
| File name | Description |
|---|---|
| config.xml | This file contains the application information for the platform to install and launch the application. |
| css/style.css | This file contains the CSS styling for the application UI. |
| img/ | This directory contains the images used in the application. |
| index.html | This is a starting file from which the application starts loading. It contains the layout of the application screens. |
| js/app.js | This file contains the code for the main functionalities of the application. |
| js/list.js | This file contains the code for customizing the TAU list component. |
| js/moreoptions.js | This file contains the code for customizing the TAU more options component. |
| js/progress.js | This file contains the code for customizing the TAU progress bar component. |
Implementation
To define the application layout and initialize the application view:
-
The basic application layout is defined in the index.html file.
The application is composed of 3 different pages:
- Main page for the recording and standby mode
- List page for the list of voice recordings
- Play page for the play mode
Each page is created as a <div> element with the ui-page class using TAU.
<!--index.html-->
<body>
   <!--Main page-->
   <div class="ui-page" id="main" data-enable-page-scroll="false">
   </div>

   <!--List page-->
   <div class="ui-page" id="list" data-enable-page-scroll="true">
   </div>

   <!--Play page-->
   <div class="ui-page" id="play" data-enable-page-scroll="false">
   </div>
</body>
-
The buttons on the main page are created using the -webkit-mask CSS property.
For example, the standby button is created as shown in the following example. The -webkit-mask-image property clips the visible portion of an element according to the mask image transparency.
<!--index.html--> <!--Main page: Content: Standby--> <div id="voice-recorder-start" class="stand-by"> <div id="voice-recorder-stop-bg"></div> <div id="voice-recorder-stop-icon"></div> </div> <!--css/style.css--> <!-------MAIN PAGE: STANDBY-------> #voice-recorder-stop-bg { position: absolute; top: 0; width: 100%; height: 100%; background-color: rgb(255, 255, 255); -webkit-mask-image: url("../image/voicerecorder_stop_bg.png"); -webkit-mask-size: 126px 126px; -webkit-mask-repeat: no-repeat; z-index: 1; } #voice-recorder-stop-icon { position: absolute; top: 0; width: 100%; height: 100%; background-color: rgb(224, 4, 4); -webkit-mask-image: url("../image/voicerecorder_stop_icon.png"); -webkit-mask-size: 126px 126px; -webkit-mask-repeat: no-repeat; z-index: 2; } -
The more options button is created in the header section of the page using a <button> element with the ui-more ui-icon-overflow class.
The more options pop-up page is created using a <div> element with the ui-popup class and moreoptionsPopupCircle ID name. The ID is used later in the moreoption.js file to identify the pop-up page to customize it.
<!--index.html-->
<!--Main page: Popup: More options-->
<div id="moreoptionsPopupCircle" class="ui-popup">
   <div id="selector" class="ui-selector">
      <div id="to-list" class="ui-item list-icon" data-title="List"></div>
   </div>
</div>

<!--Main page: Header-->
<header class="ui-header ui-has-more">
   <h2 id="recording-title" class="ui-title">Voice Memo</h2>
   <button id="main-moreoptions" type="button" class="ui-more ui-icon-overflow">More Options</button>
</header>
The actual view of the more options pop-up page is created and destroyed dynamically as the main page appears and disappears:
/* js/app.js */ function init() { /* Add event listeners for tauMoreOptions components */ document.querySelector("#main").addEventListener("pagebeforeshow", function() { tauMoreOptions.pageBeforeShowHandler("#main"); }); document.querySelector("#main").addEventListener("pagebeforehide", tauMoreOptions.pageHideHandler); } /* js/moreoptions.js */ /* Handle events before the more options page shows @public @param {String} pageId - ID of the page with the more options component */ tauMoreOptions.pageBeforeShowHandler = function(pageId) { var radius = window.innerHeight / 2 * 0.8; page = document.querySelector(pageId); popup = page.querySelector("#moreoptionsPopup"); handler = page.querySelector(".ui-more"); popupCircle = page.querySelector("#moreoptionsPopupCircle"); elSelector = page.querySelector("#selector"); clickHandlerBound = clickHandler.bind(null); clickElSelectorBound = clickElSelector.bind(null); handler.addEventListener("click", clickHandlerBound); elSelector.addEventListener("click", clickElSelectorBound); if (tau.support.shape.circle) { selector = tau.widget.Selector(elSelector, { itemRadius: radius }); } }; /* Handle events before the more options page hides @public */ tauMoreOptions.pageHideHandler = function() { handler.removeEventListener("click", clickHandlerBound); elSelector.removeEventListener("click", clickElSelectorBound); if (tau.support.shape.circle) { selector.destroy(); } }; -
The circle progress bar is also created and destroyed dynamically as the recording starts and ends:
/* js/app.js */
/*
   Change the view when recording starts
   @public
*/
uiEvents.startRecording = function()
{
   tauProgress.pageBeforeShowHandler();
};

/*
   Change the view when recording stops
   @public
*/
uiEvents.stopRecording = function()
{
   tauProgress.pageHideHandler();
};
After figuring out the shape of the screen, the progress bar component is created accordingly:
/* js/progress.js */
/*
   Handle events before the progress bar page shows
   @public
*/
tauProgress.pageBeforeShowHandler = function()
{
   if (tau.support.shape.circle)
   {
      /* Make a circle progress bar object */
      if (!progressBar)
      {
         progressBar = document.getElementById("circleprogress");
      }

      /* Make a circle progress bar object (tau) */
      progressBarWidget = new tau.widget.CircleProgressBar(progressBar,
      {
         size: "full"
      });
   }
};

/*
   Handle events before the progress bar page hides
   @public
*/
tauProgress.pageHideHandler = function()
{
   /* Release the progress bar object */
   if (progressBarWidget)
   {
      clearVariables();
      progressBarWidget.destroy();
   }
};
The method for changing the status of the progress bar is also handled in the progress.js file:
/* js/progress.js */
/*
   Fill in the progress bar as time passes
   @public
*/
tauProgress.changeProgressValue = function()
{
   /* Get the current value of progress bar and convert it into float */
   var value = parseFloat(progressBarWidget.value());

   /* Circle must be filled full when it reaches the max amount of recording time */
   /* Value increases by 100 / MAX_DURATION SEC every 1 second */
   if (value < app.MAX_DURATION_SEC)
   {
      value += (100 / app.MAX_DURATION_SEC);
   }
   else
   {
      value = app.MAX_DURATION_SEC;
   }

   /* Set the new value of the progress bar */
   progressBarWidget.value(value);
};