
The WebWorkerTimer sample application demonstrates how you can use the Web workers.
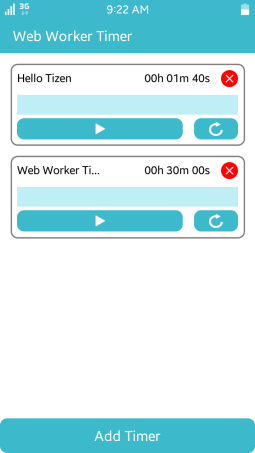
The application opens with the main screen that shows the Web worker timer list.
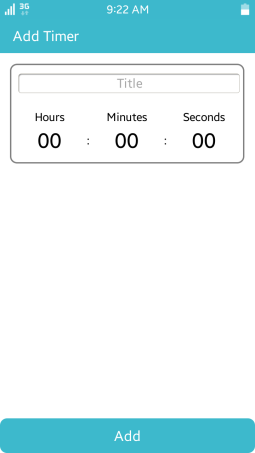
To add a new timer, click Add Timer, define the timer details, and click Add.
The following figure illustrates the main screens of the WebWorkerTimer.
Figure: WebWorkerTimer screens
Source Files
You can create and view the sample application project, including the source files, in the IDE.
| File name | Description |
|---|---|
| config.xml | This file contains the application information for the platform to install and launch the application, including the view mode and the icon to be used in the device menu. |
| css/style.css | This file contains the CSS styling for the application UI. |
| index.html | This is a starting file from which the application starts loading. It contains the layout of the application screens. |
| js/app.js | This file contains the application code. |
| js/timerWorker.js | This file contains the Web worker timer code. |
Implementation
Defining the Application Layout
To define the application layout:
-
In the index.html file, create a <div> element for each component in the page-main main screen:
<!--index.html-->
<div class="page active" id="page-main">
   <div class="page-header">
      <p>Web Worker Timer</p>
   </div>
   <div class="page-content">
      <div class="content-list" id="timer-list"></div>
   </div>
   <div class="page-footer">
      <div class="footer-button" id="main-add-btn">
         <p>Add Timer</p>
      </div>
   </div>
</div>
-
In the index.html file, create a <div> element for each component in the page-add-timer timer addition screen:
<!--index.html-->
<div class="page" id="page-add-timer">
   <div class="page-header">
      <p>Add Timer</p>
   </div>
   <div class="page-content">
      <table class="add-timer-form">
         <tr>
            <td colspan="5">
               <input type="text" name="title" id="add-timer-title" placeholder="Title"/>
            </td>
         </tr>
         <tr>
            <td>Hours</td>
            <td></td>
            <td>Minutes</td>
            <td></td>
            <td>Seconds</td>
         </tr>
         </tr>
         <tr>
            <td>
               <select class="add-timer-select" id="add-timer-hour"></select>
            </td>
            <td>:</td>
            <td>
               <select class="add-timer-select" id="add-timer-min"></select>
            </td>
            <td>:</td>
            <td>
               <select class="add-timer-select" id="add-timer-sec"></select>
            </td>
         </tr>
      </table>
   </div>
   <div class="page-footer">
      <div class="footer-button" id="timer-add-btn">
         <p>Add</p>
      </div>
   </div>
</div>
-
Set the styles for the page header, content, and footer in the style.css file:
<!--css/style.css--> .page-header { height: 8%; width: 100%; padding-left: 5%; background: #3db9cc; color: #ffffff; font-size: 20px; font-weight: 500; -webkit-box-pack: justify; } .page-content { height: 84%; width: 100%; overflow: scroll; } .page-footer { height: 8%; width: 100%; } -
Set the styles for the timer list item in the style.css file:
<!--css/style.css--> .list-item { width: 92%; -webkit-box-pack: justify; border: solid 2px #d3d3d3; border-radius: 10px; margin: auto; margin-top: 4%; padding: 2%; display: table; table-layout: fixed; } -
Set the styles for the list item components in the style.css file:
<!--css/style.css-->
.item-header
{
   height: 30px;
}

.item-title
{
   white-space: pre;
   float: left;
   width: 40%;
   height: 24px;
   line-height: 24px;
   overflow: hidden;
   text-overflow: ellipsis;
}

.item-time
{
   float: right;
   margin-right: 5%;
   width: 35%;
   height: 24px;
   line-height: 24px;
   text-align: right;
}

.item-delete-btn
{
   float: right;
   width: 24px;
   height: 24px;
   background-color: #ff0000;
   border-radius: 100%;
   background-image: url("../images/delete.png");
   background-size: 20px 20px;
   background-repeat: no-repeat;
   background-position: center;
}
Adding List Items
Add a timer list item by using the addTimer() method and creating a <div> element:
/* Create a list item container */
listItem = createDiv("list-item");

/* Create an item header container */
listItemHeader = createDiv("item-header");

/* Create a title and time DIV, and a delete button */
listItemTitle = createDiv("item-title");
listItemTitle.appendChild(document.createTextNode(title));
listItemDeleteButton = createDiv("item-delete-btn");
listItemTime = createDiv("item-time");
listItemTime.appendChild(document.createTextNode(getTimeString(time)));

/* Append item header's children */
listItemHeader.appendChild(listItemTitle);
listItemHeader.appendChild(listItemDeleteButton);
listItemHeader.appendChild(listItemTime);

/* Create a progress bar */
listItemProgress = createDiv("item-progress");
listItemProgressBar = createDiv("progress-bar");
listItemProgress.appendChild(listItemProgressBar);
Using Web Workers
To use the Web workers:
-
Bind the event listener, which is triggered when the Web worker receives a message:
/* js/timerWorker.js */ self.onmessage = function(e) { if (e.data.message === "INIT") { /* When you receive "INIT" message, initialize timerWorker */ time = e.data.time; currentTime = e.data.time; isRunning = false; } else if (e.data.message === "START") { /* When you receive "START" message, toggle state of isRunning and set or clear interval event */ if (isRunning) { self.postMessage("PAUSE"); clearInterval(intervalHandler); isRunning = false; } else { self.postMessage("START"); intervalHandler = setInterval(timerOn, 1000); isRunning = true; } } else if (e.data.message === "RESET") { /* When you receive "RESET" message, change isRunning to false and clear interval event */ clearInterval(intervalHandler); isRunning = false; currentTime = time; self.postMessage("RESET"); } }; function timerOn() { currentTime--; self.postMessage(currentTime); if (currentTime === 0) { self.postMessage("PAUSE"); clearInterval(intervalHandler); isRunning = false; currentTime = time; } } -
Create a Web worker:
/* js/app.js */ timerWorker = new Worker("./js/timerWorker.js"); -
Bind the event listener, which is triggered when the Web worker posts a message:
/* js/app.js */
timerWorker.onmessage = function(e)
{
   if (e.data === "START")
   {
      /* When timerWorker sends "START" message, change start button image to pause icon */
      listItemStartButton.style.backgroundImage = "url(\"./images/pause.png\")";
   }
   else if (e.data === "PAUSE")
   {
      /* When timerWorker sends "PAUSE" message, change start button image to start icon */
      listItemStartButton.style.backgroundImage = "url(\"./images/start.png\")";
   }
   else if (e.data === "RESET")
   {
      /* When timerWorker sends "RESET" message, change start button image to start icon */
      listItemStartButton.style.backgroundImage = "url(\"./images/start.png\")";
      /* Reset time and progress bar */
      listItemTime.innerHTML = getTimeString(time);
      listItemProgressBar.style.width = "0%";
   }
   else
   {
      /* When timerWorker sends time data, change time and progress bar in list item */
      listItemTime.innerHTML = getTimeString(e.data);
      listItemProgressBar.style.width = ((time - e.data) / time) * 100 + "%";
   }
};