
The Camera sample application demonstrates how you can handle the camera in the Tizen wearable device. You can take pictures, record videos, and preview photos and videos.
The following figure illustrates the main screens of the Camera.
Figure: Camera screens
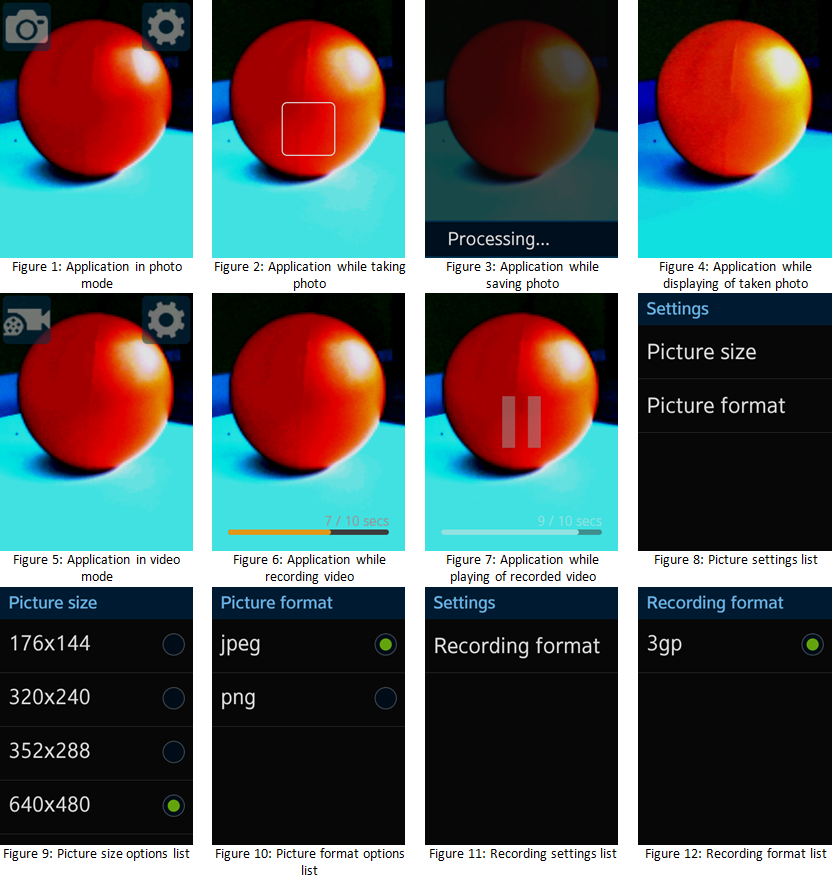
The application opens with the main screen, where it displays a preview from the Tizen wearable camera with 2 icons at the top of the screen.
You can:
- Switch between photo and video modes
- Take pictures with a preview
- Record videos (limited to 10 seconds) with a preview
- Define custom settings for pictures (size and format) and recordings (format)
To handle the camera:
To set the mode, click the left icon.
Based on the mode you select, the icon shows a photo camera for taking pictures or a video camera for recording videos.
To take a picture, set the photo mode and tap the free space on the screen.
The application auto-focuses the image, takes the photo, and displays a preview of the picture.
To record a video, set the camera mode and tap the free space on the screen.
The application starts recording. To stop recording, tap the screen. The maximum recording time is 10 seconds.
The application saves the video and displays a preview image of the recorded video. To watch the video, click the preview image.
To specify additional settings, click the right icon.
The application shows a list of settings specific to the selected mode.
Source Files
You can create and view the sample application project including the source files in the IDE.
| File name | Description |
|---|---|
| config.xml | This file contains the application information for the platform to install and launch the application, including the view mode and the icon to be used in the device menu. |
| css/style.css | This file contains the CSS styling for the application UI. |
| index.html | This is a starting file from which the application starts loading. It contains the layout of the application screens. |
| js/app.js | This file contains code for the main application module used for initialization. |
| js/core/ | This directory contains the core modules. They are used in other parts of the application code. core.js implements simple AMD (Asynchronous Module Definition) and specifies module defining. The application uses a simple MV (Model View) architecture. |
| js/helpers/ | This directory contains helper functions for playing audio files and formatting date and strings. |
| js/models/camera.js | This file defines an abstract layer over the Camera API. |
| js/views/ | This directory contains the code for handling the UI events for all pages. |
| lib/tau | This directory contains the external libraries (TAU library). |
Implementation
The application code is separated into modules. Each module specifies its dependent modules.
The entry point for the application is the app module. It is loaded first by the Core library with the data-main attribute help.
<!--index.html-->

<script src="./js/core/core.js" data-main="./js/app.js"></script>
The app module's responsibility is to load view initialization module – views/initPage (by adding it as dependant module in requires array).
/* App module */

define(
{
   name: 'app',
   requires: ['views/initPage'],
   def: function appInit()
   {
      'use strict';

      /* Initiates the module */
      function init()
      {
         console.log('app::init');
      }

      return
      {
         init: init
      };
   }
});
The views/initPage module loads the other view modules as dependencies to let them initialize. It also manages view navigation, handles Tizen hardware keys, checks the battery state, and notifies other modules about application state changes, such as background, foreground and exit.
/* js/views/initPage.js */
/*Initializes the page module */

define({
   name: 'views/initPage',
   requires: ['core/event', 'core/systeminfo', 'core/application', 'views/main', 'views/settings',
              'views/preview', 'views/pictureSize', 'views/pictureFormat', 'views/recordingFormat'],
   def: function viewsInitPage(req)
   {
      'use strict';

      var app = req.core.application,
          e = req.core.event,
          sysInfo = req.core.systeminfo;

      /**
      * Handles the hardware keys tap event
      * @param {event} ev
      */
      function onHardwareKeysTap(ev)
      {
         var keyName = ev.keyName,
             page = document.getElementsByClassName('ui-page-active')[0],
             pageid = (page && page.id) || '';

         if (keyName === 'back')
         {
            if (pageid === 'main')
            {
               e.fire('application.exit');
               window.setTimeout(function appCloseTimeout()
               {
                  app.exit();
               }, 100);
            }
            else if (pageid === 'preview' || pageid === 'settings')
            {
               e.fire('main.open');
            }
            else if (pageid === 'picture-size' ||
            pageid === 'picture-format' ||
            pageid === 'recording-format')
            {
               e.fire('settings.open');
            }
            else
            {
               history.back();
            }
         }
      }

      /**
      * Handles visibilitychange event
      * @param {event} ev
      */
      function onVisibilityChange(ev)
      {
         e.fire('visibility.change', ev);
      }

      /* Handles the window unload event */
      function onUnload()
      {
         e.fire('application.exit');
      }

      /* Handles the onLowBattery state */
      function onLowBattery()
      {
         app.exit();
      }

      /* Handles the window blur event */
      function onBlur()
      {
         e.fire('application.state.background');
      }

      /* Handles window focus event */
      function onFocus()
      {
         e.fire('application.state.foreground');
      }

      /* Registers the module event listeners */
      function bindEvents()
      {
         document.addEventListener('tizenhwkey', onHardwareKeysTap);
         document.addEventListener('visibilitychange', onVisibilityChange);
         window.addEventListener('unload', onUnload);
         window.addEventListener('blur', onBlur);
         window.addEventListener('focus', onFocus);
         sysInfo.listenBatteryLowState();
      }

      /* Initiates the module */
      function init()
      {
         /* Bind the events to page elements */
         bindEvents();
         sysInfo.checkBatteryLowState();
      }

      e.listeners(
      {
         'core.systeminfo.battery.low': onLowBattery
      });

      return
      {
         init: init
      };
   }
});
The views/main module handles most of the application UI interaction. It shows the camera preview and allows the user to take a picture and record a video. To handle this task, it processes the user actions and uses the models/camera module to handle them.
When the application starts or goes foreground, it creates the camera preview and initializes the models/camera module which uses the Camera API to create the CameraControl object.
/* js/views/main.js */

/**
* Executes when preview stream is obtained
* @param {LocalMediaStream} stream
*/
function onPreviewStream(stream)
{
   var streamUrl = window.webkitURL.createObjectURL(stream);

   previewInitAttemtps = 0;
   cameraStream = stream;
   cameraPreview.src = streamUrl;
   camera.registerStream(cameraStream);
   if (pageHelper.isPageActive(page))
   {
      cameraPreview.play();
   }
}

/* Gets the media stream */
function getUserMedia(onUserMediaSuccess, onUserMediaError)
{
   navigator.webkitGetUserMedia(
   {
      video: true,
      audio: true
   },
   onUserMediaSuccess,
   onUserMediaError
   );
}

/* Requests for the camera stream */
function requestForCameraStream()
{
   return getUserMedia(onPreviewStream, onPreviewStreamError);
}

/* Initializes the camera preview */
function initCameraPreview()
{
   if (previewInitInProgress)
   {
      return;
   }

   previewInitInProgress = true;
   requestForCameraStream();
}

/* Initiates the module */
function init()
{
   initCameraPreview();
}

/* js/models/camera.js */

/* Initiates the camera settings */
function initCameraSettings()
{
   var pictureFormats = null,
       pictureSizes = null,
       recordingFormats = null;

   cameraSettings = storage.get(STORAGE_SETTINGS_KEY);

   if (!cameraSettings)
   {
      cameraSettings = {};

      pictureFormats = getAvailablePictureFormats();
      cameraSettings.pictureFormat = pictureFormats[0];

      pictureSizes = getAvailablePictureSizes();
      cameraSettings.pictureSize = pictureSizes[0];

      recordingFormats = getAvailableRecordingFormats();
      cameraSettings.recordingFormat = recordingFormats[0];

      saveCameraSettings();
   }
}

/**
* Executes when the camera control is created from the stream
* @param {CameraControl} control
*/
function onCameraControlCreated(control)
{
   cameraControl = control;
   initCameraSettings();
   e.fire('ready');
}

/**
* Executes on camera control creation error.
* @param {object} error
*/
function onCameraControlError(error)
{
   console.error(error);
   e.fire('error', {error: error});
}

/**
* Registers stream that camera controls.
* @param {LocalMediaStream} mediaStream
*/
function registerStream(mediaStream)
{
   navigator.tizCamera.createCameraControl(mediaStream, onCameraControlCreated, onCameraControlError);
}
The models/camera module encapsulates the Camera API and creates an event-driven interface for the view modules.
The main functions exposed by this module are:
- registerStream – initializes the module and creates the CameraControl object. Fires the following events:
- models.camera.ready – the module is ready to use.
- models.camera.error – an error occurred during the initialization.
- release – releases the camera (CameraControl). Fires the following events:
- models.camera.release – the camera was released
- takePicture – takes a picture using the current settings. Fires the following events:
- models.camera.autofocus.start – the request is accepted, the autofocus process starts
- models.camera.autofocus.success – the autofocus is done
- models.camera.autofocus.failure – an error occurred during the autofocus process, it does not stop taking the picture
- models.camera.shutter – the camera shutter event
- models.camera.picture.done – a picture is successfully created (filename in the event details)
- models.camera.picture.error – an error occurred during taking the picture
- models.camera.picture.canceled – the picture taking was canceled (for example if the application goes background)
- startRecording – starts recording. Fires the following events:
- models.camera.recording.start – the request is accepted and the recording starts
- models.camera.recording.error – an error occurred during the initialization of the recording
- stopRecording – stops the recording. Fires the following events:
- models.camera.recording.done – a video file is successfully created (filename in the events details). This event is fired also when the time limit for the video recording is exceeded
- models.camera.recording.error – an error occurred during the ending of the recording
- getRecordingTime – returns the current recording time
Other module's functions (not listed above) are used to manage the camera settings.
The view modules call the models/camera module functions and listen to its events to update the UI.
The taking picture process starts when the user touches the device screen in the photo mode. The views/main module calls the takePicture function of the models/camera module when a click event is detected.
/* js/views/main.js  */

/* Takes a photo */
function takePhoto()
{
   previewTapAllowed = false;
   hideNavigationBtns();

   /* Ensure the preview is visible to prevent webkit freeze */
   cameraPreview.classList.remove('hidden');
   camera.takePicture();
}

/**
* Handles the camera preview click event
* @param {event} ev
*/
function onCameraPreviewClick(ev)
{
   ev.preventDefault();
   ev.stopPropagation();

   if (!previewTapAllowed)
   {
      return;
   }

   if (photoMode)
   {
      takePhoto();
   }
   else
   {
      (...)
   }
}

/* Registers the listeners for click events */
function bindCameraReadyEvents()
{
   cameraPreview.addEventListener('click', onCameraPreviewClick);
}
The models/camera module starts processing the request. It triggers the autofocus (CameraControl.autoFocus) and notifies the other modules about the results. The views/main module listens to the autofocus events and updates the UI by creating proper animation and pausing the camera preview (freeze effect).
/* js/models/camera.js */

/* Handles the autofocus success */
function onAutoFocusSuccess()
{
   e.fire('autofocus.success');
   if (!takingPictureCancelRequested)
   {
      setTimeout(startTakingPicture, TAKE_PICTURE_DELAY);
   }
}

/* Handles the autofocus error */
function onAutoFocusFailure()
{
   e.fire('autofocus.failure');
   if (!takingPictureCancelRequested)
   {
      setTimeout(startTakingPicture, TAKE_PICTURE_DELAY);
   }
}

/**
* Takes a picture.
* When autofocus starts, camera.autofocus event is fired.
* When autofocus succeeds, camera.autofocus.success event is fired.
* When autofocus fails, camera.autofocus.failure event is fired.
* When picture is ready camera.picture.done event is fired with picture
* path as a data. If error occurs, camera.picture.error event is fired.
* @return {boolean} If process starts true is returned,
* false otherwise (camera other operation is in progress).
*/
function takePicture()
{
   if (busy)
   {
      return false;
   }

   busy = true;
   takingPictureInProgress = true;
   takingPictureCancelRequested = false;
   e.fire('autofocus.start');
   if (cameraControl.autoFocus())
   {
      setTimeout(onAutoFocusSuccess, AUTOFOCUS_DELAY);
   }
   else
   {
      setTimeout(onAutoFocusFailure, AUTOFOCUS_DELAY);
   }

   return true;
}
/* js/views/main.js */

/* Shows the autofocus frame */
function showAutoFocus()
{
   focusContainer.classList.remove('hidden');
   focusFrame.classList.add('autofocus-animation');
}

/* Handles the camera.autofocus.start event */
function onAutoFocusStart()
{
   showAutoFocus();
}

/* Handles the camera.autofocus.success event */
function onAutoFocusSuccess()
{
   pausePreview();
   focusFrame.classList.add('autofocus-success');
}

/* Handles camera.autofocus.failure event */
function onAutoFocusFailure()
{
   pausePreview();
   focusFrame.classList.add('autofocus-failure');
}

e.listeners(
{
   'models.camera.autofocus.start': onAutoFocusStart,
   'models.camera.autofocus.success': onAutoFocusSuccess,
   'models.camera.autofocus.failure': onAutoFocusFailure,
});
When the autofocusing is done, the models/camera module can go a step forward towards taking the actual picture using CameraControl.image.takePicture. Before that, the picture settings must be applied using CameraControl.image.applySettings. There is also a shutter callback registered (CameraControl.image.onshutter) and the proper event fired the view module can update the UI ("Processing" toast).
/* js/models/camera.js */

/* Handles the camera onshutter event */
function onShutter()
{
   e.fire('shutter');
}

/* Executes when the image settings are applied */
function onImageSettingsApplied()
{
   if (!takingPictureCancelRequested)
   {
      cameraControl.image.takePicture(onPictureDone, onPictureError);
   }
}

/**
* Executes when an error occurs during applying the image settings
* @param {object} error
*/
function onImageSettingsError(error)
{
   busy = false;
   takingPictureInProgress = false;
   e.fire('picture.error', {error: error});
}

/* Starts taking the photo */
function startTakingPicture()
{
   var settings = {},
       fileName = '';

   fileName = createPictureFileName();
   picturePath = PICTURE_DESTINATION_DIRECTORY + '/' + fileName;

   settings.fileName = fileName;
   settings.pictureFormat = getPictureFormat();
   settings.pictureSize = getPictureSize();

   if (!cameraControl)
   {
      cancelTakingPicture();

      return;
   }
   cameraControl.image.onshutter = onShutter;
   cameraControl.image.applySettings(settings, onImageSettingsApplied, onImageSettingsError);
}

/* js/views/main.js */

/* Handles the camera.shutter event */
function onCameraShutter()
{
   hideAutoFocus();
   showStatusMessage('Processing...');
}

e.listeners(
{
   'models.camera.shutter': onCameraShutter
});
Now, the models/camera module waits for the onPictureDone() or onPictureError() function to get executed. When they do, it notifies the other modules about this fact with image file details and does some cleaning. The view/main module passes control to views/preview module, which loads the taken picture and shows it to the user.
/* js/models/camera.js */


/* Executes when the picture is ready */
function onPictureDone()
{
   busy = false;
   takingPictureInProgress = false;
   e.fire('picture.done', {path: picturePath});
}

/**
* Executes when an error occurs during taking picture
* @param {object} error
*/
function onPictureError(error)
{
   busy = false;
   takingPictureInProgress = false;
   e.fire('picture.error', {error: error});
}

/* js/views/main.js */


/**
* Handles the camera.picture.done event
* @param {event} ev
*/
function onPictureDone(ev)
{
   var path = ev.detail.path;
   hideAutoFocus();
   e.fire('show.preview', {picture: path});
}

/**
* Handles the camera.picture.error event
* @param {object} error
*/
function onPictureError(error)
{
   console.error('picture error', error);
   hideAutoFocus();
   hideStatusMessage();
}

e.listeners(
{
   'models.camera.picture.done': onPictureDone,
   'models.camera.picture.error': onPictureError,
});

/* js/views/preview.js */

/**
* Handles views.settings.show event
* @param {event} ev
*/
function show(ev)
{
   var detail = ev.detail;

   if (detail.picture)
   {
      previewPictureMode = true;
      picture.src = detail.picture;

   }
   else if (detail.video)
   {
      (...)
   }
   tau.changePage('#preview');
}

e.listeners(
{
   'views.main.show.preview': show
});
Recording videos is implemented in a similar way. The views/main module calls the startRecording function of the models/camera module and listens to its events in order to update the UI.