
The Music Player sample application demonstrates how you can implement the Tizen official Music Player application with full functionality using the Tizen Content API and the moreoption winset of TAU.
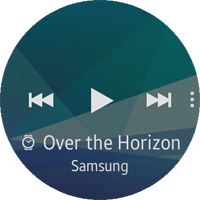
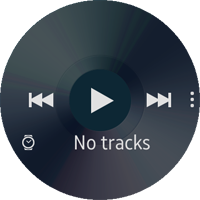
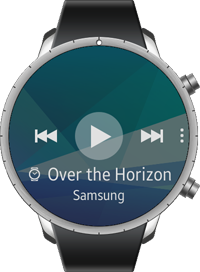
The application opens with the main screen that shows the control buttons and information of the current album:
-
When the next or previous button is touched, the screen changes to the next or previous track information. If there is no audio file, the No tracks text is displayed.
-
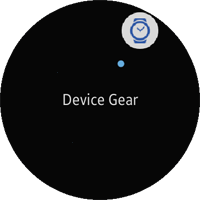
When the More options button (3 dots on the right edge) is touched, the moreoption winset is shown.
Using the More options selector, the application can change its status between Gear or mobile.
The following figure illustrates the main screens of the Music Player.
Figure: Music Player screens
Prerequisites
To ensure proper application execution, the following privileges must be set:
- http://tizen.org/privilege/content.read
- http://tizen.org/privilege/content.write
Source Files
You can create and view the sample application project including the source files in the IDE.
| File name | Description |
|---|---|
| config.xml | This file contains the application information for the platform to install and launch the application, including the view mode and the icon to be used in the device menu. |
| css/style.css | This file contains the CSS styling for the application UI. |
| index.html | This is a starting file from which the application starts loading. It contains the layout of the application screens. |
| js/app.js | This file starts the application and music controls. |
| js/getcontent.js | This file gets audio information from the target or emulator audio files. |
| js/moreoptions.js | This file contains the moreoption winset of the TAU (Tizen Advanced UI) code. |
Implementation
Defining the Application Layout
The application has 2 screens (main and More options popup), whose content is defined in the index.html file:
-
The main screen shows the audio information (or no album information).
There are 3 buttons (play, next, and previous), 2 strings (title and artist) and the More options button.
A header section must be added for the More options button using the TAU ui-has-more class.
The other elements are defined in the content section.
<!--index.html-->
<!--Header of the main page for the More options button-->
<header id="music_player_header" class="ui-header ui-has-more">
   <button type="button" class="ui-more ui-icon-overflow"></button>
</header>

<!--Main page content-->
<div id="music_player_content" class="ui-content content-padding">
   <div id="div_background"></div>
   <div id="div_now_playing">
      <div id="div_play" class="play btn">
         <audio id="myaudio"></audio>
      </div>
      <div id="div_prev" class="btn"></div>
      <div id="div_next" class="btn"></div>
      <div id="div_device" class="gear"></div>
      <div id="div_title"></div>
      <div id="div_sub_title"></div>
   </div>
</div>
-
This sample does not use the header area. Change the height of the header to 0 pixels in the style.css file:
<!--css/style.css-->
#music_player_header
{
   height: 0px;
}
When the More options button is clicked, a selector is opened as a popup. To set items as selector options, set the icons and data titles for them.
<!--index.html-->
<div id="moreoptionsPopupCircle" class="ui-popup">
   <div id="selector" class="ui-selector">
      <div class="ui-item repeat-all" data-title="Repeat All"></div>
      <div class="ui-item device-gear" data-title="Device Gear"></div>
      <div class="ui-item favorite-icon" data-title="Favorite"></div>
      <div class="ui-item shuffle-on" data-title="Shuffle On"></div>
      <div class="ui-item bt-headset" data-title="BT Headset"></div>
      <div class="ui-item delete-icon" data-title="Delete Icon"></div>
   </div>
</div>
-
As an example, the following sample is made using the 'device-gear' CSS class for the device gear selector.
The class sets an icon image and it is used before the item is selected.
<!--css/style.css-->
.device-gear::before
{
   position: absolute;
   content: "";
   top: 0;
   left: 0;
   width: 100%;
   height: 100%;
   -webkit-mask-image: url(../image/More_option/music_more_opt_select_device_gear.png);
   -webkit-mask-size: 100% 100%;
   background-color: rgb(89, 88, 91);
   -webkit-mask-repeat: no-repeat;
   display: block;
}
After the item is selected, the following class is used, and the item's background color is changed.
<!--css/style.css-->
.ui-item.ui-item-active::before
{
   background-color: #3261ba;
}
Getting Media or Audio File Information
This sample application shows audio file information in the target device. It gets the information using the Content API:
-
To get information, use the content.find() method with the following parameters to find content that satisfies the conditions set by a filter:
- successCallback(): Callback method to be invoked when the content has been retrieved.
- errorCallback [optional] [nullable]: Callback method to be invoked when an error has occurred.
- directoryId [optional] [nullable]: Directory ID that is used to select the content to retrieve in a specified directory.
- filter [optional] [nullable]: Filter that is used to select the content to retrieve.
- sortMode [optional] [nullable]: Sort order that is used to determine the order in which the contents are returned.
/* js/getcontent.js */ getcontent.refreshMusics = function refreshMusics() { refreshed = false; try { tizen.content.find(contentFindSuccess, contentFindError, null, filter, sortMode); } catch (error) { console.error("Content Find ERROR: ", error.message); } }; -
Define the filter and sort mode like in the following example to only find the audio type content and then sort it in the ascending order based on the title name:
/* js/getcontent.js */ /* AttributeFilter(DOMString attributeName, optional FilterMatchFlag? matchFlag, optional any matchValue); */ filter = new tizen.AttributeFilter('type', 'EXACTLY', 'AUDIO'), /* SortMode(DOMString attributeName, optional SortModeOrder? order); */ sortMode = new tizen.SortMode('title', 'ASC' ), -
When the content is found, the contentFindSuccess() callback is called. It pushes the information to the musicPlayList array through a detailed classification.
The content is classified based on the album name, artist name, title name, file name, audio play time, file path, and thumbnail path.
/* js/getcontent.js */
function contentFindSuccess(items)
{
   var length = items.length, /* Item's length */
       i = 0,
       item = null;
       /* Fill the musicPlayList array with the new audio file information */
   for (i = 0; i < length; i += 1)
   {
      item = items[i];
      /* Push this information to the musicPlayList array */
      musicPlayList.push(
      {
         'albumName': item.album, /* Album name */
         'artistName': item.artists, /* Artist name */
         'titleName': item.title, /* Title name */
         'fileName': item.name, /* File name (except for the extension) */
         'duration': item.duration, /* Total play time */
         'musicFilePath': item.contentURI, /* File path */
         'thumbnailFilePath': item.thumbnailURIs[0] /* Thumbnail path */
      });
   }
   refreshed = true;
}
Displaying the Audio Information on the Screen
The main page consists of 3 sections: the audio title, audio artist, and background image.
To display the audio information:
-
Call the refreshMusic() and initGetMusic() methods to get the audio information:
/* js/app.js */ function init() { globalPage = "main"; /* Current page is the "main" page */ deviceStatus = "Device Gear"; /* At first, the device status is "gear" */ bindEvents(); getcontent.refreshMusics(); initGetMusic(); } /* js/app.js */ function initGetMusic() { var interval = setInterval(function() { if (getcontent.getRefreshed()) { musicPlayList = getcontent.getMusicPlayList(); clearInterval(interval); initControlPage(); } }, 10); } -
The initControlPage() method displays the title, artist, and thumbnail of the audio file. If there is no audio file, it displays the pre-defined title and a background image.
The currentPlayNumber variable is used for managing audio information. The initControlPage() method sets the currentPlayNumber to 0, because the method is called as the initial methods.
/* js/app.js */
function initControlPage()
{
   /* There is no playlist */
   if (musicPlayList.length === 0)
   {
      changeHtmlString("div_title", TITLE_NO_TRACK);
      changeBackgroundImage("div_background", BACKGROUND_IMAGE_NO_ALBUM);
   }
   /* If there is a playlist, the information of the first track is displayed */
   else
   {
      currentPlayNumber = 0;
      changeHtmlString("div_title", musicPlayList[currentPlayNumber].titleName);
      changeHtmlString("div_sub_title", musicPlayList[currentPlayNumber].artistName);
      changeBackgroundImage("div_background", musicPlayList[currentPlayNumber].thumbnailFilePath);
   }
}
Controlling the Play and Pause Buttons
An audio file is played or paused when the play or pause button is clicked.
-
Bind the play button event in the bindEvents() method:
/* js/app.js */ document.querySelector("#div_play").addEventListener('click', controlMusic); -
The controlMusic() method sets the audio source, and changes the play button to the pause button when music is playing, and vice versa when the music is paused.
The startMusic() method is called to start playing music.
/* js/app.js */
function controlMusic()
{
   var div_play = document.querySelector('#div_play');
   /* Playlist exists with the gear status */
   if (deviceStatus === "Device Gear" && musicPlayList.length !== 0)
   {
      /* When the sample initiates, there is no audio source information in the myaudio element */
      /* Add the first music file path (currentPlayNumber is 0) */
      if (myaudio.src === "")
      {
         myaudio.src = musicPlayList[currentPlayNumber].musicFilePath;
         musicStatus = true;
         div_play.className = 'btn pause';
         startMusic();
      }
      /* In other cases, it controls play and pause */
      else
      {
         /* If audio is paused, it plays audio, and change the pause button into the play button */
         if (myaudio.paused)
         {
            myaudio.play();
            /* Check the current music time using setInterval */
            interval = setInterval(function()
            {
               musicTime++;
               /* When the track is played to the end, move to the next track */
               if (musicTime > (musicPlayList[currentPlayNumber].duration / 1000))
               {
                  startMusic("next");
               }
            }, 1000);
            div_play.className = 'btn pause';
            musicStatus = true;
         }
         /* If audio is playing, it pauses the audio and changes the play button into the pause button */
         else
         {
            myaudio.pause();
            clearInterval(interval);
            div_play.className = 'btn play';
            musicStatus = false;
         }
      }
   }
}
Controlling the Next and Previous Buttons
To control the next and previous buttons, bind the next and previous button events in the bindEvents() method. Pass the string parameter that presents the currently touched button information.
/* js/app.js */
document.querySelector("#div_prev").addEventListener('click', function()
{
   startMusic("prev");
});

document.querySelector("#div_next").addEventListener('click', function()
{
   startMusic("next");
});
Controlling Rotary Events
Bind the rotary event in the bindEvents() method:
/* js/app.js */
document.addEventListener('rotarydetent', rotaryEventHandler);
The rotaryEventHandler() method only executes on the main page, because it only manages the rotary event of the main page.
/* js/app.js */
function rotaryEventHandler(event)
{
   var direction = event.detail.direction;
   /* Call changeControlPage function in the main page */
   if (globalPage === "main")
   {
      /* changeControlPage(direction); */
      startMusic(direction);
   }
}
Starting Music
The startMusic() method plays the audio file from the beginning, and changes the current track number on the main page according to the parameter. It moves to the next or previous track in the array.
It operates similarly as the controlMusic() method.
/* js/app.js */
function startMusic(direction)
{
   /* Playlist must exist with the gear status */
   if (deviceStatus === "Device Gear" && musicPlayList.length !== 0)
   {
      changePlayNumber(direction);
      changeControlPage();
      myaudio.src = musicPlayList[currentPlayNumber].musicFilePath;
      clearInterval(interval);
      musicTime = 0;
      if (musicStatus === true)
      {
         myaudio.play();
         /* Check the current music time using setInterval */
         interval = setInterval(function()
         {
            musicTime++;
            /* When a track is played to the end, move to the next track */
            if (musicTime > (musicPlayList[currentPlayNumber].duration / 1000))
            {
               startMusic("next");
            }
         }, 1000);
      }
   }
}
Using the More Options Popup Click Event Selector
This sample uses the selector in the More options screen, and adds a click handler to the selector:
-
Add an event listener for the selector:
/* js/moreoption.js */ var elSelector = page.querySelector("#selector"); elSelector.addEventListener("click", clickSelector); -
The clickSelector() event handler method gets the clicked target and its title. If the center circle is clicked, it returns to the main page in this sample.
function clickSelector(event)
{
   var target = event.target,
       title;
   /* If the class (device-gear, device-mobile) is clicked, call the setDeviceStatus method of app.js */
   if (target.classList.contains("device-gear") || target.classList.contains("device-mobile"))
   {
      title = target.getAttribute("data-title");
      app.setDeviceStatus(title, target);
   }
   if (tau.support.shape.circle)
   {
      /* 'ui-selector-indicator' is the default indicator class name of the selector component */
      if (target.classList.contains("ui-selector-indicator"))
      {
         app.setGlobalPage("main");
         tau.closePopup(popupCircle);
      }
   }
}
Handling Page Navigation
This sample has 2 screens for the main page and the popup page, so simple page navigation is needed:
-
Declare the global variable for page navigation in the app.js file:
/* js/app.js */
var global_page;
-
When the app.js file is loaded, set the global_page variable to main in the init() method:
/* js/app.js */ function init() { globalPage = "main"; /* Current page is "main" page */ deviceStatus = "Device Gear"; /* At first, device status is "gear" status */ bindEvents(); getcontent.refreshMusics(); initGetMusic(); } -
When the popup is loaded, set the global_page variable to moreoption in the moreoptions.js file:
/* js/moreoption.js */ function clickHandler(event) { if (tau.support.shape.circle) { tau.openPopup(popupCircle); global_page = "moreoption"; } else { tau.openPopup(popup); } }; -
The backEventHandler() method handles the hardware key back event.
When the global_page variable is main, the back key event lets the application quit, and in the case of the popup, it closes the popup.
/* js/app.js */
function backEventHandler(e)
{
   var popupCircle = document.querySelector("#moreoptionsPopupCircle");

   /* Hardware back key event occurs */
   if (e.keyName === "back")
   {
      if (globalPage === "main")
      {
         try
         {
            tizen.application.getCurrentApplication().exit();
         }
         catch (ignore) {}
      }
      else
      {
         tau.closePopup(popupCircle);
         globalPage = "main";
      }
   }
}
Managing the Button Effect
This sample has many buttons in the <div> elements in the index.html file.
These buttons have an active effect in the .btn CSS class, as shown in the following figure.
Figure: Music Player button effect
To manage the effect:
-
Add a .btn class in the <div> element to create a button:
<!--index.html-->
<div id="div_play" class="play btn">
<div id="div_prev" class="btn">
<div id="div_next" class="btn">
-
Declare the .btn CSS class in the style.css file. Set the .btn class's border-radius attribute to 50% to create the effect of a circular button.
<!--style/style.css--> .btn { border-radius: 50%; } -
Declare the active .btn CSS class in the style.css file. The class changes the background color when the button is touched.
<!--style/style.css-->
.btn:active
{
   background-color: rgba(250,250,250,0.4);
   transition: all 0.2s ease;
}