Camera
You can use basic camera features, including preview and capture. You can capture still images with the device’s internal camera and keep the images on your target device.
Figure: Camera image examples
The main features of the Tizen.Multimedia.Camera class include the following:
-
Configuring the camera
You can configure the camera and set the camera and autofocus event handlers.
-
Setting the display for the camera preview
You can preview images in real-time with the
StartPreview()method of theTizen.Multimedia.Cameraclass. The camera provides support for the following features:- Pixel formats, such as NV12, NV12T, NV16, NV21, YUYV, UYVY, YUV420P, I420, YV12, RGB565, RGB888, RGBA, ARGB, JPEG, H264, INVZ, MJPEG, VP8, and VP9.
- Preview at the frame rate, which you can set by
PreviewFpsproperty. - Rotation and flip of the preview.
You can also customize the display settings for the camera preview.
-
Capturing and saving images
You can start the camera preview and capture an image.
-
Setting camera attributes
You can control the following camera settings:
- Contrast
- Exposure
- Brightness
- Effects
- ISO
- White balance
- Zoom
- Flash
- Focus
- Metering
- EXIF tag (geo, orientation, software information, and description)
- Scene mode, HDR, theater
- Image quality
Depending on the camera device type, the device supports different orientations, resolutions, or preview and capture formats. You can obtain this information from the device using the
SupportedPreviewResolutions,SupportedCapturePixelFormats, or otherSupportedXXXproperties of the Tizen.Multimedia.CameraCapabilities class.Since devices can have multiple camera sensors with different capabilities, create a
Tizen.Multimedia.Camerainstance with a proper Tizen.Multimedia.CameraDevice enumeration value, determining which camera sensor is used. Usually, the primary sensor is located on the back side, and the secondary sensor on the front side of the device. Once the camera sensor is selected, the selected sensor starts working.Note
Simultaneous use of multiple camera sensors is not allowed. The target device often supports more functionalities than the emulator. The behavior of the shutter sound can vary depending on the legislation of each country.
-
Releasing resources
When you have finished working with the camera, you can release the resources.
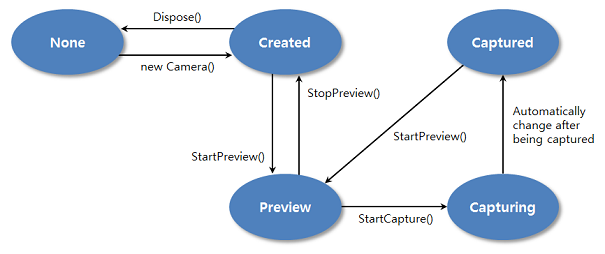
The following figure illustrates the camera state changes in normal mode.
Figure: Camera states in normal mode
Prerequisites
To enable your application to use the camera functionality, follow the steps below:
-
If your device support CameraDeviceManager, you can get the information of supported devices:
C#CopyCameraDeviceManager cdm = null; try { cdm = new CameraDeviceManager(); cdm.DeviceConnectionChanged += (s, e) => { if ((CameraDeviceInformation.Type == CameraDeviceType.Usb) && !IsConnected) { // do something, if external usb camera is disconnected } } foreach (var deviceInfo in cdm.SupportedDevices) { if (deviceInfo.Type == CameraDeviceType.BuiltIn) { // do something } } // or you can check whether external camera device is connected or not easily. if (cdm.IsExternalCameraConnected) { // do something } } catch (NotSupportedException e) { Log.Info("Camera", $"CameraDeviceManger is not supported. {e.ToString()}"); } ... // If CameraDeviceManger is not used anymore, dispose it. cdm?.Dispose(); -
Create a camera instance:
C#Copytry { Camera camera = new Camera(CameraDevice.Rear); } catch (Exception ex) { Log.Error("Camera", "Creating camera instance failed. " + ex.ToString()); }The
CameraDevice.Rearparameter means that the currently activated device camera is the primary camera. You can select between the rear (primary) and front (secondary) camera. The available parameter values are defined in the Tizen.Multimedia.CameraDevice enumeration. -
Check the current state of the camera using the
Stateproperty of the Tizen.Multimedia.Camera class:C#CopyCameraState state; /// Check the camera state after creating the camera state = camera.State;The returned state is one of the values defined in the Tizen.Multimedia.CameraState enumeration. If the state is not
Created, re-initialize the camera by recreating the instance.
Configure the camera
After setting up the necessary prerequisites, configure the camera and set the camera preview event handler.
To configure the camera, follow the below steps:
-
Set the image quality using the
ImageQualityproperty of the Tizen.Multimedia.CameraSettings class:C#Copycamera.Settings.ImageQuality = 100;The image quality value can range from 1 (lowest quality) to 100 (highest quality).
-
Set the display for showing preview by using the
Displayproperty of the Tizen.Multimedia.Camera class withNUI.Windowclass.The camera state must be in the
Created:C#Copy// Create new NUI window or set NUI window to be rendered // `nuiWindow` of the following code is the instance of `NUI.Window` class. camera.Display = new Display(nuiWindow); -
Set the camera preview resolution using the
PreviewResolutionproperty of theTizen.Multimedia.CameraSettingsclass. You must set this property before previewing.To find out which resolutions can be set for the camera preview on a specific device, use the
SupportedPreviewResolutionsproperty of the Tizen.Multimedia.CameraCapabilities class. This property returns anIEnumerablevariable.The following example sets the camera preview resolution to the first found supported resolution:
C#CopyIList supportedResolutions = _camera.Capabilities.SupportedPreviewResolutions.ToList(); foreach(Size resolution in supportedResolutions) { camera.Settings.PreviewResolution = resolution; break; } -
Set the capture format using the
CapturePixelFormatproperty of theTizen.Multimedia.CameraSettingsclass:C#Copycamera.Settings.CapturePixelFormat = CameraPixelFormat.Jpeg;The Tizen.Multimedia.CameraPixelFormat enumeration defines the available capture formats.
-
Register event handlers for managing various events of the
Tizen.Multimedia.Cameraclass, related to the camera preview, autofocus, and capturing:-
To handle the camera preview, register an event handler for the
Previewevent. The event handler is invoked once per frame during a preview:C#Copypublic static void PreviewEventHandler(object sender, PreviewEventArgs e) { if (e.Preview.PlaneType == PlaneType.RgbPlane) { /// do something } } camera.Settings.PreviewPixelFormat = CameraPixelFormat.Rgba; camera.Preview += PreviewEventHandler;
-
- To receive notifications about autofocus state changes, register an event handler for the FocusStateChanged event. The event handler is invoked every time the autofocus state changes:
    ```csharp
    public static void FocusStateChangedEventHandler(object sender, CameraFocusStateChangedEventArgs e)
    {
        Log.Info("Camera", "Focus state is changed to " + e.State.ToString());
    }

    camera.FocusStateChanged += FocusStateChangedEventHandler;
    ```

    Before autofocusing starts, the autofocus state is `Released`. After the `StartFocusing()` method is called, the camera starts autofocusing and the state changes to `Ongoing`. If autofocusing finishes successfully, the state changes to `Focused`. If autofocusing fails, the state changes to `Failed`.

-   To receive a captured still image, register an event handler for the `Capturing` event. The event handler is invoked once for each captured frame and is used to get information about the captured image.

    The image is saved in the format set by the `CapturePixelFormat` property of the `Tizen.Multimedia.CameraSettings` class in the previous step.

    The following event handler example saves the captured frame as a JPEG image:

    ```csharp
    public static void CapturingEventHandler(object sender, CameraCapturingEventArgs e)
    {
        if (e.MainImage != null)
        {
            /// PostView and Thumbnail can be null
            if (e.MainImage.Data.Length > 0)
            {
                File.WriteAllBytes("StillImage.jpg", e.MainImage.Data);
            }
        }
    }

    camera.Capturing += CapturingEventHandler;
    ```

-   To receive a notification when the image has been captured, register an event handler for the `CaptureCompleted` event. The event handler is invoked after the event handler of the `Capturing` event completes, and is used for notification and for restarting the camera preview.

    The following event handler example restarts the camera preview:

    ```csharp
    public static void CaptureCompletedEventHandler(object sender, EventArgs e)
    {
        camera.StartPreview();
    }

    camera.CaptureCompleted += CaptureCompletedEventHandler;
    ```
Set the display for the camera preview
Before displaying the camera preview on the screen, check the camera display settings. You can use the default display settings provided by the camera framework, or you can customize the display settings to meet your needs.
To customize the display settings, follow the below steps:
-
Camera selection and orientation
Before you can correctly customize the display settings, you need to know which camera is active (front or back) and at what angle the physical camera is being held (orientation):
-
To determine the active camera, check the Tizen.Multimedia.CameraDevice enumeration value:
C#Copypublic enum CameraDevice { Rear, /// Rear camera Front /// Front camera }The rear camera is usually the primary camera, and the front camera is usually the secondary camera. If, for example, you created the camera instance for the primary camera, the camera preview shows the rear camera view.
-
To determine the current camera angle, use the
LensOrientationproperty of the Tizen.Multimedia.CameraSettings class:C#Copyint angle = camera.Settings.LensOrientation;The returned value of the
anglevariable is in degrees.
Once you know the active camera and its current orientation angle (or tilt), you can calculate how to rotate the display to match the camera orientation, and whether and how to flip the display to create the mirror effect if the front camera is active.
To correctly rotate the display as the camera orientation changes, think about the orientation and direction of the physical camera lens, relative to the display. If the camera faces away from the display, the camera orientation is calculated clockwise across the display. If the camera faces the same way as the display, the camera orientation is calculated counter-clockwise across the display. For example, if the camera and display face in opposite directions, the right side of the image is at 90 degrees, and if the camera and display face in the same direction, the right side is at 270 degrees (360 - 90).
-
-
Display rotation
The display rotation setting is preset to a default value for each camera. Before changing the display rotation value, retrieve the default value using the
Rotationproperty of the Tizen.Multimedia.CameraDisplaySettings class:C#CopyRotation rotation = camera.DisplaySettings.Rotation;Calculate and set a new display rotation value based on the current camera orientation:
C#Copyint lengOrientation; int displayRotationAngle; Rotation displayRotation = Rotation.Rotate0; /// Get the recommended display rotation value lengOrientation = camera.Settings.LensOrientation; displayRotationAngle = (360 - lengOrientation) % 360; /// Convert the display rotation value to an enumerator type switch (displayRotationAngle) { case 0: displayRotation = Rotation.Rotate0; break; case 90: displayRotation = Rotation.Rotate90; break; case 180: displayRotation = Rotation.Rotate180; break; case 270: displayRotation = Rotation.Rotate270; break; default: displayRotation = Rotation.Rotate0; break; } /// Set the display rotation camera.DisplaySettings.Rotation = displayRotation; -
Display flip
The display flip setting is preset to a default value for each camera. For example, to support the mirror mode, the secondary (front) camera is set as flipped by default.
Before changing the display flip value, retrieve the default value using the
Flipproperty of theTizen.Multimedia.CameraDisplaySettingsclass:C#CopyFlips displayFlip = camera.DisplaySettings.Flip;Calculate and set a new display flip value based on the direction the camera is facing and the current camera orientation:
C#Copy/// If the camera is facing in the same direction as the display, /// apply flip to the front camera because of the mirror effect int lengOrientation; int displayRotationAngle; Flips displayFlip = Flips.None; /// Get the recommended display rotation value lengOrientation = camera.Settings.LensOrientation; displayRotationAngle = (360 - lengOrientation) % 360; /// Set the mirror display if (displayRotationAngle == 90 || displayRotationAngle == 270) { displayFlip = Flips.Vertical; } else { displayFlip = Flips.Horizontal; } /// Set the display flip camera.DisplaySettings.Flip = displayFlip;The system applies display flip after display rotation, so you must always calculate the correct display flip value after determining the display rotation.
NoteFor an overlay surface, when the device orientation changes, the displayed camera preview does not rotate automatically. If you want to rotate the display according to the device orientation, use the
Rotationproperty of theTizen.Multimedia.CameraDisplaySettingsclass.
Take a photo
To take a photo, follow the below steps:
-
After configuring the camera, start the camera preview using the
StartPreview()method of the Tizen.Multimedia.Camera class:C#Copycamera.StartPreview();The camera preview draws preview frames on the screen and allows you to capture frames as still images.
After starting the camera preview, the application flows as follows:
- During the camera preview, the application calls the camera preview event handler for each frame.
- The camera preview event handler calls the
StartFocusing()method, which starts the autofocusing process. - During autofocusing, as the autofocus state changes, the application calls the camera autofocus event handler.
-
When the preview and autofocus processes are completed, the application can start image capturing.
To capture an image, use the
StartCapture()method:C#Copycamera.StartCapture();
Set camera attributes
You can set various camera attributes with the Tizen.Multimedia.CameraSettings class.
To set some attributes, follow the below steps:
-
Camera preview attributes
The camera preview attributes are a group of attributes that you can set before starting the preview. The following example sets the FPS and image quality attributes:
C#Copycamera.Settings.PreviewFps = CameraFps.Auto; camera.Settings.ImageQuality = 100; -
Camera zoom attribute
Retrieve the range of available zoom level values using the
ZoomRangeproperty, and set the zoom level using theZoomLevelproperty. The following example retrieves the available zoom level range and sets the zoom level to minimum:C#CopyRange zoomRange = camera.Settings.ZoomRange; camera.Settings.ZoomLevel = zoomRange.Min; -
Camera brightness attribute
Retrieve the range of available brightness level values using the
BrightnessRangeproperty, and the current brightness level using theBrightnessproperty. The following example retrieves the available brightness level range and sets the brightness level to minimum:C#CopyRange brightnessRange = camera.Settings.BrightnessRange; int brightness = camera.Settings.Brightness; /// Set a new brightness level camera.Settings.Brightness = brightnessRange.Min; -
Camera manual focus attribute
Retrieve the range of available manual focus level values using the
FocusLevelRangeproperty, and the current manual focus level using theFocusLevelproperty. The following example retrieves the available manual focus level range and sets the manual focus level to minimum:C#Copyif (camera.Settings.IsFocusLevelSupported) { Range focusLevelRange = camera.Settings.FocusLevelRange; int focusLevel = camera.Settings.FocusLevel; /// Set a new manual focus level camera.Settings.FocusLevel = focusLevelRange.Min; }
Release resources
After you have finished working with the camera, follow the steps below to stop the camera and clean up the application environment:
-
If autofocus is switched on, switch if off using the
StopFocusing()method of the Tizen.Multimedia.Camera class:C#Copycamera.StopFocusing(); -
Stop the camera preview using the
StopPreview()method:C#Copycamera.StopPreview(); -
Destroy the camera handle and release all its resources using the
Dispose()method:C#Copycamera.Dispose();
Related information
- Dependencies
- Tizen 4.0 and Higher