SDL Graphics with Vulkan®
Vulkan® is a generation API for high-efficiency access to graphics and computing on modern GPUs. It is an open-standard, cross-platform API designed from the ground up by industry experts collaborating under the Khronos consortium. It aims to address the inefficiencies of existing 3D APIs, such as OpenGL®, which are designed for single-core processors and lag to map modern hardware. It provides a much lower-level fine-grained control over the GPU to maximize performance and achieve a consistent user experience across different operating environments. For general information on Vulkan®, and the comparative merits of Vulkan® and OpenGL®, see the official Khronos Vulkan® Web site and Vulkan® vs. OpenGL®.
The Tizen platform supports the Vulkan API in order to provide the most cutting-edge 3D programming tools for you to create high-quality games and real-time graphics in applications. Vulkan® is especially recommended for performance- or latency-sensitive applications. With Vulkan®, you can achieve a much smoother user experience by parallelizing the rendering job across multiple threads which can feed the GPU in an efficient manner. Applications demanding explicit control on work submission, synchronization, and less power consumption can seriously consider migrating to Vulkan® as well. Tizen allows the use of the Vulkan API through SDL.
Figure: Vulkan® in Tizen
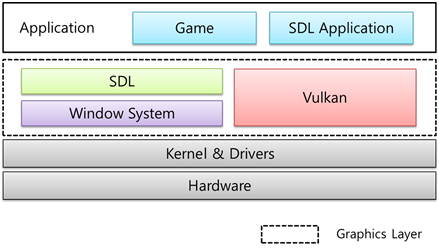
The main Vulkan API features include rendering 3D objects in an SDL application.
Before using the Vulkan API in Tizen, make sure that you are familiar with the following key Vulkan® features, which help you to align your application design around Vulkan® concepts and exploit the hardware to the fullest:
-
Cross-platform
Vulkan® is designed to run on a wide range of platforms and hardware with very different form factors and power envelopes. While OpenGL® has the OpenGL® ES variant for mobile and embedded systems and OpenGL® for desktops, Vulkan® provides a unified API that is completely identical across all these platforms. You simply link to the same library, with the same header and the same code on all targeted platforms, and the application runs everywhere. By not limiting itself to a subset of platforms, Vulkan® enables you to “write once and run everywhere”. This means that by targeting this API, you can achieve a large market share across both mobile and desktop devices.
-
Explicit control
Vulkan® is an explicit API, and wants you to define “exactly what you want”, rather than relying on hidden driver heuristics to do the right thing. Vulkan®, by design, is a very low-level API that provides applications direct control over the GPU. Older higher-level APIs hide most of the costly operations, such as memory management and resource synchronization, denying you any control over them.
Vulkan® attempts to turn as much of the problematic “implicitness” of older APIs as possible into “explicit” application choices. It provides a number of explicit mechanisms for many operations, such as memory allocation, synchronization, and work submission, allowing applications to be more expressive.
-
Multi-core friendly
Older APIs written in the single-core processor age do not do enough to take advantage of today’s multi-core processors and thereby max out the single core by over-burdening the render thread with all heavy tasks, such as error checking, implicit resource tracking, synchronization, and state validation.
Vulkan® provides tools and design choices to spread its workload across multiple threads. It achieves this by removing from the driver the thread-specific features, such as global data, access synchronization, thread safety, and order guarantee, and handing the responsibility to you. By carefully handling the threads and scaling across multiple threads on a device with more cores, you can distribute your workload across threads much better. This leads to better efficiency and better performance in applications that otherwise find themselves maxing out a single core.
-
High efficiency
With a better design, Vulkan® offers the potential to reduce the workload of the render thread, thereby allowing the application to draw less power and generate less heat. It achieves better throughput by removing lots of (mostly) unnecessary background work, such as runtime error checking, state validation, and shader compilation, from the main loop. It delegates that background work to the tooling and layers, which are used during development and get removed before the application makes it to a consumer device.
-
Portable
With the introduction of an intermediate shader language, called SPIR-V, Vulkan® improves the shader program portability and allows you to write shaders in languages other than GLSL (such as C/C++). This avoids the need for the compiler to execute during runtime to translate the shader code and allows offline shader precompilation. It also relieves the vendors from the shader/kernel source shipping and IP leakage.
Prerequisites
To enable your application to use the Vulkan® functionality:
-
To use Vulkan® for 3D rendering, you must create an SDL application, and understand both Vulkan® and SDL.
-
Check whether the device supports Vulkan®.
As not all Tizen devices available on the market support Vulkan® yet, check for device support with the
system_info_get_platform_bool()function before using the Vulkan APIs. If the device can support Vulkan®, the function returnstruein the second parameter.bool vulkan_support; system_info_get_platform_bool("http://tizen.org/feature/vulkan.version.1_0", &vulkan_support); -
To use the functions and data types of the Vulkan (in mobile and wearable applications) and SDL (in mobile and wearable applications) APIs, include the
<SDL.h>and<vulkan/vulkan.h>header files in your application:#include <SDL.h> #include <vulkan/vulkan.h>
Rendering a Triangle with Vulkan®
To render a triangle using Vulkan® in an SDL application:
-
Initialize the SDL library and create an SDL window.
Before using any other SDL functions, call the
SDL_Init()function to properly initialize the SDL library and start each of its various subsystems. The function accepts as a parameter a set of allowed flags OR’d together.After SDL is initialized successfully, create the
SDL_Windowinstance using theSDL_CreateWindow()function. The parameters define the title of the window, the X and Y position coordinates, width, height, and a set ofSDL_WindowFlagsOR’d together.Note
To use the Vulkan® context, use the
SDL_WINDOW_VULKANflag when you create a window. Do not use bothSDL_WINDOW_VULKANandSDL_WINDOW_OPENGLsimultaneously.The
SDL_main()function is mandatory for the Tizen framework to initialize the SDL application. You must use theSDL_main()function instead of the usualmain()function in your SDL application.int SDL_main(int argc, char *argv[]) { SDL_Init(SDL_INIT_VIDEO | SDL_INIT_EVENTS); demo.sdl_window = SDL_CreateWindow("SDL Vulkan Sample", 0, 0, demo.sdl_mode.w, demo.sdl_mode.h, SDL_WINDOW_SHOWN | SDL_WINDOW_FULLSCREEN | SDL_WINDOW_VULKAN); } -
Initialize the Vulkan library.
Create a Vulkan instance, which is the connection between the application and the Vulkan library. To create an instance:
-
Fill in a
VkApplicationInfostruct with some information about the application:sTypespecifies the type of the structure. Most Vulkan structs require you to explicitly specify the structure type in thesTypemember.pNextcan point to extension information in the future, but currently leave itNULLfor the default initialization.pApplicationNamepoints to a string containing the application name.applicationVersioncontains developer-supplied version number of the application.pEngineNameis a pointer to a string containing the name of the engine (if any) used to create the application.engineVersionis an unsigned integer variable containing the developer-supplied version number of the engine used to create the application.apiVersionis the version of the Vulkan® API against which the application expects to run.
const VkApplicationInfo app = { .sType = VK_STRUCTURE_TYPE_APPLICATION_INFO, .pNext = NULL, .pApplicationName = APP_SHORT_NAME, .applicationVersion = 0, .pEngineName = APP_SHORT_NAME, .engineVersion = 0, .apiVersion = VK_API_VERSION_1_0, }; -
Vulkan® is a platform-agnostic API, which means that you need an extension to interface with the window system. The
SDL_Vulkan_GetInstanceExtensions()SDL function returns the extensions Vulkan® needs to interface with the windowing system. Pass them to theVkInstanceCreateInfostruct.Fill in the
VkInstanceCreateInfostruct to provide sufficient information for creating an instance. This struct tells the Vulkan® driver which global extensions and validation layers you want to use. Global means that they apply to the entire program and not only a specific device.sTypeandpNextare similar to theVkApplicationInfostructure.enabledLayerCountis the number of global layers to enable.ppEnabledLayerNamesis a pointer to an array containing the names of layers to enable for the created instance.enabledExtensionCountis the number of global extensions to enable.ppEnabledExtensionNamesis a pointer to an array of strings containing the names of extensions to enable.
SDL_Vulkan_GetInstanceExtensions(demo->sdl_window, &(demo->enabled_extension_count), demo->extension_names); VkInstanceCreateInfo inst_info = { .sType = VK_STRUCTURE_TYPE_INSTANCE_CREATE_INFO, .pNext = NULL, .pApplicationInfo = &app, .enabledLayerCount = demo->enabled_layer_count, .ppEnabledLayerNames = (const char *const *)instance_validation_layers, .enabledExtensionCount = demo->enabled_extension_count, .ppEnabledExtensionNames = (const char *const *) demo->extension_names, }; -
Call the
vkCreateInstance()function to actually create the instance:vkCreateInstance(&inst_info, NULL, &demo->inst);The general pattern that object creation function parameters in Vulkan® follow is:
- Pointer to the struct with the creation info
- Pointer to the custom allocator callbacks
- Pointer to the variable that stores the handle to the new object
On success, the handle to the instance is returned in the wrapped
VkInstancemember.
-
-
Select a physical device.
After creating a Vulkan instance, look for and select a graphics card in the system that supports the features you need. You can select any number of graphics cards and use them simultaneously, but the following example only selects the first graphics card. The selected graphics card is stored in a
VkPhysicalDevicehandle.Retrieve the list the graphics cards, store them in an array of the
VkPhysicalDevicehandles, and select the first graphics card as the physical device:VkPhysicalDevice *physical_devices = malloc(sizeof(VkPhysicalDevice) * gpu_count); err = vkEnumeratePhysicalDevices(demo->inst, &gpu_count, physical_devices); demo->gpu = physical_devices[0]; -
Check for supported queue families.
Almost every operation in Vulkan®, from drawing to uploading textures, requires commands to be submitted to a “queue”. There are different types of queues that originate from different queue families, and each queue family allows only a subset of commands. You need to check which queue families are supported by the device and which one of them supports the commands that you want to use. The following example looks for a queue that supports graphics commands:
-
Check which queue families are supported by the device with the
vkGetPhysicalDeviceQueueFamilyProperties()function:VkQueueFamilyProperties *queue_props; vkGetPhysicalDeviceQueueFamilyProperties(demo->gpu, &demo->queue_count, demo->queue_props); assert(demo->queue_count >= 1); VkPhysicalDeviceFeatures features; vkGetPhysicalDeviceFeatures(demo->gpu, &features); -
The
VkQueueFamilyPropertiesstruct contains details about the queue family, including the type of operations that are supported and the number of queues that can be created based on that family. Look for at least 1 queue family that supportsVK_QUEUE_GRAPHICS_BIT:uint32_t graphicsQueueNodeIndex = UINT32_MAX; for (i = 0; i < demo->queue_count; i++) { if ((demo->queue_props[i].queueFlags & VK_QUEUE_GRAPHICS_BIT) != 0) { if (graphicsQueueNodeIndex == UINT32_MAX) graphicsQueueNodeIndex = i; } } demo->graphics_queue_node_index = graphicsQueueNodeIndex;
-
-
Create a logical device.
After selecting a physical device to use, you need to set up a logical device to interface with it. You can even create multiple logical devices from the same physical device, if you have varying requirements.
-
Add a new
VkDevicetype member in which to store the logical device handle:VkDevice device;Logical devices are cleaned up with the
vkDestroyDevice()function before the instance is cleaned up. -
The creation of a logical device involves specifying a lot of details in structs again. First, fill in the
VkDeviceQueueCreateInfostruct, which describes the number of queues you want for a single queue family. In the following example, only 1 queue with graphics capabilities is needed.The currently available drivers only allow you to create a low number of queues for each family queue, and you do not really need more than one. That is because you can create all of the command buffers on multiple threads and then submit them all at once on the main thread with a single low-overhead call.
Vulkan® lets you assign priorities to queues to influence the scheduling of the command buffer execution using floating point numbers between 0.0 and 1.0. This is required even if there is only a single queue.
float queue_priorities[1] = {0.0}; const VkDeviceQueueCreateInfo queue = { .sType = VK_STRUCTURE_TYPE_DEVICE_QUEUE_CREATE_INFO, .pNext = NULL, .queueFamilyIndex = demo->graphics_queue_node_index, .queueCount = 1, .pQueuePriorities = queue_priorities }; -
Fill in the main
VkDeviceCreateInfostructure.First add pointers to the queue creation info and device features structs. The remainder of the information requires you to specify device-specific extensions and validation layers. An example of a device-specific extension is
VK_KHR_swapchain, which allows you to present rendered images from that device to windows. The following example enables the same validation layers for devices as before for the instance. It requires no device-specific extensions.VkDeviceCreateInfo device = { .sType = VK_STRUCTURE_TYPE_DEVICE_CREATE_INFO, .pNext = NULL, .queueCreateInfoCount = 1, .pQueueCreateInfos = &queue, .enabledLayerCount = demo->enabled_layer_count, .ppEnabledLayerNames = (const char *const *)((demo->validate) ? demo->device_validation_layers : NULL), .enabledExtensionCount = demo->enabled_extension_count, .ppEnabledExtensionNames = (const char *const *)demo->extension_names, .pEnabledFeatures = NULL }; -
Instantiate the logical device with the
vkCreateDevice()function.The parameters are the physical device to interface with, the queue and usage info you just specified, the optional allocation callback pointer, and a pointer to a variable to store the logical device handle in.
vkCreateDevice(demo->gpu, &device, NULL, &demo->device);
-
-
Create a window surface.
Since Vulkan® is a platform-agnostic API, it cannot interface directly with the window system on its own. To establish the connection between Vulkan® and the window system to present results to the screen, you need to use the WSI (Window System Integration) extensions. The
VK_KHR_surfaceextension exposes aVkSurfaceKHRobject that represents an abstract type of surface to present rendered images to. The surface in this example program is backed by the window that you have already created using SDL.The
VK_KHR_surfaceextension is an instance-level extension and you have actually already enabled it, because it is included in the list returned by theSDL_Vulkan_GetInstanceExtensions()function. Even though the window surface is created before the logical device in this example, it is only mentioned here after the logical device creation, because window surfaces are part of the render targets and presentation part, and explaining them earlier would have cluttered up the basic setup.Note
Window surfaces are an entirely optional component in Vulkan®, if you only need off-screen rendering. Vulkan® allows you to do that without hacks, such as creating an invisible window (necessary for OpenGL®).
-
Add a
VkSurfaceKHRtype variable:VkSurfaceKHR surface;When no longer needed, surfaces are destroyed with the
vkDestroySurfaceKHR()function. -
Although the
VkSurfaceKHRobject and its usage is platform-agnostic, its creation is not, because it depends on the window system details. Therefore, there is a platform-specific addition to the extension, which on Tizen isSDL_vulkanSurfaceand is also automatically included in the list from theSDL_Vulkan_GetInstanceExtensions()function.This platform-specific extension on Tizen provides the
SDL_Vulkan_CreateSurface()function to create a surface hiding the platform differences for you. The parameters are the SDL window pointer, custom allocators, and pointer to theVkSurfaceKHRvariable. It simply passes through theVkResultfrom the relevant platform call.SDL_Vulkan_CreateSurface(demo->sdl_window, (SDL_vulkanInstance)demo->inst, (SDL_vulkanSurface*)&demo->surface);
-
-
Create the presentation queue.
Although the Vulkan® implementation can support window system integration, that does not mean that every device in the system supports it. Therefore, you need to ensure that a device can present images to the surface you created. Since the presentation is a queue-specific feature, the problem is actually about finding a queue family that supports presenting to the surface you created.
-
Look for a queue family that has the capability of presenting to your window surface, by using the
vkGetPhysicalDeviceSurfaceSupportKHR()function, which takes the physical device, queue family index, and surface as parameters. Then simply check the value of thebooleanand store the presentation family queue index. Note that it is very likely that it ends up being the same queue family as previously selected for the physical device, so the example adds logic to explicitly prefer a physical device that supports drawing and presentation in the same queue for improved performance:demo->fpGetPhysicalDeviceSurfaceSupportKHR(demo->gpu, i, demo->surface, &supportsPresent[i]); demo->graphics_queue_node_index = graphicsQueueNodeIndex; -
Add a member variable for the
VkQueuehandle:VkQueue queue; -
Ideally, you need multiple
VkDeviceQueueCreateInfostructs to create a queue from both graphics and presentation queue families. An elegant way to do that is to create a set of all unique queue families that are necessary for the required queues and modifyVkDeviceCreateInfoto point to the vector. However, in this example, as the queue families are the same and the 2 handles most likely have the same value, you only need to pass the same index once and retrieve the queue handle:vkGetDeviceQueue(demo->device, demo->graphics_queue_node_index, 0, &demo->queue);Now the queue handle is ready.
-
-
Prepare the rendering infrastructure.
You have successfully created the main handles to access the GPU to request rendering. Now prepare the rendering infrastructure, such as buffers, textures, vertices, render pass, descriptors, commands, and frame buffers, before initiating the actual drawing:
static void demo_prepare(struct demo *demo) { demo_prepare_buffers(demo); demo_prepare_depth(demo); demo_prepare_textures(demo); demo_prepare_vertices(demo); demo_prepare_descriptor_layout(demo); demo_prepare_render_pass(demo); demo_prepare_pipeline(demo); demo_prepare_descriptor_pool(demo); demo_prepare_descriptor_set(demo); demo_prepare_framebuffers(demo); demo->prepared = true; } -
Initiate rendering from the main loop.
Now you are set to perform continuous rendering from the application main loop. Initiate the main loop and call the rendering routine as well as start polling for user input events:
while(1) { while (SDL_PollEvent(&event)) { printf("SDL Event type :: %d\n", event.type); if (event.type == SDL_MOUSEBUTTONDOWN) printf("SDL_MOUSEBUTTONDOWN Event!!\n"); if (event.type == SDL_MOUSEMOTION) printf("SDL_MOUSEMOTION Event!!\n"); } demo_run(&demo); } -
Before exiting the application, destroy all the Vulkan resources as well as the SDL window that needs to be explicitly freed up:
demo_cleanup(&demo);
SDL_DestroyWindow(demo.sdl_window);

SDL_Quit();
Related Information
- Dependencies
- Tizen 2.4 and Higher for Mobile
- Tizen 2.3.1 and Higher for Wearable