Application Resources
You can get or set common resources for multiple devices with different specifications.
The main features of the Resource Manager API include:
-
Setting resources
You can set resources for your application in the Resource Manager view in Tizen Studio. By setting specific resources for specific languages and screen resolutions, you ensure that the application works flawlessly on multiple devices.
Note
The Resource Manager tool is supported since Tizen 2.4.
If you cannot access the
Resource Managerview in Tizen Studio, check the version and API version attributes in the<manifest>element of the application manifest file.For more information on the Resource Manager tool, see Providing Resources for Multiple Device Types.
-
Using the resources
You can use different resources (such as images, layouts, and sounds) between devices with different device specifications. For example:
- To set a different button image for an application depending on the device’s current language setting, use the
app_resource_manager_get()function to get the appropriate resource file path. - To use different images depending on the device’s screen resolution (DPI), use the same
app_resource_manager_get()function to get the appropriate image file path.
- To set a different button image for an application depending on the device’s current language setting, use the
-
Testing the resources
You can test the different resources by running them in the emulator.
Note
The resource files must be set to be in different folders and have the same filename.
Prerequisites
To use the functions and resource types of the Resource Manager API, include the <app_resource_manager.h> header file in your application:
#include <app_resource_manager.h>
Setting Resources Using the Resource Manager Tool
To set the resources:
-
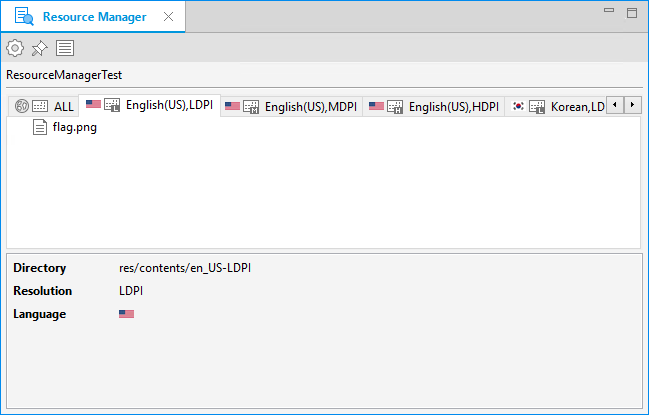
To activate the Resource Manager view content in Tizen Studio, select the project in the Project Explorer view.

If the Resource Manager view is not visible, open it: in the Tizen Studio menu, go to Window > Show View > Resource Manager.
-
To open the Resource Configuration Dialog window, click the
 icon in the Resource Manager view toolbar menu.
 -
To add resource directories for the required languages and screen resolutions, select them in the Language and DPI drop-down menus, and click Add.
The resource directory hierarchy is created.

-
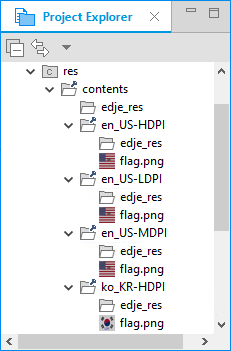
To add images in the created resource directory, copy them directly to the resource directories.
Note
The file names of the resources that you want to use interchangeably depending on the device conditions must be the same.
-
To view the resource directories, use the
res.xmlfile.Tizen Studio creates the
res.xmlfile automatically when you build the application package.
Getting the Resource File Path
To get the appropriate resource file path in your code:
-
Create the resource manager using the
app_resource_manager_init()function.app_resource_manager_init();If the function returns
APP_RESOURCE_ERROR_NONE, the resource manager has been successfully created. -
Get the resource path using the
app_resource_manager_get()function. You need 2 parameters:-
Resource ID
The resource ID is an identifier for a specific resource. It consists of subdirectories and filenames including its extension. The same resources are located in different locations with the same filename for supporting multiple devices.
-
Resource type
The resource type defines whether the resource is an image, layout, sound, or some other file type. There are 4 resource types, which are defined in the
app_resource_eenumerator.Resources with the same resource type are grouped as a folder. The folder name is irrelevant to the actual resource type within it.
Evas_Object *img
char *img_path = NULL;

app_resource_manager_get(APP_RESOURCE_TYPE_IMAGE, "flag.png", &img_path);

Evas* canvas = evas_object_evas_get(ad->conform);
img = evas_object_image_filled_add(canvas);

if (img_path != NULL) {
    evas_object_image_file_set(img, img_path, NULL);

    evas_object_move(img, 50, 50);
    evas_object_resize(img, 300, 200);
    evas_object_show(img);
    free(img_path);
}
If the function returns
APP_RESOURCE_ERROR_NONE, the resource path has been successfully retrieved. -
-
When you no longer need to get the resource path, call the
app_resource_manager_release()function to release the resource manager instance.The resource manager instance must be released only when the application is closing, so this function must be called in the
app_terminate()callback function.static void app_terminate(void *data) { app_resource_manager_release(); }
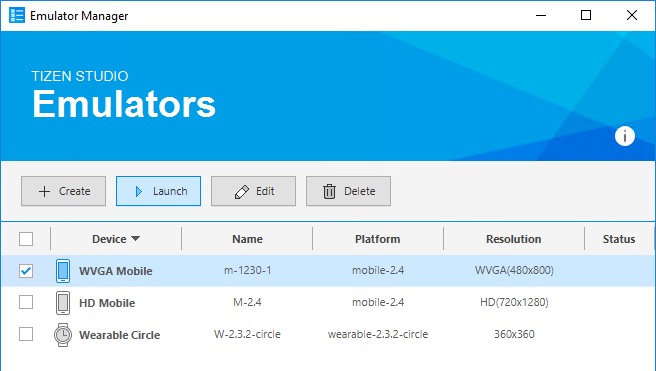
Checking Resources with the Emulator Manager
To check how the resources are shown on different device configurations, create emulator instances with different resolutions with the Emulator Manager and run the application on the instances using different language settings:
-
Open the Emulator Manager by selecting Tools > Emulator Manager in the Tizen Studio menu.
-
In the Emulator Manager window, the HD Mobile emulator has already been created.
Next, create an emulator instance with a WVGA resolution by clicking Create.
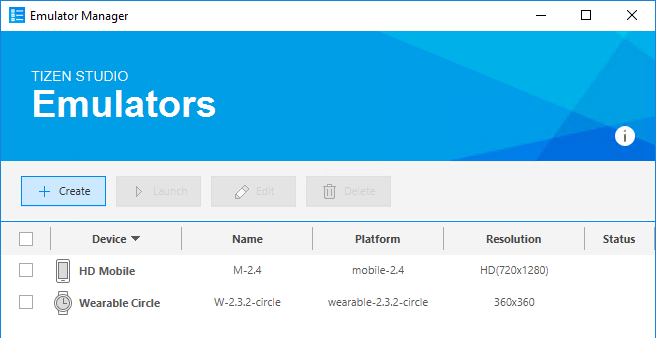
Select mobile, and the WVGA Mobile template. Click Finish. If the HD Mobile emulator has not been created, create it as well. For more information on creating an emulator instance, see Creating Emulator Instances.
-
Run the application on the WVGA Mobile device emulator:
-
In the Emulator Manager window, select the WVGA Mobile emulator and click Launch.
The WVGA Mobile device emulator starts.
-
In the Project Explorer view in Tizen Studio, right-click the application and select Run As > Tizen Native Application.
The application launches on the emulator.

-
To close the emulator, right-click it and select Close.
-
-
Run the application on the HD Mobile device emulator:
-
In the Emulator Manager window, select the HD Mobile emulator and click Launch.
The HD Mobile device emulator starts.


-
In the Project Explorer view in Tizen Studio, right-click the application and select Run As > Tizen Native Application.
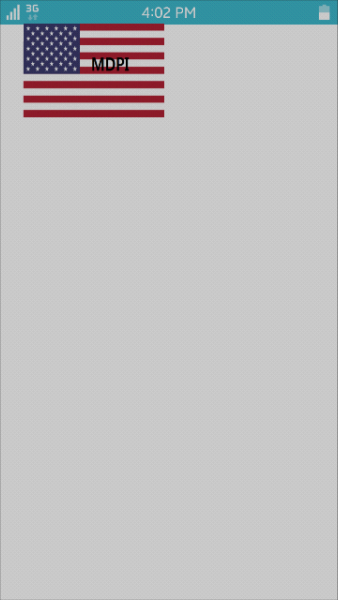
The application launches on the emulator, and you can see that a different image is displayed depending on the device display resolution.
-
-
If you change the emulator language settings and run the application again, you can also see that a different image is displayed depending on the device language (in this case, US English and Korean).

Related Information
- Dependencies
- Since Tizen 2.4
- API References