Media Playback
You can play different audio formats and video in your application.
The main media playback features are:
-
Handling audio
Enables you to play audio and control the playback.
-
Handling video
Enables you to play video.
-
Using the player features
Enables you to manage the player and control the volume, sound mode, display, stream info, and audio effects.
-
Streaming playback
Enables you to set specific URLs for streaming media playback.
-
Using the WAV player
Enables you to play audio in the WAVE format.
-
Using the tone player
Enables you to play tones.
Before you start, set up the player.
Audio Player
You can play audio and control functions for using audio resources. The resources can be media files stored on the device in a file or memory, or they can be streamed from a streaming server (defined with a URI) through the network.
The supported audio formats include MP3, AAC, WMA, M4A, 3GA, WAV, and AMR. The available formats depend on the target device.
Software and hardware audio codec can be selected using the player API. You must check the default codec type by calling player_get_audio_codec_type().
If the software codec is selected, you can use multiple instances of the player to play several audio data streams concurrently. This implies that your application can play multiple uncompressed audio files at the same time.
The following figure illustrates the general player state changes.
Figure: Player state changes
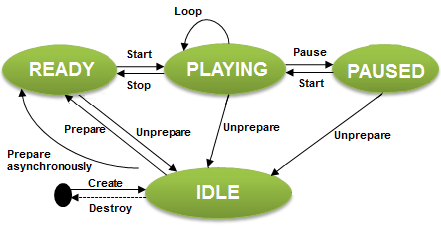
The player_interrupted_cb() callback could be called due to the resource restriction in the system. The player state could be IDLE, READY, or PAUSED based on the resource management policy. You must check the state of the current instance and take appropriate action.
Video Player
Tizen enables your application to play video, and it uses its own user surface. The surface requires a drawing area, so you have to get an overlay region and set it to the player instance to display the drawing area:
-
Get the overlay region or Evas object from the Graphics module.
You can display video on a UI layer with the Evas object as well as on an overlay layer.
Note
Using the Evas object have been deprecated since Tizen 11.0.
-
Create the player instance.
-
Set the surface type and display handle to the player using the
player_set_display()function.
The supported video formats include WMV, ASF, MP4, 3GP, AVI, MKV, and OGG. The available formats depend on the target device.
Software and hardware video codec can be selected using the player API. You should check the default codec type by calling player_get_video_codec_type().
Before you select the software codec, you should consider the performance of the hardware core because decoding speed and quality can be influenced by the performance of the hardware.
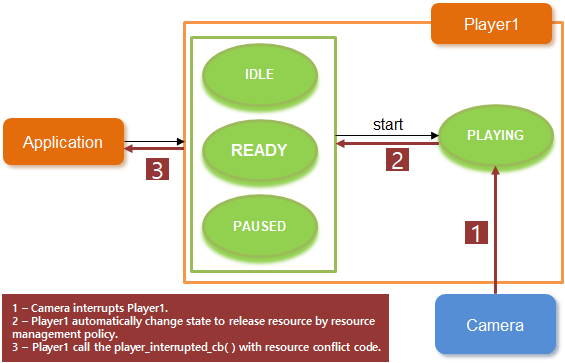
In case there is a video interruption, the state will be either IDLE, READY, or PAUSED because of the resource restriction in the system. You must check the state of the current instance and take appropriate action.
The following figure illustrates what happens when the player gets interrupted by the system.
Player Features
The Player API provides the following features:
-
Operating general controls for the audio and video content, such as play, pause, resume, and stop
The callback interface specifies the functions used to notify the player status during playback events. Since the player engine works asynchronously, you must implement a listener to ensure that the player flows correctly. When each player operation is completed, an event is generated, and the
player_completed_cb()function is called. If an error occurs in the player engine, you are notified if you have registered theplayer_error_cb()callback. -
Modifying playback properties
When the player state is changed to READY, you can modify various playback properties, such as volume, audio latency mode, mute mode, looping mode, audio only mode, track information of each stream and etc.
-
Moving the audio and video content based on time
-
Getting information about the audio and video content
When the player state is changed to READY, the multimedia resource is available and you can get content information from the media. You can also get content information in the PLAYING state, in some cases of playback streaming.
-
Playing multiple audio streams
The maximum number of player instances is limited by the system and multimedia resources. The maximum number is a system-wide count and it can be applied depending on the CPU model, CPU speed, CPU core number, CPU load from other applications, and the available memory. Thus, the exact number can be smaller than the maximum number, in which case the prepare functions fail. A reasonable working player number is under 10. To free up system resources, stop unneeded players.
The Player sub-APIs offer the following features:
-
Display
Use the Display API to play a video stream.
After changing to the IDLE state, create the display handle and set the display type.
-
Stream information
Use the Stream Information API to play a video stream.
After changing to the READY state, you can retrieve stream information.
-
Audio effect
Use the Audio Effect API to set and get the audio effect.
After changing to the IDLE state, you can adjust the audio effect.
-
Subtitles
Use the Subtitle API to read the subtitle track.
After changing to the READY state, the subtitles can be read.
-
Media Streams
Use the Media stream API to play and control the external demuxed stream.
-
Spherical Video Playback
Use the Spherical Video API to set the rendering attributes for spherical video playback.
Playback Streams
You can set specific URLs for streaming media playback by using the player_set_uri() function.
Both Hypertext Transfer Protocol (HTTP) and Real Time Streaming Protocol (RTSP) protocols support streaming media playback. The HTTP request header supports the playback of both complete and download-in-progress media files.
For HTTP streaming, buffering can happen when the player is prepared. You can get the status using the player_set_buffering_cb() function.
The player supports the streaming protocol features:
-
Hypertext Transfer Protocol (HTTP)
- HTTP Streaming
- HTTP Live Streaming
-
Real Time Streaming Protocol (RTSP)
- RTSP Streaming
WAV Player
The WAV Player API provides controlling functions for using audio resources (media files stored on the device). Use the WAV Player API to enable your application to play audio and control playback. You can use the WAV and OGG audio formats.
Tizen enables your application to play WAVE format audio in 1 of 2 ways:
-
Through the multimedia application control
When using the multimedia application control, the device standard media player application is launched to play audio.
-
With the WAV player functions
When using the WAV player functions, your application plays audio using its own user interface.
Most operations of the WAV Player API work in a synchronous mode. The WAV Player API requires a callback to notify the application of the operational status of the player. The callback must be implemented and passed to stop the WAV playback.
Multiple instances of the WAV player can be used to play several audio data streams concurrently. This means that your application can play multiple uncompressed audio files, such as WAV, at the same time.
The following figure illustrates the general WAV player state changes.
Figure: WAV player state changes

Tone Player
Tizen enables your application to play a tone or a list of tones using the Tone Player API.
You can generate tones in 2 ways:
- Specify the frequency values. You can specify either 1 or 2 frequencies.
- Use a DTMF (Dual Tone Multi Frequency) preset frequency value of the
tone_type_eenumerator.
You can start and stop playing a tone, and play a tone for a specified duration.
The following figures illustrate the general tone player state changes.
Figure: Tone player states

Prerequisites
To enable your application to use the playback functionality:
-
To use the functions and data types of the Player API, include the
<player.h>header file in your application:#include <player.h> #include <Elementary.h> #include <glib.h>In this guide, you also need the
<Elementary.h>and<glib.h>header files to set the display and use the Glib library functions. -
Retrieve the default internal storage paths for audio and video files, and define the specific paths for the audio and video files to play. To access and use internal storage, include the
storage.hheader file in your application.#define MP3_SAMPLE "SampleAudio.mp3"; #define MP4_SAMPLE "SampleVideo.mp4"; int internal_storage_id; char *audio_storage_path = NULL; char *video_storage_path = NULL; char *audio_path = NULL; char *video_path = NULL; static bool storage_cb(int storage_id, storage_type_e type, storage_state_e state, const char *path, void *user_data) { if (type == STORAGE_TYPE_INTERNAL) { internal_storage_id = storage_id; return false; } return true; } void _get_storage_path() { int error_code = 0; char *path = NULL; error_code = storage_foreach_device_supported(storage_cb, NULL); error_code = storage_get_directory(internal_storage_id, STORAGE_DIRECTORY_MUSIC, &path); if (error_code != STORAGE_ERROR_NONE) { audio_storage_path = strdup(path); free(path); } error_code = storage_get_directory(internal_storage_id, STORAGE_DIRECTORY_VIDEOS, &path); if (error_code != STORAGE_ERROR_NONE) { video_storage_path = strdup(path); free(path); } } void _set_test_path() { int path_len = 0; path_len = strlen(audio_storage_path) + strlen(MP3_SAMPLE) + 1; audio_path = malloc(path_len); memset(audio_path, 0x0, path_len); strncat(audio_path, audio_storage_path, strlen(audio_storage_path)); strncat(audio_path, MP3_SAMPLE, strlen(MP3_SAMPLE)); path_len = strlen(video_storage_path) + strlen(MP4_SAMPLE) + 1; video_path = malloc(path_len); memset(video_path, 0x0, path_len); strncat(video_path, video_storage_path, strlen(video_storage_path)); strncat(video_path, MP4_SAMPLE, strlen(MP4_SAMPLE)); } -
To start using the tone player, declare a player ID variable for identifying the tone player:
int tone_player_id; -
To use the functions and data types of the WAV Player API, include the
<wav_player.h>header file in your application:#include <wav_player.h> #include <stdio.h> #include <sound_manager.h>In this guide, you also need the
<stdio.h>and<sound_manager.h>header files to use standard file input and output functions and the Sound Manager API functions.
Preparing the Player
To initialize the player for use:
-
Define a variable for the player handle, and create the handle by passing the variable to the
player_create()function. You need the handle for defining which file to play and with what playback settings. The following example code also creates buttons for the UI to control the playback.struct appdata { player_h player; }; static void init_base_player(appdata_s *ad) { int error_code = 0; error_code = player_create(&ad->player); if (error_code != PLAYER_ERROR_NONE) dlog_print(DLOG_ERROR, LOG_TAG, "failed to create"); /* Perform more playback configuration, such as setting callbacks, setting the source file URI, and preparing the player */ } static void create_base_gui(appdata_s *ad) { /* Create a window */ /* Create a button */ /* Add a callback to the button */ evas_object_smart_callback_add(button_init, "clicked", init_base_player, ad); evas_object_smart_callback_add(button_end, "clicked", release_base_player, ad); /* Create an Evas image object for the video surface */ } static void app_create(void *data) { appdata_s *ad = data; create_base_gui(ad); return true; } -
To receive notifications, register the appropriate callbacks:
-
To receive notifications about playback interruptions, register a callback function using the
player_set_interrupted_cb()function:static void _player_interrupted_cb(player_interrupted_coded_e code, void *data) { appdata_s *ad = data; player_state_e state; player_get_state(ad->player, &state); log_print(DLOG_INFO, LOG_TAG, "current player state = %d", state); /* If the state is PLAYER_STATE_PAUSED, update UI (for example, button) */ } static void init_base_player(appdata_s *ad) { /* Set an interruption callback if the application wants to know the reason */ error_code = player_set_interrupted_cb(g_player, _player_interrupted_cb, ad); if (error_code != PLAYER_ERROR_NONE) dlog_print(DLOG_ERROR, LOG_TAG, "failed to create"); }The playback is interrupted and the callback is triggered when, for example, some other multimedia application starts. The player state automatically changes to
PLAYER_STATE_PAUSEDorPLAYER_STATE_IDLEbased on the resource management policy. To get the current state, useplayer_get_state(). -
To receive a notification when the playback ends, register a callback function using the
player_set_completed_cb()function:static void _player_completed_cb(void *data) { dlog_print(DLOG_INFO, "Player", "Playback End"); } static void init_base_player(appdata_s *ad) { /* Set a completed callback for when the playback ends */ error_code = player_set_completed_cb(g_player, _player_completed_cb, ad); if (error_code != PLAYER_ERROR_NONE) dlog_print(DLOG_ERROR, LOG_TAG, "failed to set completed cb"); } -
To receive notifications about player errors during playback, register a callback function using the
player_set_error_cb()function:static void _player_error_cb(int error_code, void *user_data) { dlog_print(DLOG_ERROR, LOG_TAG, "playback failed, error = %x", error_code); } static void init_base_player(appdata_s *ad) { error_code = player_set_error_cb(g_player, _player_error_cb, NULL); if (error_code != PLAYER_ERROR_NONE) dlog_print(DLOG_ERROR, LOG_TAG, "failed to set error cb"); }The player error callback is triggered when the player stops working due to an error. You can use the callback to try to recover from the error. For example, try to change the player state to
PLAYER_STATE_READYby calling theplayer_stop()function. Then remove all other callbacks and reset the player by calling theplayer_unprepare()function. At the end, the player is in thePLAYER_STATE_IDLEstate, so you can release the resources allocated to the player.Note
Do not call the
player_destroy()function from the called context, as this can cause thePLAYER_ERROR_INVALID_OPERATIONerror.
-
Playing an Audio File
To play an audio file:
-
After creating the player handle, specify the audio file to play using the
player_set_uri()function:error_code = player_set_uri(ad->player, audio_path); -
Prepare the player for playback using the
player_prepare()function:error_code = player_prepare(ad->player);The function changes the player state from
PLAYER_STATE_IDLEtoPLAYER_STATE_READY, which is required to start playback. -
Start playing the audio file using the
player_start()function:error_code = player_start(ad->player);The function changes the player state from
PLAYER_STATE_READYtoPLAYER_STATE_PLAYING. The audio file plays until you call theplayer_stop()orplayer_pause()function.
Playing a Video File
To play a video file:
-
After creating the player handle, specify the video file to play using the
player_set_uri()function:error_code = player_set_uri(ad->player, video_path); -
Set the display on which the video is played.
To retrieve the correct display handle, use the
GET_DISPLAY()function. To set the display, use theplayer_set_display()function with the player handle, display typeplayer_display_type_eenumerator, and display handle:error_code = player_set_display(g_player, PLAYER_DISPLAY_TYPE_OVERLAY, GET_DISPLAY(evas_obj));After the
player_set_display()function has been successfully executed, the player is connected to the display.Note
For an overlay surface, when the device orientation changes, the displayed video does not rotate automatically. If you want to change the video orientation according to the device orientation, use the
player_set_display_rotation()function within theapp_device_orientation_cb()callback function used by the application. For an Evas surface, the Evas object for the video is rotated by the window manager used by the application, not by theplayer_set_display_rotation()function. -
Prepare the player for playback using the
player_prepare()function:error_code = player_prepare(ad->player);The
player_prepare()function works synchronously, so it can block the application execution. To prepare the player asynchronously instead, use theplayer_prepare_async()function:error_code = player_prepare_async(ad->player, _prepared_cb, ad);Both functions change the player state from
PLAYER_STATE_IDLEtoPLAYER_STATE_READY, which is required to start playback.
-
Play the video file:
-
Ensure that the player state has changed to
PLAYER_STATE_READY. To check the state, use theplayer_get_state()function in a waiting loop:player_state_e state; do { error_code = player_get_state(ad->player, &state); if (error_code != PLAYER_ERROR_NONE) break; usleep(1000); } while (state != PLAYER_STATE_READY); -
Start playing the video file using the
player_start()function:if (error_code == PLAYER_ERROR_NONE) error_code = player_start(g_player);If you used the
player_prepare_async()function to prepare the player, use the following callback function to handle the playback:static void _prepared_cb(void *data) { appdata_s *ad = data; int error_code = 0; error_code = player_start(ad->player); }The
player_start()function changes the player state fromPLAYER_STATE_READYtoPLAYER_STATE_PLAYING. The video file plays until you call theplayer_stop()orplayer_pause()function.
-
Stopping the Player and Releasing Resources
To stop the player and release the resources allocated to the player:
-
Stop the player using the
player_stop()function:error_code = player_stop(player); dlog_print(DLOG_ERROR, LOG_TAG, "player_stop() = %d", error_code); -
Reset the player using the
player_unprepare()function:error_code = player_unprepare(player); dlog_print(DLOG_ERROR, LOG_TAG, "player_unprepare() = %d", error_code);After the player is reset, it is in the
PLAYER_STATE_IDLEstate. -
Destroy the player handle using the
player_destroy()function:error_code = player_destroy(player); dlog_print(DLOG_ERROR, LOG_TAG, "player_destroy = %d", error_code);
Playing Multiple Files Simultaneously
To play multiple files simultaneously:
-
Define the variables for player handlers, player states, file paths, playback time, and return value.
In this guide, you also need the
<stdio.h>and<unistd.h>header files to use standard file input and output functions and system calls.#include <stdio.h> #include <unistd.h> static player_h player_1; static player_h player_2; static player_h player_3; static player_state_e state_1; static player_state_e state_2; static player_state_e state_3; static int ret =0; static char *path_1 = NULL; static char *path_2 = NULL; static char *path_3 = NULL; char *resource_path = NULL; resource_path = app_get_resource_path(); snprintf(path_1, sizeof(path_1)-1, "%s/sample.3gp", resource_path); snprintf(path_2, sizeof(path_2)-1, "%s/test.wav", resource_path); snprintf(path_3, sizeof(path_3)-1, "%s/test2.wav", resource_path); free(resource_path); static const int PLAYBACK_TIME = 6; -
Create a player handle for each file using the
player_create()function:ret = player_create(&player_1); ret = player_create(&player_2); ret = player_create(&player_3); -
Specify the files to play using the
player_set_uri()function:ret = player_set_uri(player_1, path_1); ret = player_set_uri(player_2, path_2); ret = player_set_uri(player_3, path_3); -
Prepare the players for playback using the
player_prepare()function:ret = player_prepare(player_1); ret = player_prepare(player_2); ret = player_prepare(player_3);The function changes the player states from
PLAYER_STATE_IDLEtoPLAYER_STATE_READY, which is required to start playback. -
Play the files:
-
Ensure that the player states have changed to
PLAYER_STATE_READY. To check the states, use theplayer_get_state()function in a waiting loop:/* Wait to prepare player_1 */ ret = player_get_state(player_1, &state_1); while (state_1 != PLAYER_STATE_READY) { ret = player_get_state(player_1, &state_1); usleep(1000); } /* Wait to prepare player_2 */ ret = player_get_state(player_2, &state_2); while (state_2 != PLAYER_STATE_READY) { ret = player_get_state(player_2, &state_2); usleep(1000); } /* Wait to prepare player_3 */ ret = player_get_state(player_3, &state_3); while (state_3 != PLAYER_STATE_READY) { ret = player_get_state(player_3, &state_3); usleep(1000); } -
Start playing the files using the
player_start()function:ret = player_start(player_1); ret = player_start(player_2); ret = player_start(player_3);
-
-
After the playback has ended or been stopped, reset the players and destroy the player handles using the
player_unprepare()andplayer_destroy()functions:ret = player_unprepare(player_1); ret = player_destroy(player_1); ret = player_unprepare(player_2); ret = player_destroy(player_2); ret = player_unprepare(player_3); ret = player_destroy(player_3);
Configuring the Video Playback Display
To set the display parameters for playing a video file:
-
Make sure that the player handle has been created, the display set, and the player prepared and started.
-
During playback, you can manage the display settings as needed:
-
Make the display visible:
-
Check whether the display is already visible using the
player_is_display_visible()function:bool is_visible; error_code = player_is_display_visible(player, &is_visible); dlog_print(DLOG_ERROR, LOG_TAG, "player_is_display_visible = %d", error_code); -
If the display is not visible, make it visible using the
player_set_display_visible()function with the second parameter set totrue:if (!is_visible) { error_code = player_set_display_visible(player, true); dlog_print(DLOG_ERROR, LOG_TAG, "player_set_display_visible = %d", error_code); }
-
-
Set the display mode using the
player_set_display_mode()function:error_code = player_set_display_mode(player, PLAYER_DISPLAY_MODE_FULL_SCREEN); dlog_print(DLOG_ERROR, LOG_TAG, "player_set_display_mode = %d", error_code);The available display modes are defined in the
player_display_mode_eenumeration. -
Set the display rotation using the
player_set_display_rotation()function:error_code = player_set_display_rotation(player, PLAYER_DISPLAY_ROTATION_90); dlog_print(DLOG_ERROR, LOG_TAG, "player_set_display_mode = %d", error_code);The available display rotations are defined in the
player_display_rotation_eenumeration.
-
Retrieving Stream Information
To retrieve information about the audio and video streams:
-
Create the player handle, prepare and start the player, and set the display parameters.
Note
To retrieve the stream information, the player state must be either
PLAYER_STATE_PLAYINGorPLAYER_STATE_PAUSED. -
Retrieve the stream information:
-
Video display size
Retrieve the width and height of the video display using the
player_get_video_size()function:int width; int height; error_code = player_get_video_size(player, &width, &height); dlog_print(DLOG_ERROR, LOG_TAG, "player_is_display_visible = %d", error_code); -
Duration
Retrieve the total media running time (in milliseconds) using the
player_get_duration()function:int duration; error_code = player_get_duration(player, &duration); dlog_print(DLOG_INFO, LOG_TAG, "player_get_duration = %d", error_code); -
Audio stream details
Retrieve the audio stream details using the
player_get_audio_stream_info()function. The function returns the audio sample rate (in Hz), number of audio channels (1 for mono or 2 for stereo), and audio bit rate (in Hz).int sample_rate; int channels; int bit_rate; error_code = player_get_audio_stream_info(player, &sample_rate, &channels, &bit_rate); dlog_print(DLOG_INFO, LOG_TAG, "player_get_audio_stream_info = %d", error_code); -
Video stream details
Retrieve the video stream details using the
player_get_video_stream_info()function. The function returns the number of frames per second and the video bit rate (in Hz).int fps; int bit_rate; error_code = player_get_video_stream_info(player, &fps, &bit_rate); dlog_print(DLOG_INFO, LOG_TAG, "player_get_video_stream_info = %d", error_code); -
Audio and video codec names
Retrieve the audio and video codec names using the
player_get_codec_info()function:char *audio_codec; char *video_codec; error_code = player_get_codec_info(player, &audio_codec, &video_codec); dlog_print(DLOG_INFO, LOG_TAG, "player_get_codec_info = %d", error_code); -
Content metadata
Retrieve information about the album, artist, author, genre, title, and year using the
player_get_content_info()function. The available metadata attributes are defined in theplayer_content_info_eenumeration.char *album; char *artist; char *author; char *genre; char *title; char *year; error_code = player_get_content_info(player, PLAYER_CONTENT_INFO_ALBUM, &album); dlog_print(DLOG_INFO, LOG_TAG, "player_get_content_info album = %d", album); error_code = player_get_content_info(player, PLAYER_CONTENT_INFO_ARTIST, &artist); dlog_print(DLOG_INFO, LOG_TAG, "player_get_content_info artist = %d", artist); error_code = player_get_content_info(player, PLAYER_CONTENT_INFO_AUTHOR, &author); dlog_print(DLOG_INFO, LOG_TAG, "player_get_content_info author = %d", author); error_code = player_get_content_info(player, PLAYER_CONTENT_INFO_GENRE, &genre); dlog_print(DLOG_INFO, LOG_TAG, "player_get_content_info genre = %d", genre); error_code = player_get_content_info(player, PLAYER_CONTENT_INFO_TITLE, &title); dlog_print(DLOG_INFO, LOG_TAG, "player_get_content_info title = %d", title); error_code = player_get_content_info(player, PLAYER_CONTENT_INFO_YEAR, &year); dlog_print(DLOG_INFO, LOG_TAG, "player_get_content_info year = %d", year);Note
The values must be released using the
free()function. -
Album artwork
Retrieve the album artwork using the
player_get_album_art()function. The function returns the encoded artwork image and size.void *album_art; int size; error_code = player_get_album_art(player, &album_art, &size); dlog_print(DLOG_INFO, LOG_TAG, "player_set_display_mode = %d", error_code);
-
Inserting Subtitles
To insert subtitles to a video file:
-
Set the subtitle path using the
player_set_subtitle_path()function:#define SUBTITLE "subtitles_test_file.srt" char *data_path = app_get_data_path(); int path_len = strlen(data_path) + 10; char *path = malloc(path_len); strncat(path, data_path, path_len); strncat(path, SUBTITLE, path_len); error_code = player_set_subtitle_path(player, path); dlog_print(DLOG_ERROR, LOG_TAG, "player_set_subtitle_path() = %d", error_code); free(path);Note
You can set the subtitle path when the player state is
PLAYER_STATE_IDLE,PLAYER_STATE_READY,PLAYER_STATE_PLAYING, orPLAYER_STATE_PAUSED.
Starting and Stopping the WAV Player
To start and stop the WAV player:
-
Start playback using the
wav_player_start_new()function.The second parameter should be sound information handle which can created by
sound_manager_create_stream_information().The third parameter defines a callback that is invoked when the player finishes playback. Implement the callback and handle any post-playback actions in it.
The final parameter returns the WAV player ID, which you need to stop the player.
static void
_playback_completed_cb(int id, void *user_data)
{
    const char* path = (const char*)user_data;
    dlog_print(DLOG_INFO, "WAV Player", "Completed! [id:%d, path:%s]", id, path);
}

void
main()
{
    int wav_player_id;
    wav_player_error_e ret;
    const char* wav_path = "PATH OF YOUR WAV FILE";
    sound_stream_info_h stream_info;

    sound_manager_create_stream_information(SOUND_STREAM_TYPE_MEDIA, NULL, NULL, &stream_info);

    ret = wav_player_start_new(wav_path, stream_info, _playback_completed_cb, (void*)wav_path, &wav_player_id);
}
To set the path of your WAV file, you may need to retrieve the default path for audio files. For more information, see the Data Storages guide.
-
To stop the WAV player, use the
wav_player_stop()function with the ID of the WAV player:void my_stop() { wav_player_error_e ret; ret = wav_player_stop(wav_player_id); }
Playing a Tone
To start and stop playing a tone:
-
Start playback using the
tone_player_start_new()function.The first parameter should be the
tone_type_eenumerators which can define the available values for the tone type.The second parameter should be sound information handle which can created by
sound_manager_create_stream_information().tone_player_start_new(TONE_TYPE_DEFAULT, stream_info, -1, &tone_player_id);The player ID is assigned and returned if the function succeeds. The ID of the tone player that starts first is 0, the ID of the second one is 1, and so on. If you set the player ID parameter to
NULL, the ID is not returned. -
To stop playback, use the
tone_player_stop()function with the ID of the player you want to stop:tone_player_stop(tone_player_id);
Playing a Tone for a Specified Duration
To play a tone for a specified duration, use the tone_player_start_new() function with the duration (third parameter) set to the number of milliseconds you want playback to last:
tone_player_start_new(TONE_TYPE_SUP_CONGESTION, stream_info, 1000, &tone_player_id);
When you set the duration to a specified time, playback stops automatically after that time. You can also stop playback manually using the tone_player_stop() function.
Related Information
- Dependencies
- Since Tizen 2.4