HTML Priorities
The HTML markup is not as important as before, because JavaScript APIs can be used to create various functionalities. For example, graphics APIs (in TV applications) can be used for making games, media APIs (in TV applications) for creating video chats, and communication APIs (in TV applications) for various types of messaging. However, HTML remains the basis of Web applications, and it is useful to be familiar with its behavior.
The structure of the HTML document can be classified into DOCTYPE and HTML DOM (Document Object Model). When an HTML document is loaded, the browser renders the contents in its screen as follows:
- HTML is parsed referring to the rules defined in the
<!DOCTYPE>element. - HTML DOM tree is established.
- DOM elements, including references to JavaScript, are arranged based on the information defined in the head element. This is called rendering.
- The elements are painted on the screen based on CSS rules.
<!DOCTYPE> Element
The <!DOCTYPE> element informs the browser of the HTML version and which rules it must follow. It is not a composition element of the HTML.
The browser, based on the version defined in the <!DOCTYPE> element and DTD (Document Type Definition), decides how to handle the HTML before interpreting it. Therefore, the <!DOCTYPE> element must be declared at the beginning of an HTML document.
<!--HTML5-->
<!DOCTYPE html>

<!--Prior to HTML5-->
<!DOCTYPE html PUBLIC "{HTML Version Information}" "{DTD (Document Type Definition) file link defined by Rule in HTML DOM}">
HTML DOM Tree
HTML DOM is a structured model to control Web elements. It is an official W3C standard to express the document regardless of platforms or languages, and the foundation of the HTML5 APIs.
The <html> element is the top-level element of the HTML DOM tree that wraps the entire document, and it has the <head> and <body> elements as child nodes:
<!DOCTYPE html>
<html>
   <head>
      <!--Content-->
   </head>
   <body>
      <!--Content-->
   </body>
</html>
<head> element
The <head> element contains the information that the browser refers to when rendering the body element to interpret information, such as the title of HTML document, CSS, JavaScript, and favicon:
<!DOCTYPE html>
<html>
   <head>
      <meta charset="utf-8"/>
      <title> Tizen applications </title>
      <link rel="stylesheet" href="css/style.css"/>
      <script src="/common/js/ui.js"></script>
   </head>
   <body>
      <!--Content-->
   </body>
</html>
The <head> contains the following subelements:
-
<title>: Defines the title of the document. -
<meta>: Defines information, such as encoding, creator, and keywords of the document.Note
The viewport element, which sets the screen area, is included in the meta information. -
<style>,<link>: Sets the styles of the document. -
<script>,<noscript>: Adds functions to the document.
<body> element
The <body> element defines the area displaying content on the browser screen:
<!DOCTYPE html>
<html>
<head>
<!--Content-->
</head>
<body>
<section id="tizen_wrap">
<header>
<h1>Tizen Web App</h1>
</header>
<section id="contents">
<!--Content-->
</section>
<footer>
<p>© All rights reserved.</p>
</footer>
</section>
</body>
</html>
CSS Rule Priorities
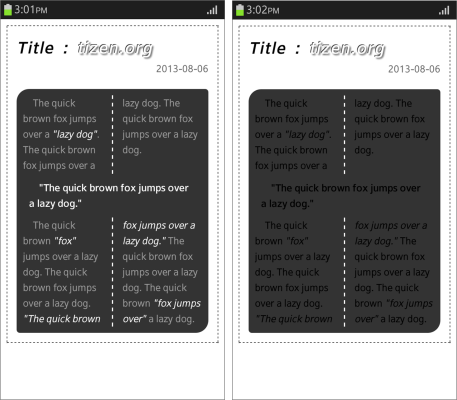
The basic rule of HTML, CSS, and JavaScript is that the code is applied from the top to the bottom of the document. Sometimes the lack of understanding of the CSS rule priorities can cause a result you do not expect.
The following figure illustrates this problem in mobile applications by applying a font color to a black background.
Figure: Expected and actual result of applying a font color (Optional feature)
Basic CSS Rules
When creating a CSS document, the following rules apply:
-
When more than 1 overlapping styles are applied to the same element, only the last style is visible:
p {color: red} p {color: blue} <!--Blue color is applied--> -
The style applied in the parent node at the DOM tree is inherited. For more information, see W3C inheritance documentation.
-
The style that has the highest CSS specificity is applied. The specificity of different elements is defined as follows:
- ID attribute = 100
- Class attribute = 10
- Element = 1
<body> <p id="target" class="target">Hello World</p> </body> <style> p#target {color: black} /* Specificity: 101 */ p#target {color: red} /* Specificity: 101 */ p.target {color: blue} /* Specificity: 11 */ p {color: tomato} /* Specificity: 1 */ </style> <!--Red color is applied--> -
When the
!importantattribute is used, it has the highest priority:<body> <p id="target" class="target">Hello World</p> </body> <style> p#target {color: black !important} p#target {color: red} p.target {color: blue} p {color: tomato} </style> <!--Black color is applied-->
Keeping these rules in mind, you can use any of the following ways to achieve the expected result illustrated in the figure above:
.contents {color: #999 !important;}

section.contents {color: #999;}

body .contents {color: #999;}

#container > .contents {color: #999;}
Using CSS with HTML
There are various ways to connect CSS with HTML. Creating a separate CSS file and managing it separately is convenient when it comes to applying changes in the future. The file is connected to the HTML file using a <link> tag in the <head> element.
In the following example, the applied order of the CSS elements is as follows:
<link>tag in the<head>element<style>tag in the<head>element@importattribute in the CSS areastyleattribute in a HTML element
<!DOCTYPE html>
<html>
   <head>
      <!--Link in head-->
      <link rel="stylesheet" href="css/style.css"/>

      <!--Style tag in head-->
      <style>
         p {color: tomato}
      </style>

      <!--@import in CSS area-->
      <style>
         @import url("css/style.css");
      </style>
   </head>

   <body>
      <!--Style attribute in HTML element-->
      <p style="color: red">Hello World</p>
   </body>
</html>
However, the priority order of the elements is as follows:
styleattribute in a HTML element<style>tag in the<head>element@importattribute in the CSS area<link>tag in the<head>element
The style attribute in the HTML element has the highest priority after the !important attribute.
Using the order above, if all other color styles are applied to <p> elements, the style attribute is used to apply the red color that has been directly defined in the HTML. This rule differs from the CSS specificity rules.
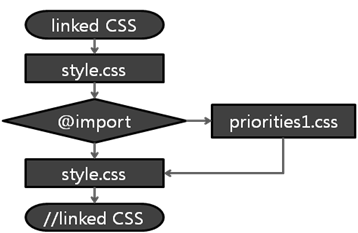
Generally, when the @import attribute is used, connect to the top of CSS file that has been linked externally, as illustrated in the following figure. If the attribute is applied in the middle of the CSS file, it is difficult to know the point where CSS has been applied, and to find the file connected to the source in the future. Therefore, group the CSS file at the top.
Note
Using the@importattribute gives the same result as connecting an external file, but it does not function correctly in older browsers (IE 5.5 and below).
Figure: Using the @import attribute
The markup in the corresponding files is as follows:
-
In the HTML code:
<head> <link rel="stylesheet" href="css/style.css"/> </head> -
In the
style.cssfile:@import url("priorities1.css"); p: after {content: " : linked in head"}Figure: Result of linking the @import attribute

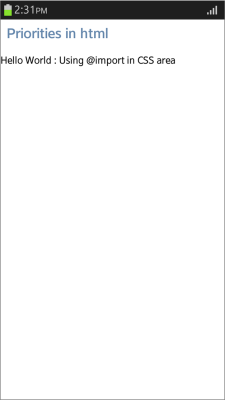
-
In the
priorities1.cssfile:p: after {content: " : Using @import in CSS area"}Figure: Result of using the @import attribute in the CSS area
JavaScript Behavior
With the advent of HTML5, numerous powerful HTML5 APIs have been introduced. Since the usage of JavaScript has increased, it has become important to use it correctly and optimize JavaScript performance.
JavaScript used in Web applications can be divided into the core, ECMAScript, and DOM, which all manipulate HTML. ECMAScript is executed when a method is called, or it can be executed when an event is fired within a HTML document through a linkage with DOM.
Using JavaScript with HTML
Used with HTML, JavaScript works as follows:
- During HTML parsing, the content of the
<script>tag is parsed to JavaScript Interpreter. - The Interpreter parses the received script code.
- Requests that need not be handled immediately are suspended.
- The handled result is passed over to the browser, which continues to parse HTML.
The following example shows how you can use JavaScript with HTML either by linking to a JavaScript file, or embedding it directly in the HTML code:
/* Linking from HTML */
<script src="js/main.js"></script>

/* Direct use in HTML */
<script>
    var obj = document.querySelector('.animated');

    function animate() {
        /* Execute */
    }

    /* Call the animation function when the event is fired */
    webkitRequestAnimationFrame(animate);
</script>
Both ways described above give the same result in behavior. However, the position of the JavaScript code affects the order in which the methods are called.
Note
Previously, adding JavaScript code within head tag was recommended because it is easy to maintain. Currently, adding it to the end of the body and executing it after parsing the HTML document is common.
JavaScript Events
JavaScript generally calls a method when a specific event is fired. More than 70 types of events, such as onload and onclick are available.
The following example shows the use of a simple event:
<!--HTML-->
<body onload="touchEventHandler()">

<script>
    /* JavaScript */
    /* Directly assigning */
    window.onload = touchEventHandler; /* Assigns the name of the subject method */

    /* Event listener (W3C standard) */
    document.addEventListener('touchstart', touchEventHandler, false);
</script>
Prefer using W3C standard event listener methods. The inline JavaScript code applied directly to an HTML tag is difficult to maintain. Assigning a method directly to an event is also difficult when passing parameters, as the method needs to be assigned for every event.
JavaScript Priorities
The rendering order of JavaScript code is based on the following rules:
- JavaScript within the
<head>element is temporarily saved, but not handled. - JavaScript within the
<body>element is immediately handled when it is parsed. - When the temporarily saved JavaScript content is executed, the
<head>element content is rendered first, and the<body>element content after it.
Using JavaScript Code within HTML
To provide users with JavaScript-based features, you must learn to use JavaScript code within an HTML document:
-
To use JavaScript code in the
<head>element, place the relevant JavaScript content in a<script>tag:<head> <script src="js/jquery_1.9.0_min.js"></script> <script> window.onload = function() { testLog('head onload'); }; $(document).ready(function() { testLog('head ready'); }); </script> </head>The JavaScript code within the
<head>element is sent to Interpreter. As there are no methods to be handled immediately, its execution is suspended. -
To use JavaScript code in the
<body>element, place the relevant JavaScript content in a<script>tag:<body> <script src="js/jquery_1.9.0_min.js"></script> <script> function testLog(txt) { var logText = document.querySelector('.log'); logText.innerHTML += '<li>JavaScript in HTML ' + txt + '</li>'; } window.onload = function() { testLog('body onload'); }; $(document).ready(function() { testLog('body ready'); }); testLog('body'); (function() { testLog('body anonymous function'); }); </script> </body>The JavaScript code within the
<body>element is sent to Interpreter. The anonymous method is immediately executed, and the HTML DOM structure is set up. The methods in the$(document).ready()method and in theonloadevent are executed in the stored order.
Note
jQuery has to be called from both the<head>and<body>elements. ThelogTextvariable has to be called from the<body>element. The method connected to theonloadevent in the<head>element is not executed.
Related Information
- Dependencies
- Tizen 2.4 and Higher
- Tizen 3.0 and Higher for TV