Relative Layout
The RelativeLayout is a layout class in which each side of the child can be specified as relative to the sibling view or the parent. The Target and the RelativeOffset properties define a relationship with each other.
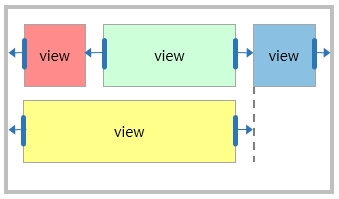
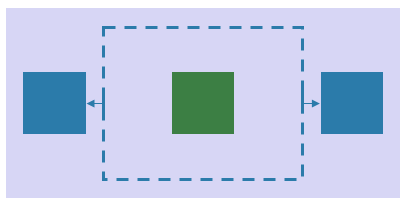
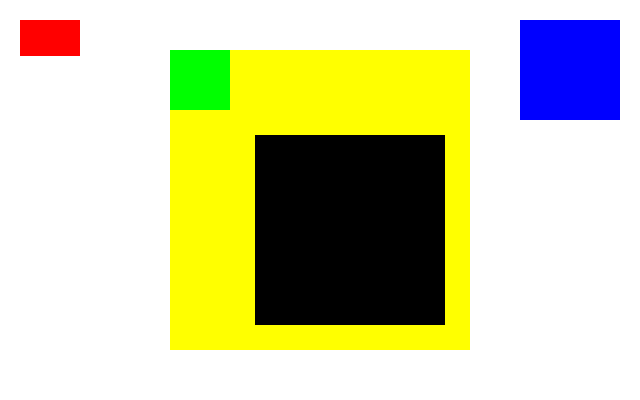
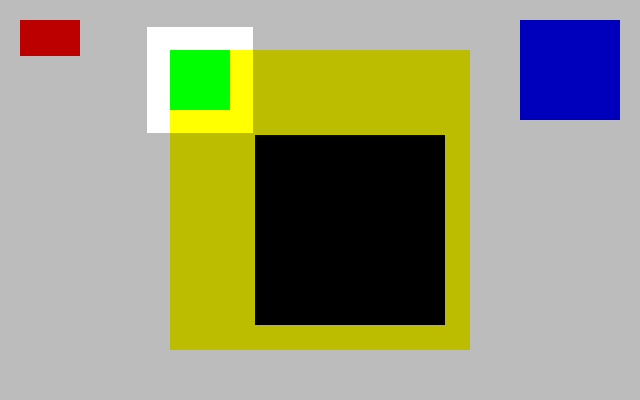
The following figure shows the relative layout position of rectangles with Target and RelativeOffset. The arrows in the preview indicate where the LeftTarget and the RightTarget are pointing:
Figure: Relative layout example with Target and RelativeOffset
                pgsql

                    Copy


            <View x:Name="Parent">
    <View.Layout>
        <RelativeLayout/>
    </View.Layout>

    <View x:Name="RedRect"
        BackgroundColor="1,0,0,1"
        WidthSpecification="100"
        HeightSpecification="100"/>

    <View x:Name="GreenRect"
        BackgroundColor="0,1,0,1" HeightSpecification="100"
        RelativeLayout.LeftTarget={x:Reference Name=RedRect}"
        RelativeLayout.RightTarget="{x:Reference Name=BlueRect}"
        RelativeLayout.FillHorizontal="true"
        RelativeLayout.LeftRelativeOffset="1.0"/>

    <View x:Name="BlueRect"
        BackgroundColor="0,0,1,1"
        WidthSpecification="100"
        HeightSpecification="100"
        RelativeLayout.RightRelativeOffset="1.0"
        RelativeLayout.LeftRelativeOffset="1.0"
        RelativeLayout.HorizontalAlignment="End"/>

    <View x:Name="YellowRect"
        BackgroundColor="1,1,0,1"
        HeightSpecification="100"
        RelativeLayout.LeftTarget="{x:Reference Name=Parent}"
        RelativeLayout.RightTarget="{x:Reference Name=BlueRect}"
        RelativeLayout.FillHorizontal="true"/>
</View>
- When the
Targetand theRelativeOffsetproperties are set as default, the following layout is seen:- The
RedRectis aligned to the left side of the parent layout. - The
BlueRectis aligned to the right side of the parent layout by theHorizontalAlignment. - The left side of
GreenRectis set to be aligned withRedRectand the right side is set to be aligned withBlueRect. - The
GreenRectfills the space betweenRedRectandBlueRectby usingFillHorizontal. - The
YellowRectrepresents that each side can be set as sibling view and parent layout.
- The
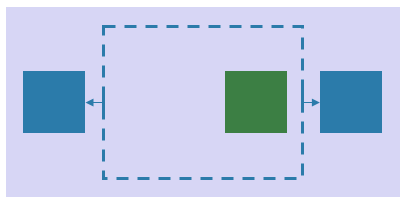
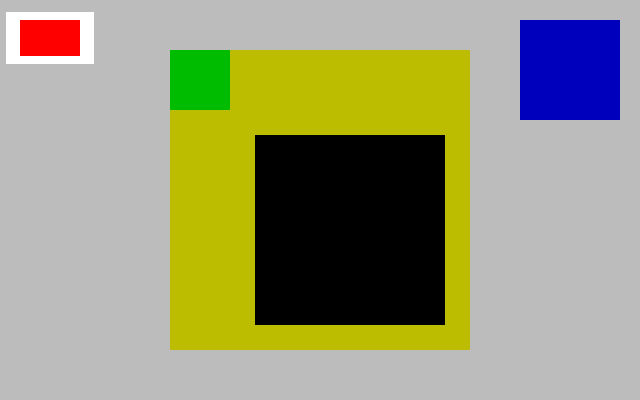
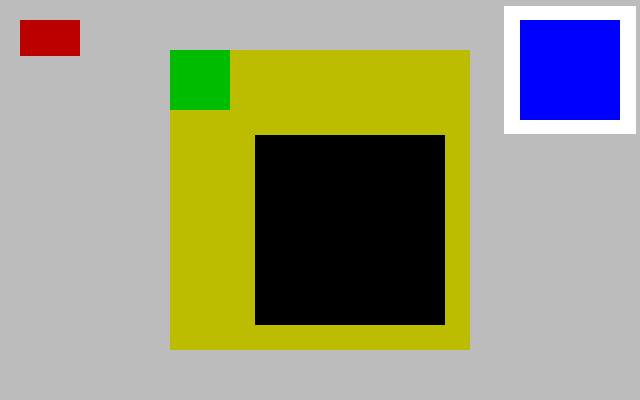
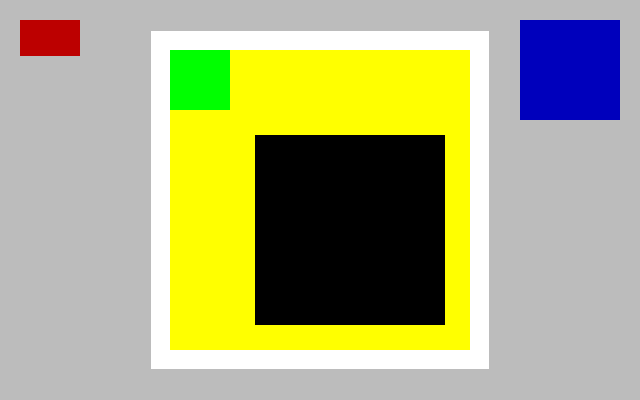
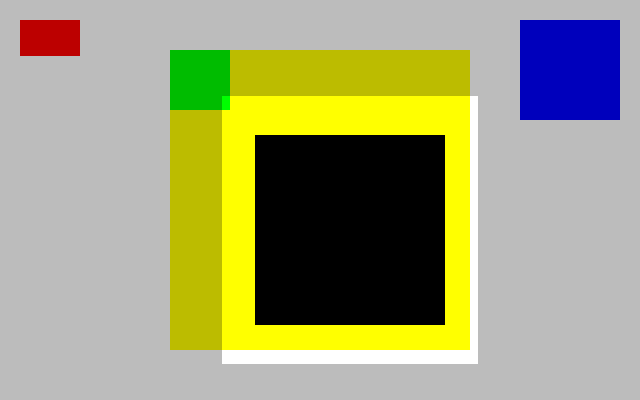
Figure: Relative layout with Target and RelativeOffset on different screen resolutions
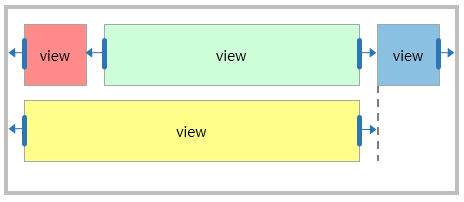
Since the children of the relative layout are laid out depending on their relationship, therefore you can create a responsive UI that keeps the proportions across different screen resolutions without modifications.
The width of RedRect and BlueRect is set as 100 by specifying the WidthSpecification property. However, the width of GreenRect and YellowRect is resized within the layout space that is set by the LeftTarget and RightTarget.
The following table describes the properties of RelativeLayout:
| Property | Type | Description |
|---|---|---|
LeftTarget |
View | Gets or sets the target that the child’s left side is referring to. |
RightTarget |
View | Gets or sets the target that the child’s right side is referring to. |
TopTarget |
View | Gets or sets the target that the child’s top side is referring to. |
BottomTarget |
View | Gets or sets the target that the child’s bottom side is referring to. |
LeftRelativeOffset |
float | Gets or sets the relative offset for the left target. When the value is 0, the left edges of the left target and child view are aligned.When the value is 1, the left edge of the child view is aligned to the right edge of the left target. |
RightRelativeOffset |
float | Gets or sets the relative offset for the right target. When the value is 0, the right edge of the child view is aligned to the left edge of the right target.When the value is 1, the right edges of the right target and child view are aligned. |
TopRelativeOffset |
float | Gets or sets the relative offset for the top target. When the value is 0, the top edges of the top target and child view are aligned.When the value is 1, the top edge of the child view is aligned to the bottom edge of the top target. |
BottomRelativeOffset |
float | Gets or sets the relative offset for the bottom target. When the value is 0, the bottom edge of the child view is aligned to the top edge of the bottom target.When the value is 1, the bottom edges of the bottom target and child view are aligned. |
HorizontalAlignment |
RelativeLayout.Alignment | Gets or sets the horizontal alignment of the child view. |
VerticalAlignment |
RelativeLayout.Alignment | Gets or sets the vertical alignment of the child view. |
FillHorizontal |
bool | Gets or sets the boolean value. It indicates whether or not the child fills its horizontal space. |
FillVertical |
bool | Gets or sets the boolean value. It indicates whether or not the child fills its vertical space. |
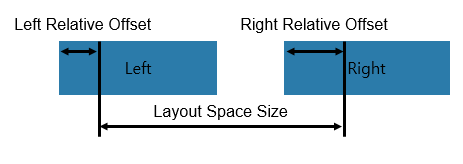
Layout space of child view
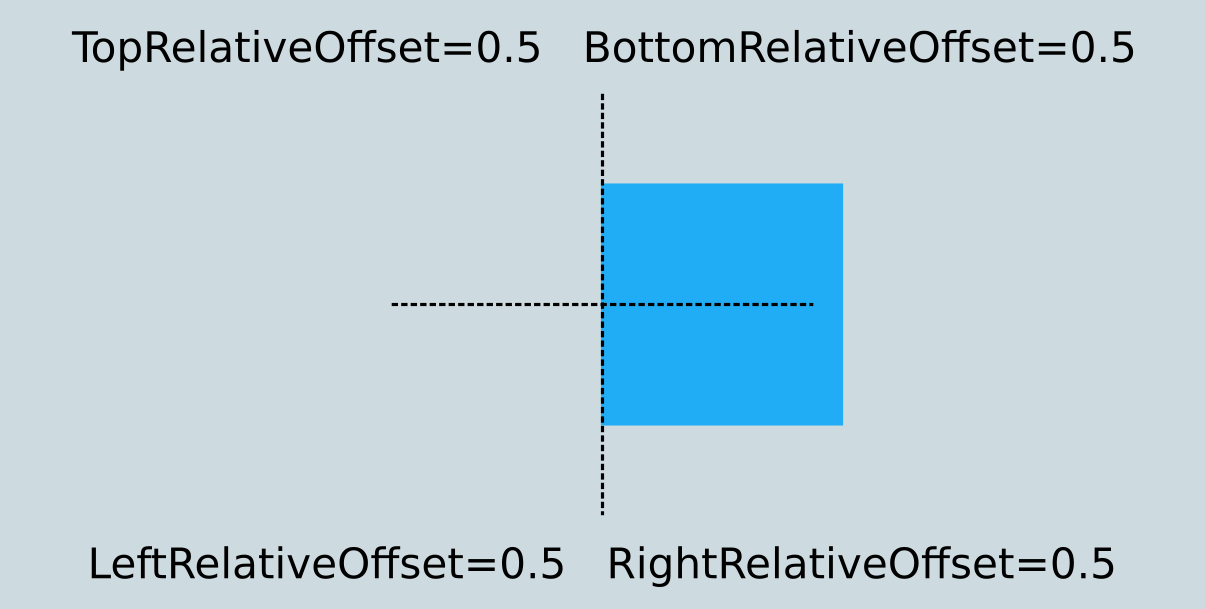
The Target and the RelativeOffset properties determine the size of the layout space. The Target property indicates the target view in which each edge of the layout space is aligned. The default value is null, which refers to the relative layout.
The RelativeOffset moves each edge of layout space in proportion to the target view size:
- If the value is
0.0f, the edge of the layout space is aligned with the left or top edge of the target view. - If the value is
1.0f, the edge of the layout space is aligned with the right or bottom edge of the target view:
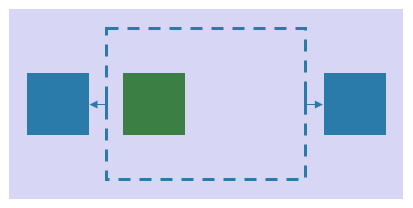
Alignment
The HorizontalAlignment and the VerticalAlignment properties describe how to align the child view with the layout space. The default value is Start for both the axes:
HorizontalAlignment: Start |
HorizontalAlignment: Center |
HorizontalAlignment: End |
|---|---|---|
 |
 |
 |
The alignment property allows to position child view within its parent. Child could be centered horizontally or vertically. It also could be aligned to the top, bottom, left or right edge of the parent.
HorizontalAlignment: Start |
HorizontalAlignment: Center |
HorizontalAlignment: End |
|---|---|---|
 |
 |
 |
Fill
The FillHorizontal and the FillVertical properties are specified by boolean values. These boolean values specify whether or not to fill the layout space. The default is false for both the axes:
FillHorizontal: false |
FillHorizontal: true |
|---|---|
|
 |
NoteThe component can take the size of the parent view only when the
WidthSpecification/HeightSpecificationproperty is set toWrapContent.
Example
RelativeLayout can fill the bounded container with the content of the view. It is possible to fill the container horizontally and vertically.
RelativeLayout initialization
                C#

                    Copy


            View relativeLayoutView = new View
{
    WidthSpecification = LayoutParamPolicies.MatchParent,
    HeightSpecification = LayoutParamPolicies.MatchParent,
    BackgroundColor = Color.White
};

relativeLayoutView.Layout = new RelativeLayout();
                dust

                    Copy


            <View
    WidthSpecification="{Static LayoutParamPolicies.MatchParent}"
    HeightSpecification="{Static LayoutParamPolicies.MatchParent}"
    BackgroundColor="White">

    <View.Layout>
        <RelativeLayout />
    </View.Layout>

</View>
Red view
The following code shows how to create the red view bounded by offsets:
RelativeLayout.SetLeftRelativeOffset(redView, 0.0f)- view’s left is at the parent’s left.RelativeLayout.SetRightRelativeOffset(redView, 0.1f)- view’s right is at the position of 0.1 width from the parent’s left.RelativeLayout.SetTopRelativeOffset(redView, 0.0f)- view’s top is at the parent’s top.RelativeLayout.SetBottomRelativeOffset(redView, 0.1f)- view’s bottom bound is at the position of 0.1 width from the parent’s top.RelativeLayout.SetFillHorizontal(redView, true)andRelativeLayout.SetFillVertical(redView, true)- Since the view does not have its Width and Height, the view should be filled with the relative position (left, right, top, and bottom).
                C#

                    Copy


            View redView = new View
{
    BackgroundColor = Color.Red
};

RelativeLayout.SetLeftRelativeOffset(redView, 0.0f);
RelativeLayout.SetRightRelativeOffset(redView, 0.1f);
RelativeLayout.SetTopRelativeOffset(redView, 0.0f);
RelativeLayout.SetBottomRelativeOffset(redView, 0.1f);

RelativeLayout.SetFillHorizontal(redView, true);
RelativeLayout.SetFillVertical(redView, true);

relativeLayoutView.Add(redView);
RelativeLayout.LeftRelativeOffset="0.0"- view’s left is at the parent’s left.RelativeLayout.RightRelativeOffset="0.1"- view’s right is at the position of 0.1 width from the parent’s left.RelativeLayout.TopRelativeOffset="0.0"- view’s top is at the parent’s top.RelativeLayout.BottomRelativeOffset="0.1"- view’s bottom bound is at the position of 0.1 width from the parent’s top.RelativeLayout.FillHorizontal="true"andRelativeLayout.FillVertical="true"- Since the view does not have its Width and Height, the view should be filled with the relative position (left, right, top, and bottom).
                routeros

                    Copy


            <View x:name="redView"
    BackgroundColor="Red"
    RelativeLayout.LeftRelativeOffset="0.0"
    RelativeLayout.RightRelativeOffset="0.1"
    RelativeLayout.TopRelativeOffset="0.0"
    RelativeLayout.BottomRelativeOffset="0.1"
    RelativeLayout.FillHorizontal="True"
    RelativeLayout.FillVertical="True"/>
Blue view
The following code shows how to position the blue view with a predefined size and change its position beginning with HorizontalAlignment:
WidthSpecificationandHeightSpecification- set the size of the view.RelativeLayout.SetLeftRelativeOffset(blueView, 1.0f)- view’s left is on the parent’s right.RelativeLayout.SetRightRelativeOffset(blueView, 1.0f)- view’s right is on the parent’s right.RelativeLayout.SetTopRelativeOffset(blueView, 0.0f)- view’s top is on the parent’s top.RelativeLayout.SetBottomRelativeOffset(blueView, 0.0f)- view’s bottom is on the parent’s top.RelativeLayout.SetHorizontalAlignment(blueView, RelativeLayout.Alignment.End)- position view begins from right to left from the container.
                C#

                    Copy


            View blueView = new View
{
    BackgroundColor = Color.Blue,
    WidthSpecification = 200,
    HeightSpecification = 200
};

RelativeLayout.SetLeftRelativeOffset(blueView, 1.0f);
RelativeLayout.SetRightRelativeOffset(blueView, 1.0f);
RelativeLayout.SetTopRelativeOffset(blueView, 0.0f);
RelativeLayout.SetBottomRelativeOffset(blueView, 0.0f);

RelativeLayout.SetHorizontalAlignment(blueView, RelativeLayout.Alignment.End);
relativeLayoutView.Add(blueView);
RelativeLayout.LeftRelativeOffset="1.0"- view’s left is on the parent’s right.RelativeLayout.RightRelativeOffset="1.0"- view’s right is on the parent’s right.RelativeLayout.TopRelativeOffset="0.0"- view’s top is on the parent’s top.RelativeLayout.BottomRelativeOffset="0.0"- view’s bottom is on the parent’s top.WidthSpecificationandHeightSpecificationset the size of the view.RelativeLayout.HorizontalAlignment="End"- position view begins from right to left from the container.
                routeros

                    Copy


            <View x:name="blueView"
    BackgroundColor="Blue"
    WidthSpecification="200"
    HeightSpecification="200"

    RelativeLayout.LeftRelativeOffset="1.0"
    RelativeLayout.RightRelativeOffset="1.0"
    RelativeLayout.TopRelativeOffset="0.0"
    RelativeLayout.BottomRelativeOffset="0.0"

    RelativeLayout.HorizontalAlignment="End"/>
Yellow view
The following code shows how to center yellow view with a predefined size:
RelativeLayout.SetLeftRelativeOffset(yellowView, 0.5f)- view’s left is on center of the parent’s view.RelativeLayout.SetRightRelativeOffset(yellowView, 0.5f)- view’s right is on center of the parent’s view.RelativeLayout.SetTopRelativeOffset(yellowView, 0.5f)- view’s top is on center of the parent’s view.RelativeLayout.SetBottomRelativeOffset(yellowView, 0.5f)- view’s bottom is on center of the parent’s view.WidthSpecificationandHeightSpecificationset the size of the view.RelativeLayout.SetHorizontalAlignment(yellowView, RelativeLayout.Alignment.Center)andRelativeLayout.SetVerticalAlignment(yellowView, RelativeLayout.Alignment.Center)- position view on the center of container.
                C#

                    Copy


            View yellowView = new View
{
    BackgroundColor = Color.Yellow,
    WidthSpecification = 600,
    HeightSpecification = 600
};

RelativeLayout.SetLeftRelativeOffset(yellowView, 0.5f);
RelativeLayout.SetRightRelativeOffset(yellowView, 0.5f);
RelativeLayout.SetTopRelativeOffset(yellowView, 0.5f);
RelativeLayout.SetBottomRelativeOffset(yellowView, 0.5f);

RelativeLayout.SetHorizontalAlignment(yellowView, RelativeLayout.Alignment.Center);
RelativeLayout.SetVerticalAlignment(yellowView, RelativeLayout.Alignment.Center);
relativeLayoutView.Add(yellowView);
RelativeLayout.LeftRelativeOffset="0.5"- view’s left is on center of the parent’s view.RelativeLayout.RightRelativeOffset="0.5"- view’s right is on center of the parent’s view.RelativeLayout.TopRelativeOffset="0.5"- view’s top is on center of the parent’s view.RelativeLayout.BottomRelativeOffset="0.5"- view’s bottom is on center of the parent’s view.WidthSpecificationandHeightSpecificationset the size of the view.RelativeLayout.HorizontalAlignment="Center"andRelativeLayout.VerticalAlignment="Center"- position view on the center of the container.
                routeros

                    Copy


            <View x:Name="yellowView"
    BackgroundColor="Yellow"
    WidthSpecification="600"
    HeightSpecification="600"
    RelativeLayout.LeftRelativeOffset="0.5"
    RelativeLayout.RightRelativeOffset="0.5"
    RelativeLayout.TopRelativeOffset="0.5"
    RelativeLayout.BottomRelativeOffset="0.5"
    RelativeLayout.HorizontalAlignment="Center"
    RelativeLayout.VerticalAlignment="Center"/>
Green view
The following code shows how to create the green view to relate to yellowView for every target:
- View’s targets are set to the
yellowView. RelativeLayout.SetLeftRelativeOffset(greenView, 0.0f)- view’s left is at the yellowView’s left.RelativeLayout.SetRightRelativeOffset(greenView, 0.2f)- view’s right is at the position of 0.2 width from the yellowView’s left.RelativeLayout.SetTopRelativeOffset(greenView, 0.0f)- view’s top is at the yellowView’s top.RelativeLayout.SetBottomRelativeOffset(greenView, 0.2f)- view’s bottom is at the position of 0.2 width from the yellowView’s left.RelativeLayout.SetFillHorizontal(greenView, true)andRelativeLayout.SetFillVertical(greenView, true)- Since the view does not have its Width and Height, the view should be filled with the relative position (left, right, top, and bottom).
                C#

                    Copy


            View greenView = new View
{
    BackgroundColor = Color.Green
};

RelativeLayout.SetLeftTarget(greenView, yellowView);
RelativeLayout.SetRightTarget(greenView, yellowView);
RelativeLayout.SetTopTarget(greenView, yellowView);
RelativeLayout.SetBottomTarget(greenView, yellowView);

RelativeLayout.SetLeftRelativeOffset(greenView, 0.0f);
RelativeLayout.SetRightRelativeOffset(greenView, 0.2f);
RelativeLayout.SetTopRelativeOffset(greenView, 0.0f);
RelativeLayout.SetBottomRelativeOffset(greenView, 0.2f);

RelativeLayout.SetFillHorizontal(greenView, true);
RelativeLayout.SetFillVertical(greenView, true);
relativeLayoutView.Add(greenView);
- View’s targets are set to the
yellowView. RelativeLayout.LeftRelativeOffset="0.0"- view’s left is at the yellowView’s left.RelativeLayout.RightRelativeOffset="0.2"- view’s right is at the position of 0.2 width from the yellowView’s left.RelativeLayout.TopRelativeOffset="0.0"- view’s top is at the yellowView’s top.RelativeLayout.BottomRelativeOffset="0.2"- view’s bottom is at the position of 0.2 width from the yellowView’s left.RelativeLayout.FillHorizontal="true"andRelativeLayout.FillVertical="true"- Since the view does not have its Width and Height, the view should be filled with the relative position (left, right, top, and bottom).
                routeros

                    Copy


            <View x:Name="greenView"
    BackgroundColor="Green"
    RelativeLayout.LeftTarget="{x:Reference Name=yellowView}"
    RelativeLayout.RightTarget="{x:Reference Name=yellowView}"
    RelativeLayout.TopTarget="{x:Reference Name=yellowView}"
    RelativeLayout.BottomTarget="{x:Reference Name=yellowView}"
    RelativeLayout.LeftRelativeOffset="0.0"
    RelativeLayout.RightRelativeOffset="0.2"
    RelativeLayout.TopRelativeOffset="0.0"
    RelativeLayout.BottomRelativeOffset="0.2"
    RelativeLayout.FillHorizontal="True"
    RelativeLayout.FillVertical="True"/>
Black view
The following code shows how to create the black view related to yellowView and greenView:
- View’s left and top targets are set to
greenView. - View’s right and bottom targets are set to
yellowView. RelativeLayout.SetLeftRelativeOffset(blackView, 1.0f)- view’s left is on the greenView’s right.RelativeLayout.SetRightRelativeOffset(blackView, 1.0f)- view’s right is on the yellowView’s right.RelativeLayout.SetTopRelativeOffset(blackView, 1.0f)- view’s top is on the greenView’s bottom.RelativeLayout.SetBottomRelativeOffset(blackView, 1.0f)- view’s bottom is on the yellowView’s bottom.RelativeLayout.SetFillHorizontal(blackView, true)andRelativeLayout.SetFillVertical(blackView, true)- Since the view does not have its Width and Height, the view should be filled with the relative position (left, right, top, and bottom).
                C#

                    Copy


            View blackView = new View
{
    BackgroundColor = Color.Black,
    Margin = new Extents(50, 50, 50, 50)
};

RelativeLayout.SetLeftTarget(blackView, greenView);
RelativeLayout.SetRightTarget(blackView, yellowView);
RelativeLayout.SetTopTarget(blackView, greenView);
RelativeLayout.SetBottomTarget(blackView, yellowView);

RelativeLayout.SetLeftRelativeOffset(blackView, 1.0f);
RelativeLayout.SetRightRelativeOffset(blackView, 1.0f);
RelativeLayout.SetTopRelativeOffset(blackView, 1.0f);
RelativeLayout.SetBottomRelativeOffset(blackView, 1.0f);

RelativeLayout.SetFillHorizontal(blackView, true);
RelativeLayout.SetFillVertical(blackView, true);
relativeLayoutView.Add(blackView);
- View’s left and top targets are set to
greenView. - View’s right and bottom targets are set to
yellowView. RelativeLayout.LeftRelativeOffset="1.0"- view’s left is on the greenView’s right.RelativeLayout.RightRelativeOffset="1.0"- view’s right is on the yellowView’s right.RelativeLayout.TopRelativeOffset="1.0"- view’s top is on the greenView’s bottom.RelativeLayout.BottomRelativeOffset="1.0"- view’s bottom is on the yellowView’s bottom.RelativeLayout.FillHorizontal="true"andRelativeLayout.FillVertical="true"- Since the view does not have its Width and Height, the view should be filled with the relative position (left, right, top, and bottom).
                routeros

                    Copy


            <View x:name="blackView"
    BackgroundColor="Black"
    RelativeLayout.LeftTarget="{x:Reference Name=greenView}"
    RelativeLayout.RightTarget="{x:Reference Name=yellowView}"
    RelativeLayout.TopTarget="{x:Reference Name=greenView}"
    RelativeLayout.BottomTarget="{x:Reference Name=yellowView}"
    RelativeLayout.LeftRelativeOffset="1.0"
    RelativeLayout.RightRelativeOffset="1.0"
    RelativeLayout.TopRelativeOffset="1.0"
    RelativeLayout.BottomRelativeOffset="1.0"
    RelativeLayout.FillHorizontal="True"
    RelativeLayout.FillVertical="True"
    Margin="50,50,50,50"/>
Related information
-
Dependencies
- Tizen 6.5 and Higher
-
API References