Converting Projects for UI Builder
You can create UI applications based on pure EFL code. However, when expanding the UI view of the application or developing an optimized application for a new device, code maintenance and development productivity can slow down. For efficiency, consider converting your application to a UI Builder application. The Tizen Native UI Builder supports UI layouts and visual editing methods for creating new UI screens for various devices.
Note
You cannot convert EFL widget applications or DALi UI applications to UI Builder projects. Only EFL basic UI and watch application projects can be converted (based on thetizen-manifest.xmlfile).
Conversion Advantages
If you convert your project to a UI Builder project, you can use the visual editing tool of the UI Builder with the following advantages:
- Low entry barriers
- Rapid response to requirements
- Application optimization and maintenance
- Recognition of user views created with EFL code
Low Entry Barriers
Even a beginner can develop a UI Builder project easily:
-
With the Design editor:
- You can create and place UI components by dragging and dropping them from the Palette to the design area.
- You can lay out the UI components by, for example, moving and sizing.
- You can preview the application screen in real time without running the emulator.
-
With the Source editor:
- You can author a view (screen) using only the name and attributes of the UI component, without knowing the Elementary API.
- You can use the auto-completion function for XML grammar in the XML editor.
Rapid Response to Requirements
You can handle development requirements quickly:
-
With the Storyboard:
- You do not need to handle the flow of views through Elementary API code editing.
- You can see the flow and connection status of each screen at a glance, and add connections between views with a single click (Shift + Mouse drag).
-
With the Outline view:
- You can see the entire UI component hierarchy of the application at a glance.
- You can configure an appropriate view by selecting from among an empty view, various view templates, and a popup style view.
Application Optimization and Maintenance
The UI Builder is an integrated development environment for various screen sizes. You can use the multiple screen support feature with the Screen Configurator:
- Implement a single business logic, such as uploading a file or taking pictures.
- Author different UI layouts based on device type.
- With the Resource Manager, check which resources are displayed depending on the device’s locale setting.
The UI Builder supports visual editing, which is more intuitive than code developing, and helps you to understand the UI design of an application quickly. It also provides traditional development tools, such as the Layout Editor view, and several migration features to manage the EFL-code-based application UI:
- You can convert a project that was created without the UI Builder into a UI Builder project.
- The UI Builder provides a conceptual view (user view) to recognize screens created with EFL code.
- The UI Builder provides life-cycle management between the EFL-code-based user views and the newly-created UI Builder views.
Recognition of User Views Created with EFL Code
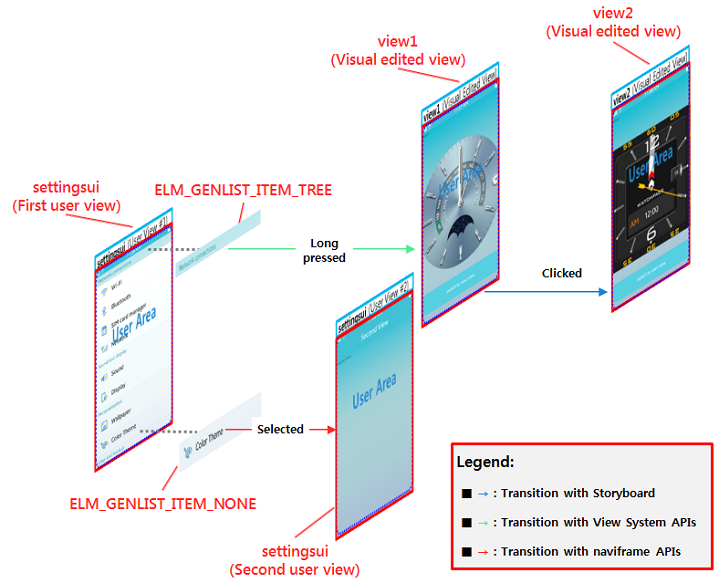
At runtime, the UI Builder view system recognizes screens created with EFL code. The system contains core UI components that are similar to common Tizen applications. The naviframe of the top-level layer is responsible for managing the life-cycle for each of the screens (views), and a single screen is managed by the view context that the system provides. The following figure shows how the screens from the SettingsUI sample application are recognized in the UI Builder environment.
Figure: Relationship between UI Builder view system and views
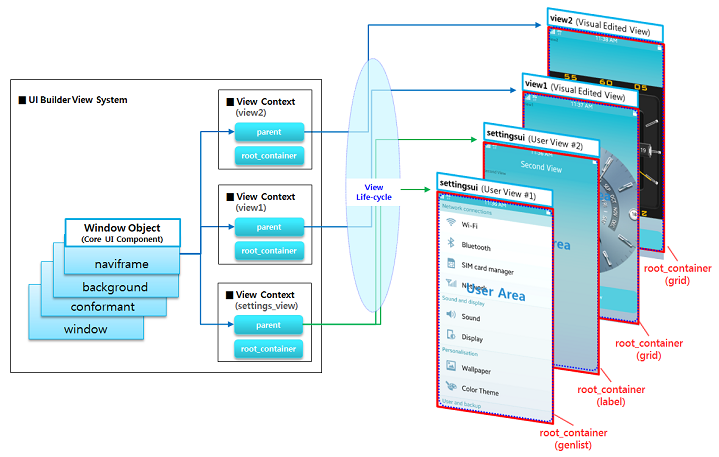
The main roles of the view context are:
- Root container: A top-level UI component for each screen (in the SettingsUI application, the genlist is the top-level UI component). The root container is referenced in the view system when the settingsui view is displayed.
- Parent: The object needed when adding the root container of the view. When the view is displayed on the screen, the naviframe object of the window object is assigned as the parent of the view context by the view system. The naviframe is of the Evas Object type, and is the top-level UI component of the view.
The user view recognizes a view (screen) created by the EFL C code that you have written. To see the views at runtime, edit the user views by using the window objects of the UI Builder view system.
To display visually-edited views (created in the UI Builder) and code-based user views (created with EFL code) on the device screen, the UI Builder view system refers to the root container of the view context. It also supports screen-to-screen transitions through the naviframe of the window object.
Table: Window object components
| Name | Type | Description |
|---|---|---|
| window | Elementary window (in mobile and wearable applications) | Forms the first window of the application. |
| bg | Background (in mobile and wearable applications) | Sets a background for a window or any container object. |
| conformant | Conformant (in mobile and wearable applications) | Provides space for indicators, virtual keypads, and softkey windows. |
| naviframe | Naviframe (in mobile and wearable applications) | Manages UI Builder views. |
Converting to a UI Builder Project
You can convert a native EFL UI project to a UI Builder project with the Convert to UI Builder Project wizard.
Creating a SettingsUI Sample Project
If there is no native EFL UI project in the Project Explorer view, create a sample project for testing purposes:
-
In the Tizen Studio menu, select File > New > Tizen Project.
-
Select Sample and click Next.
-
Select the Mobile v2.4 application, Native Application type, and UI > SettingsUI application sample.

-
Click Finish.
The sample project is created.

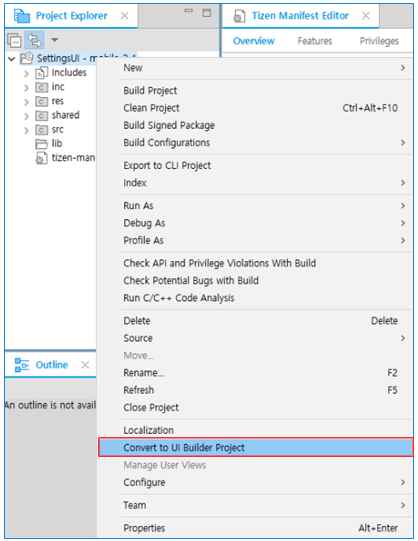
Converting the SettingsUI Project to a UI Builder Project
To convert the project:
-
Open the Convert to UI Builder Project wizard.
Right-click the SettingsUI project in the Project Explorer view, and select Convert to UI Builder Project.
-
Confirm the conversion by clicking Next.
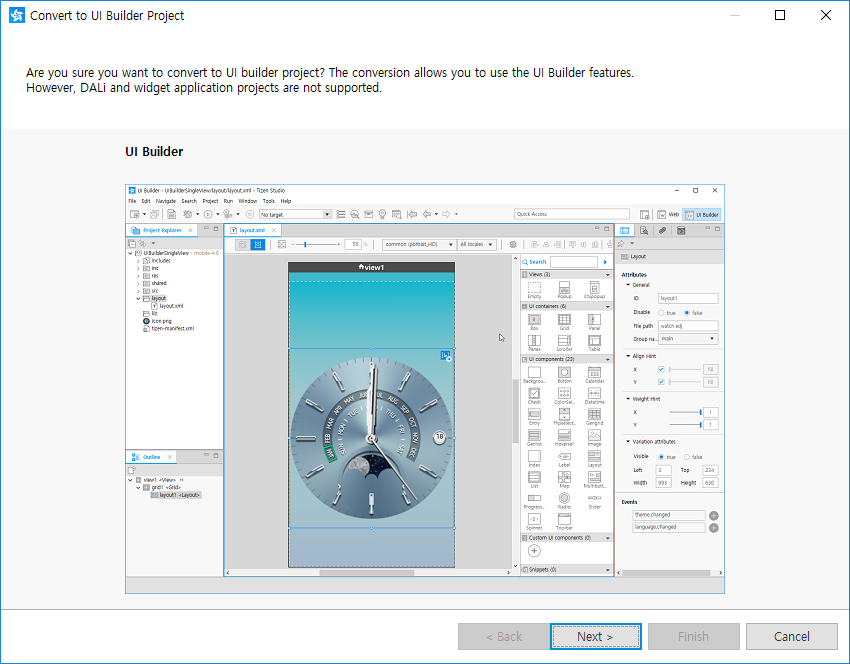
Note
When a wearable project is converted, the shape type selection appears after the opening step. The UI Builder provides different shape designs according to the shape type. Select the appropriate one for the converted project.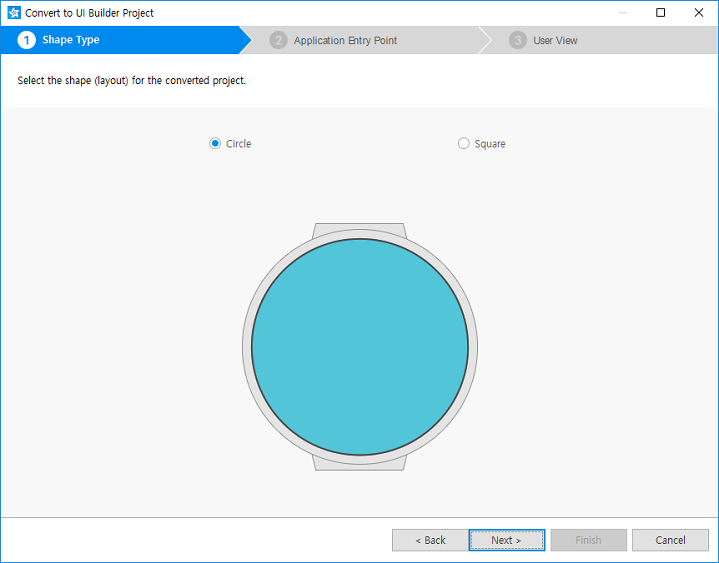
-
Select the application entry point:
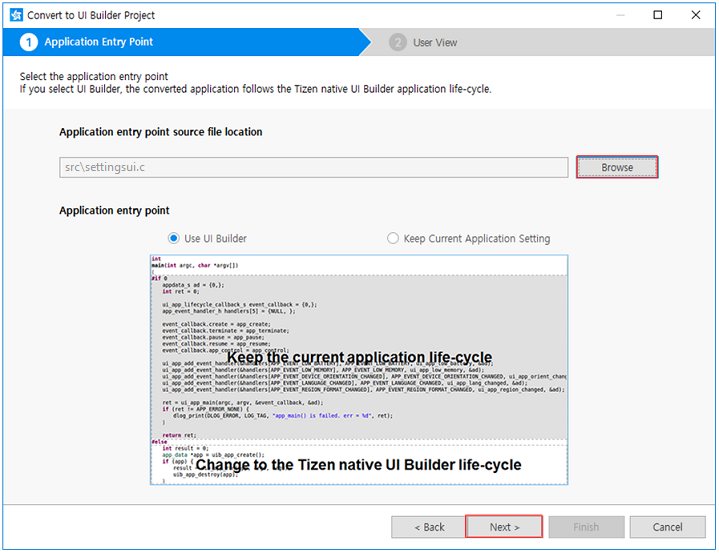
-
Click Browse.
-
Select the
settingsui.cfile (path:SettingsUI/src) and click Next.Note
Thesettingsui.cfile has amain()function corresponding to the application entry point. If you select the wrong file, a warning message appears and the Next button is disabled.
-
-
Add a user view:
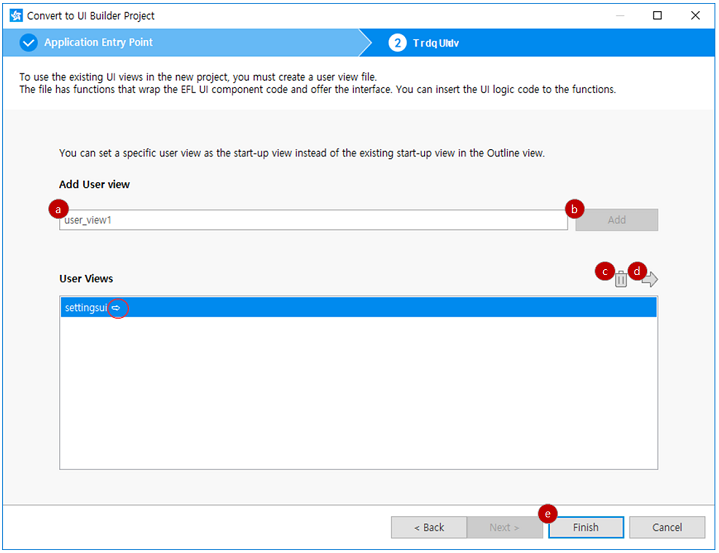
-
Enter the name (settingsui) for the user view:
- You cannot enter a name that already exists in the list.
- Use only English lowercase letters, numbers, and underscore characters. The name cannot start with a number.
-
Click Add (or press the Enter key on the keyboard).
-
If needed, click Delete to delete the user view.
By clicking Manage User View in the context menu of the converted project, you can open the wizard again.
-
Click Start-up:
- An arrow appears at the end of the selected user view name. If the start-up view already exists in the Outline view, it is replaced by the selected user view.
- If you want to cancel the selection, click Start-up again. The start-up view is changed to the previously selected user view.
-
Click Finish.
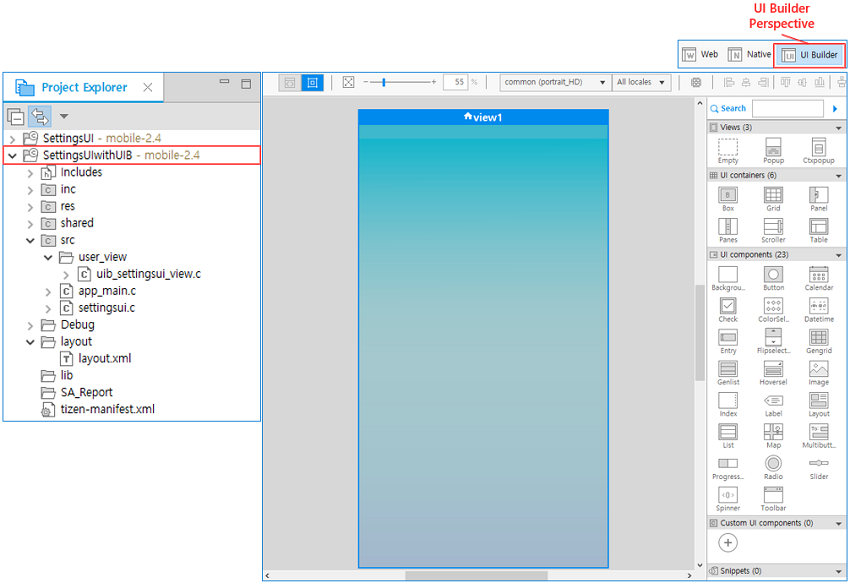
-
The converted project (SettingsUIwithUIB) appears in the Project Explorer view, the perspective is changed to UI Builder, and the Design editor is opened. You can now develop the project using the UI Builder features.
Figure: Structure of a converted project
Note
The converted project follows specific naming conventions:
- A suffix (“withUIB”) is added at the end of the original project name.
- If the same name with the same suffix already exists on the workspace, an empty serial number is appended to the end of the filename.
Using UI Builder Features
In the converted UI Builder project, you can use the UI Builder’s visual editing functions. The following examples show how to visually edit the views and define transitions between them.
Designing Views with Visual Editing
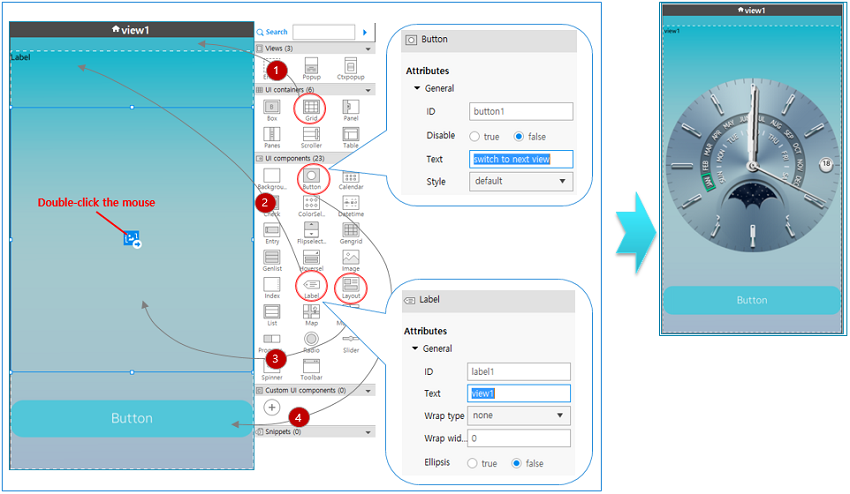
To edit view1:
-
Add a Grid UI component by dragging and dropping a grid from the Palette to the view.
-
Add a Label UI component by dragging and dropping a label from the Palette to the grid.
Enter view1 in the Text attribute of the label.
-
Add a Layout UI component by dragging and dropping a layout from the Palette to the grid:
- Double-click the layout UI component to open the New EDC File dialog.
- In the File name field, enter watchface1.
- Click Finish to open the EDC Editor.
- Select Watchface from the template list and click OK.
- In the Project Explorer view, select the SettingsUIwithUIB project and press F5 on the keyboard to refresh.
-
Add a Button UI component by dragging and dropping a button from the Palette to the grid.
Enter switch to next view in the Text attribute of the button.
Figure: Editing view1
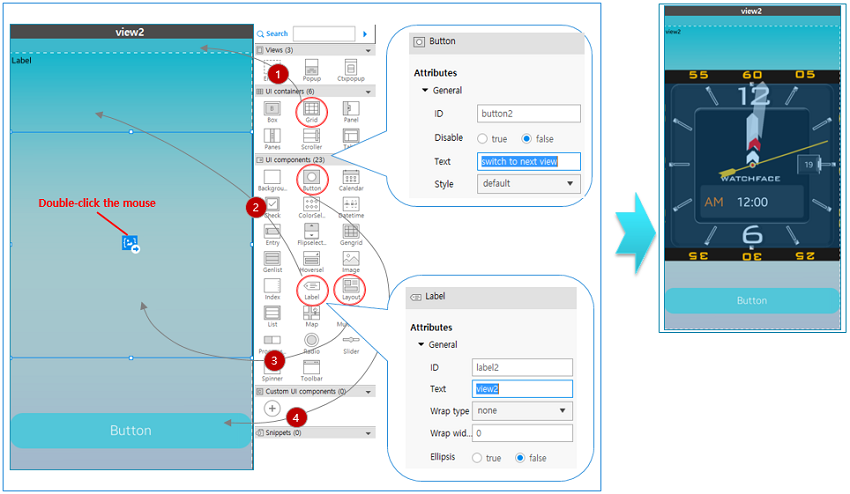
To edit view2:
-
Add a Grid UI component by dragging and dropping a grid from the Palette to the view.
-
Add a Label UI component by dragging and dropping a label from the Palette to the grid.
Enter view2 in the Text attribute of the label.
-
Add a Layout UI component by dragging and dropping a layout from the Palette to the grid:
- Double-click the layout UI component to open the New EDC File dialog.
- In the File name field, enter watchface2.
- Click Finish to open the EDC Editor.
- Select Watchface2 from the template list and click OK.
- In the Project Explorer view, select the SettingsUIwithUIB project and press F5 on the keyboard to refresh.
-
Add a Button UI component by dragging and dropping a button from the Palette to the grid.
Enter switch to next view in the Text attribute of the button.
Figure: Editing view2
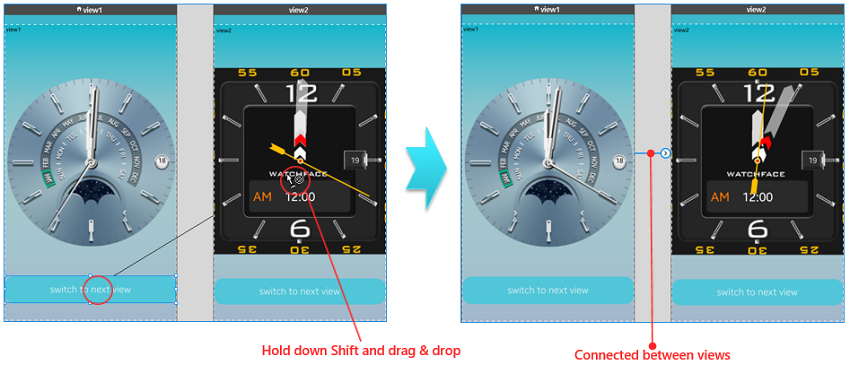
Defining Transitions Between Views
By using the Storyboard, you can easily switch between the views. To define transitions between views:
-
In the Layout Editor view, select the Storyboard.
-
Click the button in view1, hold down the Ctrl key and drag and drop the mouse cursor over view2.
Figure: Connecting views
Designing the User View
The file registered as a user view is located in the src/user_view folder. The following figure shows how to design the settingsui view screen.
The uib_uview_settingsui_create_cb() function is called automatically when the user view is displayed on the screen. The win_obj (window object) and vc (view context) are parameters passed from the UI Builder view system. If you uncomment the existing template code and execute it with the passed parameters, a Hello Tizen button appears on the screen.
Figure: Designing the settingsui view
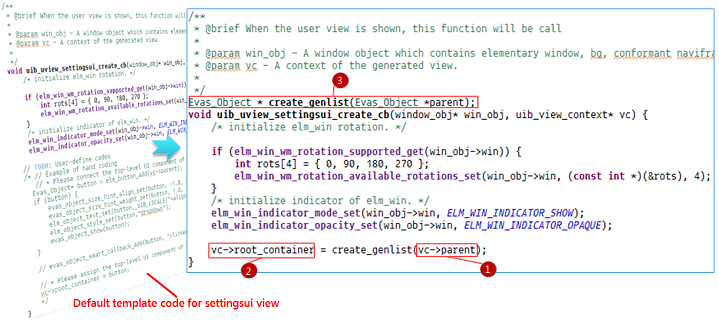
To design the settingsui view:
-
Generate the genlist UI component from the parent object of the view context:
- The genlist is a top-level UI component of the settingsui view.
- The
vcis a specific view context corresponding to the settingsui view. - The
vc->parentis the naviframe of the window object allocated from the view system when the view context is created.
-
Assign the generated genlist to a
root_containermember variable of the view context.The
root_containeris a top-level UI component of the screen, which is referenced when the UI Builder view system displays the first screen of the settingsui view. -
Add the declaration for calling the
create_genlist()function. -
In the Project Explorer view, open the
settingsui.cfile in thesrcfolder. -
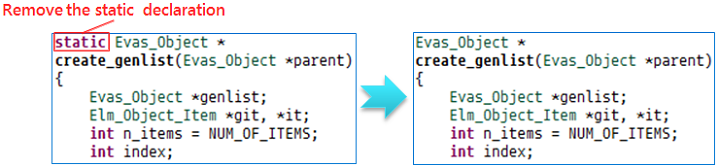
Remove the
statickeyword from thecreate_genlist()function to be called from other files.
Transition from the first view of SettingsUI to view1:
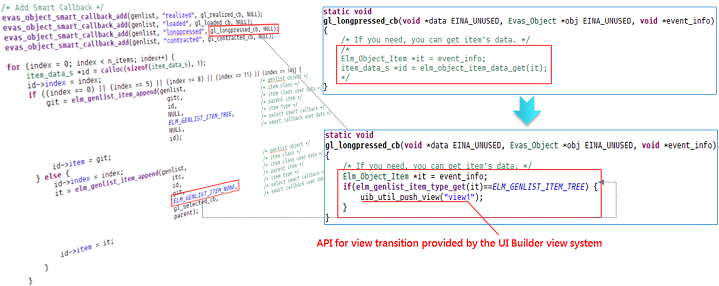
If you press the item_type_none (ELM_GENLIST_ITEM_NONE) of the genlist in the first view of the settingsui, the view in the screen switches to the second view of settingsui. You can also switch from the user view to the visually-edited view.
The following example shows the transition from the genlist to view1 when the tree_item_type (ELM_GENLIST_ITEM_TREE) is long-pressed in the genlist. In the settingsui.c file, modify the gl_longpressed_cb() function as shown in the following figure.
Figure: View transition
The following figure shows the resulting event flow between the SettingsUI views.
Figure: Event flow of settingsui views
To add screens from other applications as user views, see Combining Screens from Multiple Applications.
Related Information
- Dependencies
- Tizen Studio 1.1 and Higher