Providing Resources for Multiple Device Types
Tizen native applications can run on different types of devices, such as wearable, phone, tablets, and TVs. Tizen also supports various resolutions (WVGA ~ XQXGA) and resources.
When you take advantage of the above features, remember that you must always polish your work to create an optimal application for each device. Tizen Studio provides a tool (Resource Manager view) for developing applications for multiple device types and resolutions.
Note
The Resource Manager is supported in the 2.4 platform only. If you cannot access the Resource Manager view, check theversionandapi-versionattributes in the<manifest>element of the application manifest file.
Resource Directory Hierarchy
An application must provide a different UI depending on a specific device configuration, such as the screen size and screen orientation. When developing the application, provide alternative resources for each device display state by grouping them in resource directories.
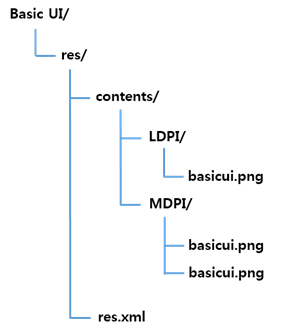
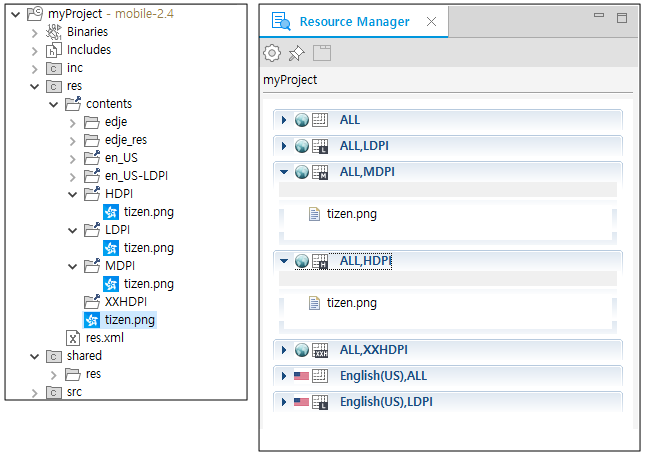
The res/contents directory contains predefined directories for specific alternative resources, and the res.xml file that is referenced at application runtime. The following example of a Basic UI project shows how to group the resources in your project. Place resources, such as images and sounds, in a specific subdirectory of the project’s res/contents directory or the root directory of the contents directory.
Figure: Resource directory hierarchy
Note
Always include the default resources in the root directory (not in a subdirectory of thecontentsdirectory) to ensure that your application has no dependencies on a specific device configuration.
A specific subdirectory is named with a configuration-qualifier. The configuration-qualifier is an indicator that represents each device configuration, and more content can be appended to it with a dash (-). The following table shows the 2 configuration-qualifier types currently supported by Tizen Studio.
Table: Configuration-qualifiers
| Configuration-qualifier type | Type value | Description |
|---|---|---|
| Language and region code | For example, en_US or en_UK |
The type values have the form ll_CC, where ll stands for an ISO 639 2-letter language code, and the optionally followed CC stands for an ISO 3166 2-upper-letter region code. |
| DPI (Dot Per Inch) density | LDPIMDPIHDPIXHDPIXXHDPI |
LDPI: low-dpi from 0 to 240MDPI: medium-dpi from 241 to 300HDPI: high-dpi from 301 to 380XHDPI: extra-high-dpi from 381 to 480XXHDPI: extra-extra-high-dpi from 481 to 600 |
Each application base scale can be applied to each DPI through a relation modification between the DPI and profile factor. For example, in the mobile profile, the Z device has a small screen (profile factor: 0.7) and the 1.8 base scale value, so the proper DPI is LDPI. The Z3 device has a large screen (profile factor: 0.8) and the 2.6 base scale value, so the proper DPI is MDPI.
Table: DPI and profile factor
| DPI type | Base scale in a small screen mobile(profile factor: 0.7) | Base scale in a large screen mobile(profile factor: 0.8) |
|---|---|---|
| LDPI | 0 ~ 1.9 | 0 ~ 2.1 |
| MDPI | 1.9 ~ 2.3 | 2.1 ~ 2.7 |
| HDPI | 2.3 ~ 3.0 | 2.7 ~ 3.4 |
| XHDPI | 3.0 ~ 3.7 | 3.4 ~ 4.3 |
| XXHDPI | 3.7 ~ | 4.3 ~ |
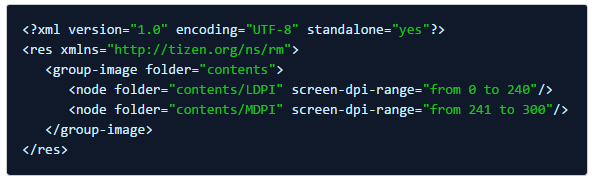
The res.xml file is composed of XML elements, and describes where each alternative resource is grouped into a device configuration. The following example shows a res.xml file based on the BasicUI project.
Figure: res.xml file
The res.xml file is automatically generated as part of the build packaging process by Tizen Studio. Since editing the res.xml file manually is not easy, Tizen Studio helps to minimize this difficulty by supporting the Resource Manager view.
Alternative Resources with the Resource Manager
The Resource Manager view helps you to place resources in your application to support specific device configurations, such as different screen densities.
In the Resource Manager view, you can:
- Show all resource configurations that the project provides (see the Tab view and Folding list view figure).
- Create multiple configuration-qualifier directories and remove them.
- Copy resources to an alternative directory by dragging and dropping in the view area. You can also remove resources.
- Generate code snippets by dragging and dropping in the source editor area.
Note
If the Resource Manager view is not visible, open it by selecting Window > Show View > Other > Tizen > Resource Manager from the Tizen Studio menu.
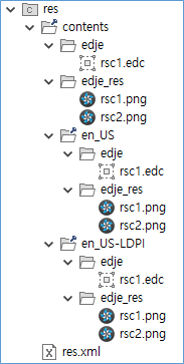
To place resource files (rsc1.edc file and the images referenced by it) for en_US and en_US-LDPI configurations:
- Open the Resource Configuration dialog by clicking
 in the Resource Manager view toolbar.
 - Add a configuration by selecting LDPI and MDPI in the DPI combo box.
- Drag the
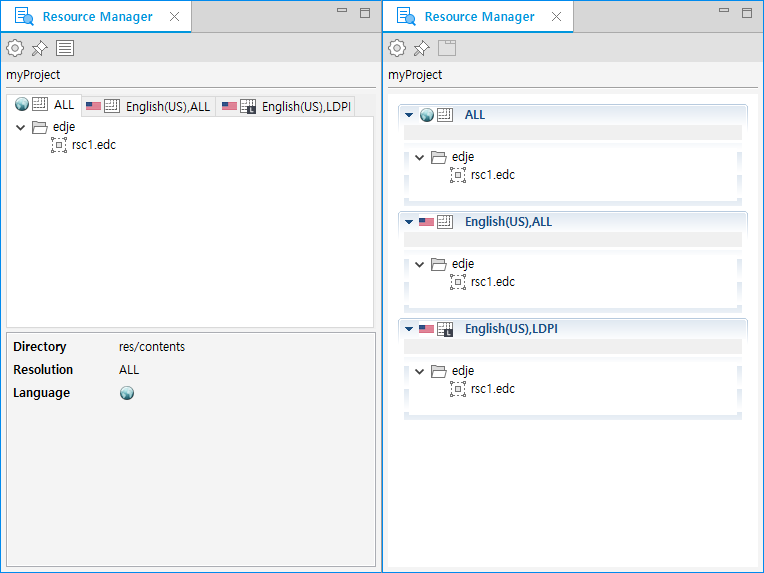
edjefolder and drop it into the proper tab list view area in the Resource Manager view. The following figure shows the Tab list view (on the left) and the Folding list view (on the right) of the Resource Manager view. You can switch between the views using the buttons in the Resource Manager view toolbar ( to switch to folding lists and
  to switch to tab lists).
Figure: Tab view and Folding list view
Note
All images used by the EDC file must be placed in theedje_resfolder created by Tizen Studio. Theedje_resfolder is excluded from the.tpkpackage file.
Managing Resources
To quickly manage resources in Tizen Studio:
-
Create a project with the Basic UI template.
-
Create a resource directory hierarchy and copy images into it.
-
Create a
res.xmlfile by building the project package. -
Check the
res.xmlfile content.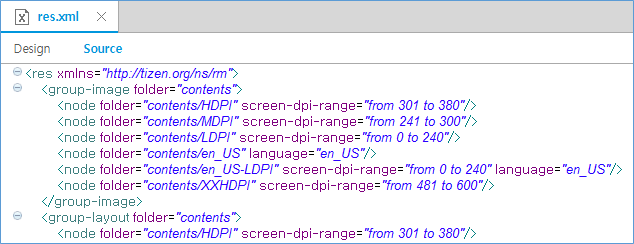
-
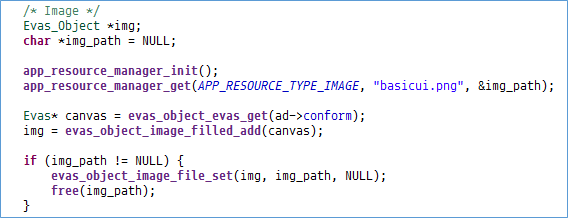
Add code for loading alternative resources by using the Resource Manager API (in mobile applications).
-
Build and run the project.
Related Information
- Dependencies
- Tizen Studio 1.0 and Higher