File
You can access a local storage to read file information. In specific applications, you can also manipulate files by accessing sandboxed file systems.
This feature is optional.
The main features of the File API include the following:
-
Local file management
-
Reading local file information
You can select a local file to upload using the
FileListinterface (in TV applications), which creates and returns aFileobject (in TV applications).The
Fileobject is used to read basic file information. -
Reading local file content
You can use the reading methods of the
FileReaderinterface (in TV applications) to read file content in text, binary, ordataURLformat. If the data is loaded, theonloadevent occurs. This event uses the data reading methods according to file format. -
Slicing local files
You can use the
slice()method with a local file or theBlobinterface (in TV applications) to slice data objects. You can use the created blob to read data as a binary string using theFileReaderinterface.
-
-
Sandboxed file system management (Optional feature)
-
Accessing sandboxed file systems
You can request access to a sandboxed file system using the LocalFileSystem interface.
-
Displaying files in a sandboxed file system
You can use
readEntries()method of the DirectoryReader interface to display directories or files. -
Creating a directory or file within a sandboxed file system
You can use the
getDirectory()andgetFile()methods of the DirectoryEntry interface to create a directory or file. -
Deleting a directory or file within a sandboxed file system
You can use the
removeRecursively()method of theDirectoryEntryinterface and theremove()method of the Entry interface to delete a directory or file.
-
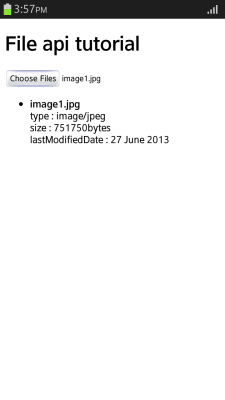
Read local file information
Reading basic information, such as file name, size, MIME type, modification date, and path, of a local file is a useful file management skill:
-
To display file information, create the
<input type="file">element and other needed elements:<input type="file" id="tizenFiles" onchange="readSelectedFiles();" multiple /> <div id="selectedFileInfoList"></div>Note
To enable multiple upload, use the
multipleattribute. -
Create a
FileListinstance (in TV applications):<script> var files = document.getElementById('tizenFiles').files; if (files.length === 0) return; </script> -
Use the
readSelectedFiles()method of theFileListinterface to retrieve and display file information, such as file name, size, MIME type, and modification date:<script> function readSelectedFiles() { var displaySection = document.getElementById('selectedFileInfoList'); var html = []; for (var i = 0; i < files.length; i++) { var file = files[i]; html.push('<li>', '<strong>', escape(file.name), '</strong><br/>', ' type: ', file.type, '<br/>', /* MIME type */ ' size: ', file.size, 'bytes<br/>', /* Size */ ' lastModifiedDate: ', /* Last modification date */ (file.lastModifiedDate ? file.lastModifiedDate.toLocaleDateString() : ''), ' <br/>', '</li>'); } displaySection.innerHTML = '<ul>' + html.join('') + '</ul>'; } </script>Figure: Displaying file information (Optional feature)
Source code
For the complete source code related to this use case, see the following file:
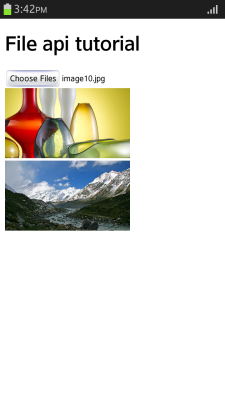
Read local file content
Reading a local image file in a Web application is a useful file management skill:
-
To read a local image file and display its information, create the
<input type="file">element and other needed elements:<input type="file" id="tizenFiles" onchange="readSelectedFiles();" multiple/> <div id="selectedFileInfoList"></div> -
Create a
FileReaderinstance (in TV applications) to read the content of the local image file. Use thereadAsDataURL()method to read data in thedataURLformat.If the data is loaded, an
onloadevent is fired. Create animgelement to allocate the event result property value for rendering:<script> function readSelectedFiles() { var files = document.getElementById('tizenFiles').files; if (files.length === 0) { return; } var html = []; for (var i = 0; i < files.length; i++) { var file = files[i]; var reader = new FileReader(); /* Check whether the file is an image */ if (!file.type.match('image.*')) { continue; } reader.onload = (function(e) { var img = document.createElement('img'); img.src = e.target.result; /* Set the selected image's dataURL */ img.title = escape(file.name); img.className = 'img'; document.getElementById('selectedFileInfoList').appendChild(img); }; reader.readAsDataURL(file); } } </script>Figure: Displaying an image file (Optional feature)
Source code
For the complete source code related to this use case, see the following file:
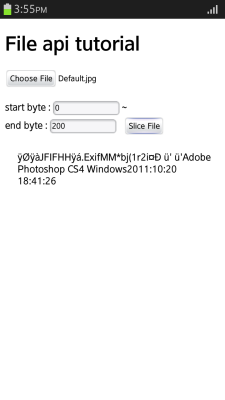
Slice blob
Slicing a local file using the Blob interface (in TV applications) is a useful file management skill:
-
Create the
<input type="file">element, the element for inputting the start byte and the end byte for slice, and the element for displaying the slicing result:<input type="file" id="tizenFile" name="tizenFile" onchange="setFileSize();"/> <br/> start byte: <input type="text" id="startByte" name="startByte" style="width: 100px;"/>~ end byte: <input type="text" id="endByte" name="endByte" style="width: 100px;"/> <input type="button" value="Slice File" onclick="readBinaryString();"/> <div id="result" style="padding: 25px 10px 0 20px;"></div> -
To read the local file, create a
FileReaderinstance (in TV applications):<script> var reader = new FileReader(); </script> -
Slice the defined byte range (from
startBytetoendByte) using theslice()method of theFileinterface (in TV applications):<script> function readBinaryString() { if (document.getElementById('tizenFile').files.length === 0) { alert('Upload File'); return; } var file = document.getElementById('tizenFile').files[0]; var startByte = document.getElementById('startByte').value; var endByte = document.getElementById('endByte').value; var blob = file.slice(startByte, endByte);A new
Blobobject is created. -
Read the data as a binary string using the
readAsBinaryString()method:reader.readAsBinaryString(blob); } </script> -
If the data loading is complete, the read data is displayed. Check the status using the
onloadendevent:<script> reader.onloadend = function(e) { if (e.target.readyState == FileReader.DONE) /* DONE == 2 */ { document.getElementById('result').textContent = e.target.result; } }; </script>Figure: Slicing a file (Optional feature)
Source code
For the complete source code related to this use case, see the following file:
Access a sandboxed file system (Optional feature)
Requesting access to sandboxed sections of a local file system is a useful file management skill:
-
Use the
requestFileSystem()method of the LocalFileSystem interface to request access to sandboxed sections of a local file system:<script> /* Tizen uses the webkit prefix */ window.requestFileSystem = window.webkitRequestFileSystem; var fs = null; /* Initialize the file system when loading a page */ if (window.requestFileSystem) { initFS(); } function initFS() { /* Request for access to the sandboxed file system */ /* and define PERSISTENT or TEMPORARY storage */ window.requestFileSystem(window.TEMPORARY, 1024 * 1024, /* Storage space (bytes) */ function(filesystem) {fs = filesystem;}, errorHandler); } </script>Note
The
requestFileSystem()method is created in the Web application program when it is initially called.The directory file in the file system root can be searched, created and deleted by accessing local file system.
Source code
For the complete source code related to this use case, see the following file:
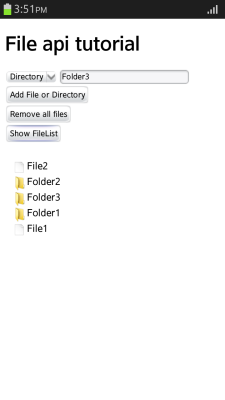
Display files in a sandboxed file system (Optional feature)
Reading a file or directory in a sandboxed section of a local file system is a useful file management skill:
-
Create the
<input type="button">element for displaying the entries (directories or files) stored in the root directory within the file system, and the list element for displaying the result:<input type="button" value="Show FileList" onclick="ShowFileList();"/> <ul id="resultSection"></ul> -
To read the entry within the file system, use the
createReader()method of the DirectoryEntry interface:<script> function ShowFileList() { if (!fs) return; var objResultSection = document.querySelector('#resultSection'); var root = fs.root; var dirReader = root.createReader(); -
Use the
readEntries()method of the DirectoryReader interface to read all entries:dirReader.readEntries(function(entries) { -
Display the list of the relevant entries using the Entry interface:
            if (!entries.length) {
                objResultSection.innerHTML = 'Filesystem is empty.';
            } else {
                var fragment = document.createDocumentFragment();
                var entry, i;

                for (i = 0; i < entries.length; i++) {
                    entry = entries[i];

                    var img = entry.isDirectory ?
                              '<img class="icon-img" src="img/icon_folder.png" alt="folder">' :
                              '<img class="icon-img" src="img/icon_file.png" alt="file">';

                    var li = document.createElement('li');
                    /* Display entry name */
                    li.innerHTML = [img, '<span>', entry.name, '</span>'].join('');
                    objResultSection.innerHTML = '';
                    fragment.appendChild(li);
                }
                objResultSection.appendChild(fragment);
            }
        }, errorHandler);
    }
</script>
NoteFor error handling, see Accessing a Sandboxed File System.
Figure: Displaying files
Source code
For the complete source code related to this use case, see the following files:
Create a directory or file (Optional feature)
Creating a directory or file in a sandboxed section of a local file system is a useful file management skill:
-
Create the
selectelement for selecting the type of entry to be added,<input type="text">element for entering the entry name, and<input type="button>"element for creating the entry:<select id="selType"> <option value="dir">Directory</option> <option value="file">File</option> </select> <input type="text" id="txtName" name="txtName" style="width: 200px;" maxlength="20"/> <input type="button" value="Add File or Directory" onclick="AddFile();"/> -
To create a directory, use the
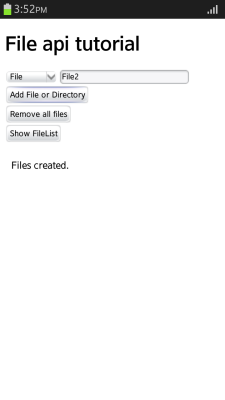
getDirectory()method. To create a file, use thegetFile()method:<script> function AddFile() { if (!fs) return; var type = document.querySelector('#selType').value; var name = document.querySelector('#txtName').value; if (name == '') { return alert('Enter File or Directory Name.'); } if (type == 'file') { /* Create file */ fs.root.getFile(name, {create: true}, null, errorHandler); } else if (type == 'dir') { /* Create directory */ fs.root.getDirectory(name, {create: true}, null, errorHandler); } document.querySelector('#resultSection').innerHTML = 'Files created.'; } </script>Note
For error handling, see Accessing a Sandboxed File System.
Figure: Adding a file
Source code
For the complete source code related to this use case, see the following file:
Remove a directory or file (Optional feature)
Deleting a directory or file in a sandboxed section of a local file system is a useful file management skill:
-
Create the
<input type="button">element for deleting the entry (directory or file):<input type="button" value="Remove all files" onclick="RemoveFile();"/> -
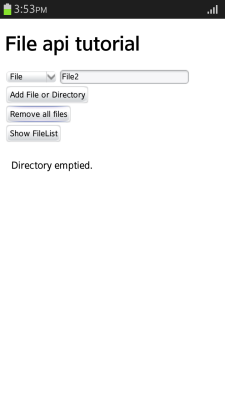
To delete a directory and all the files in it, use the
removeRecursively()method. To delete an individual file, use theremove()method:<script> function RemoveFile() { if (!fs) return; var dirReader = fs.root.createReader(); var entry, i; dirReader.readEntries(function(entries) { for (i = 0; i < entries.length; i++) { entry = entries[i]; if (entry.isDirectory) { entry.removeRecursively(function() {}, errorHandler); } else { entry.remove(function() {}, errorHandler); } } document.querySelector('#resultSection').innerHTML = 'Directory emptied.'; }, errorHandler); } </script>Note
For error handling, see Accessing a Sandboxed File System.
Figure: Deleting files
Source code
For the complete source code related to this use case, see the following file:
Related information
- Dependencies
- Tizen 2.4 and Higher
- Tizen 3.0 and Higher for TV
- API References