Building Unit Test Projects
With unit tests, you can verify that your code works well and increase its reliability. Tizen Studio provides the creating, building, and editing tools for unit tests, and a view for checking and analyzing the test results.
Tizen Studio uses the gtest framework to make and launch test cases. To manage your test cases, you can use the Test Explorer view.
Creating a Unit Test Project
You can create a test project for the Tizen Native project through the Tizen Native Unit Test Project wizard. The wizard provides the test project for each Tizen Native project type, such as UI application, service application, shared library, and static library.
To create a test project:
-
In the Tizen Studio menu, select File > New > Other > Tizen > Tizen Native Unit Test Project.
-
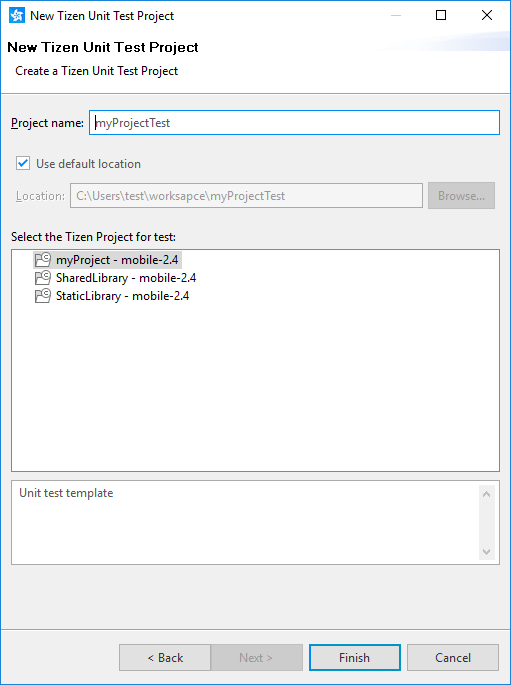
In the New Tizen Unit Test Project window:
- In the Select the Tizen Project for test panel, select the project you want to test.
- Specify a name for the test project.
- Specify a destination folder where to save the project.
- Click Finish.
To use the test project:
-
In the Project Explorer view, open the
<TEST_PROJECT_HOME>/src/<TEST_PROJECT_NAME>TestCase.cppfile. -
Add a
TEST_F()test case.Each
TEST_F()test case is independent. If theTEST_F()test case is associated with a fixture class name, the test case runs based on that fixture class. -
Add assertions.
The unit test tool supports basic assertions, binary comparison, and string comparison in the gtest. For more information, see Google Test Advanced Guide.
To test the project written in the C code, a unit test project for the C++ language is provided. In this case, the tested function must be qualified as an extern “C” to avoid the ‘undefined reference’ error as demangled symbols in the error message.
There are 2 forms of the extern “C” declaration:
-
Declare the extern “C” linkage specification in the C header file:
#ifdef __cplusplus extern "C" { #endif int foo; void bar(); #ifdef __cplusplus } #endif -
Include the C headers in the C++ code:
extern "C"
{
    #include "header.h"
}
In the following example with a calculator sample project, a test case is created for the utils_round() function declared in the utils/utils.h header file:
- Create a calculator project named myProject, and for it a unit test project named myProjectTest.
- Append the test method to the end of the
myProjectTest/src/myProjectTestTestCase.cppfile:
TEST_F(TestSuite, utils_round)
{
    double var = 3.5;
    /* long long utils_round(double value); */
    EXPECT_EQ(utils_round(var), (long long)4);
}
- Change the line that includes the
utils/utils.hfile:
#include "view/window.h"
#include "view/main-view.h"
extern "C"
{
    #include "utils/utils.h"
}
#include "utils/ui-utils.h"
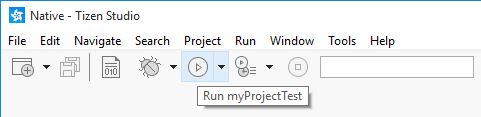
Running the Unit Test Project on Devices
To launch the unit test project, click the Run icon in the toolbar.
Figure: Launching the test project
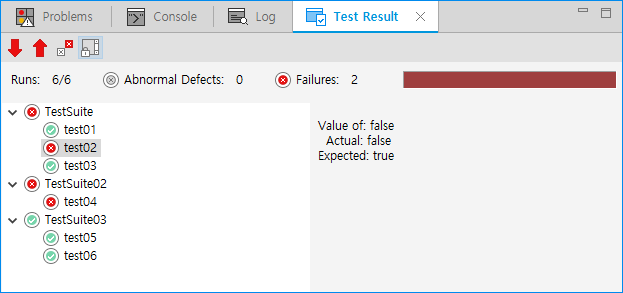
After the test cases are executed, the results are displayed on both the Test Result and Test Explorer views.
Figure: Test results
Customizing the Launch Configuration
The test case running can be customized with launch options. To set the launch options:
- In the Project Explorer view, right-click the project.
- Select Run > Run Configurations or Run > Debug Configurations.
- Select Tizen Native Unit Test, and click New.
The name of the test project is displayed in the Configurations dialog box. You can control specific launch options in the Advanced tab:
- Run Disabled Tests: If selected, the disabled test cases are also run.
- Shuffle Tests: If selected, test cases are run in a random order.
- Generate an XML Report: If selected, a test result XML file is generated.
Managing Test Cases in the Test Explorer
On the Test Explorer view, you can launch the test cases, and check the results. If you want to open the Test Explorer view or update the test cases, right-click the unit test project in the Project Explorer, and select Show in Test Explorer.
When the test cases are executed, the test case states are automatically updated.
Table: Test case states
| Icon | Description |
|---|---|
| When you open the view for the first time, all nodes have this status, except the disabled tests. | |
| Disabled nodes are not run. | |
| Test suites have this status when all their test cases have been successfully run. | |
The Test Explorer view provides the following options for testing and test cases:
- Refresh Tree: refreshes the test case tree to reflect the linked unit test project’s changes.
- Expand All and Collapse All: expands or collapses the test case tree.
- Check All and Clear All: checks or unchecks all the check boxes in the tree.
- Check Failed: checks failed test cases only.
- Run Checked: runs checked test cases.
- Run Disabled Tests: if selected, runs also the disabled test cases.
- Shuffle Tests: if selected, runs test cases in a random order.
- Generate an XML Report: if selected, generates a test result XML file.
The Run Disabled Tests, Shuffle Tests, and Generate an XML Report options can be altered in the Advanced tab of the launch configuration.
Related information
- Dependencies
- Tizen Studio 1.0 and Higher